crwdns2933423:0crwdne2933423:0

MacBook Pro 13" Retina Display Mid 2014 Display Assembly Replacement

crwdns2942213:0crwdne2942213:0

  1. MacBook Pro 13" Retina Display Mid 2014 Display Assembly Replacement, Lower Case: crwdns2935265:01crwdnd2935265:01crwdnd2935265:01crwdne2935265:0
    crwdns2935267:0crwdne2935267:0
    Magnetic Project Mat
    $19.95
    crwdns2942207:0crwdne2942207:0
    • Remove the following ten screws securing the lower case to the upper case:

    • Two 2.3 mm P5 Pentalobe screws

    • Eight 3.0 mm P5 Pentalobe screws

    • Throughout this repair, keep track of each screw and make sure it goes back exactly where it came from to avoid damaging your device.

  2. MacBook Pro 13" Retina Display Mid 2014 Display Assembly Replacement: crwdns2935265:02crwdnd2935265:01crwdnd2935265:01crwdne2935265:0
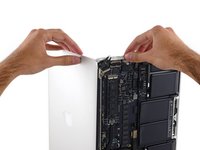
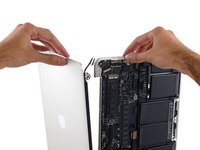
    • Wedge your fingers between the upper case and the lower case.

    • Gently pull the lower case away from the upper case to remove it.

  3. MacBook Pro 13" Retina Display Mid 2014 Display Assembly Replacement: crwdns2935265:03crwdnd2935265:01crwdnd2935265:02crwdne2935265:0 MacBook Pro 13" Retina Display Mid 2014 Display Assembly Replacement: crwdns2935265:03crwdnd2935265:02crwdnd2935265:02crwdne2935265:0
    • The lower case is connected to the upper case with two plastic clips near its center.

    • During reassembly, gently push down the center of the lower case to reattach the two plastic clips.

  4. MacBook Pro 13" Retina Display Mid 2014 Display Assembly Replacement, Battery Connector: crwdns2935265:04crwdnd2935265:01crwdnd2935265:01crwdne2935265:0
    • If necessary, remove the plastic cover adhered to the battery contact board.

  5. MacBook Pro 13" Retina Display Mid 2014 Display Assembly Replacement: crwdns2935265:05crwdnd2935265:01crwdnd2935265:02crwdne2935265:0 MacBook Pro 13" Retina Display Mid 2014 Display Assembly Replacement: crwdns2935265:05crwdnd2935265:02crwdnd2935265:02crwdne2935265:0
    • Use the flat end of a spudger to lift the battery connector straight up out of its socket on the logic board.

    • Be sure you lift up only on the connector itself, not the socket, or you risk permanent damage to the logic board.

  6. MacBook Pro 13" Retina Display Mid 2014 Display Assembly Replacement: crwdns2935265:06crwdnd2935265:01crwdnd2935265:01crwdne2935265:0
    • Bend the battery connector up out of the way to prevent accidental contact with its socket during your repair.

  7. MacBook Pro 13" Retina Display Mid 2014 Display Assembly Replacement, Display Assembly: crwdns2935265:07crwdnd2935265:01crwdnd2935265:03crwdne2935265:0 MacBook Pro 13" Retina Display Mid 2014 Display Assembly Replacement, Display Assembly: crwdns2935265:07crwdnd2935265:02crwdnd2935265:03crwdne2935265:0 MacBook Pro 13" Retina Display Mid 2014 Display Assembly Replacement, Display Assembly: crwdns2935265:07crwdnd2935265:03crwdnd2935265:03crwdne2935265:0
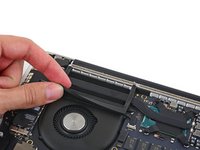
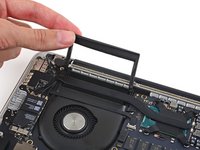
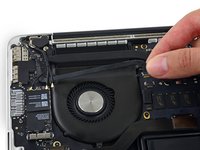
    • Carefully peel the rubber fan bumper from the edge of the heat sink to expose the iSight camera cable adhered to the fan.

    • The fan bumper wraps around the heat sink and fits into the fan duct slots. During reassembly, be sure to fit the tabs into the notches in the fan duct.

  8. MacBook Pro 13" Retina Display Mid 2014 Display Assembly Replacement: crwdns2935265:08crwdnd2935265:01crwdnd2935265:03crwdne2935265:0 MacBook Pro 13" Retina Display Mid 2014 Display Assembly Replacement: crwdns2935265:08crwdnd2935265:02crwdnd2935265:03crwdne2935265:0 MacBook Pro 13" Retina Display Mid 2014 Display Assembly Replacement: crwdns2935265:08crwdnd2935265:03crwdnd2935265:03crwdne2935265:0
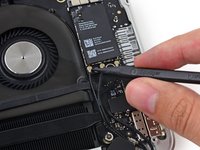
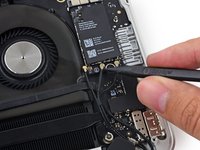
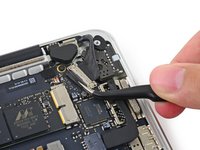
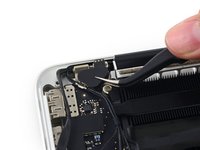
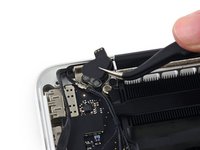
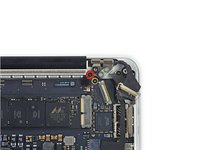
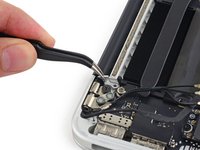
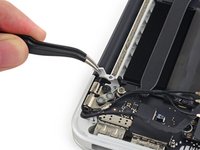
    • Insert the tip of a spudger under each of the antenna cables near their connectors and pry up to disconnect them from the AirPort board.

    • The three cables are coded with black sleeves of different lengths. During reassembly:

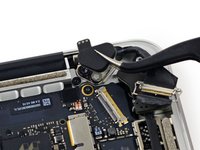
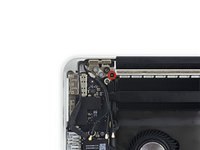
    • Connect the long-sleeved cable to the center socket.

    • The short-sleeved cable connects next to the screw.

    • The remaining cable has no sleeve, and connects in the last empty socket, next to the fan.

  9. MacBook Pro 13" Retina Display Mid 2014 Display Assembly Replacement: crwdns2935265:09crwdnd2935265:01crwdnd2935265:02crwdne2935265:0 MacBook Pro 13" Retina Display Mid 2014 Display Assembly Replacement: crwdns2935265:09crwdnd2935265:02crwdnd2935265:02crwdne2935265:0
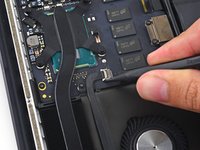
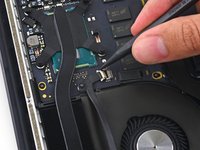
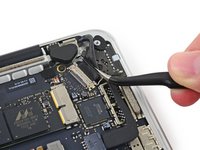
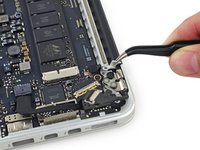
    • Use the tip of a spudger to push on either side of the the iSight camera cable connector to walk it out of its socket on the logic board.

  10. MacBook Pro 13" Retina Display Mid 2014 Display Assembly Replacement: crwdns2935265:010crwdnd2935265:01crwdnd2935265:02crwdne2935265:0 MacBook Pro 13" Retina Display Mid 2014 Display Assembly Replacement: crwdns2935265:010crwdnd2935265:02crwdnd2935265:02crwdne2935265:0
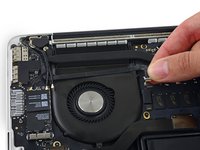
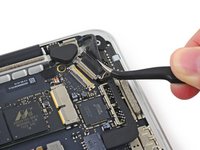
    • Peel the iSight camera cable up off the fan housing.

  11. MacBook Pro 13" Retina Display Mid 2014 Display Assembly Replacement: crwdns2935265:011crwdnd2935265:01crwdnd2935265:03crwdne2935265:0 MacBook Pro 13" Retina Display Mid 2014 Display Assembly Replacement: crwdns2935265:011crwdnd2935265:02crwdnd2935265:03crwdne2935265:0 MacBook Pro 13" Retina Display Mid 2014 Display Assembly Replacement: crwdns2935265:011crwdnd2935265:03crwdnd2935265:03crwdne2935265:0
    • Grab the black plastic tab to flip the display cable connector open and pull it straight out of its socket on the logic board.

    • During reinstallation, be sure to fully reseat the display connector tab.

  12. MacBook Pro 13" Retina Display Mid 2014 Display Assembly Replacement: crwdns2935265:012crwdnd2935265:01crwdnd2935265:03crwdne2935265:0 MacBook Pro 13" Retina Display Mid 2014 Display Assembly Replacement: crwdns2935265:012crwdnd2935265:02crwdnd2935265:03crwdne2935265:0 MacBook Pro 13" Retina Display Mid 2014 Display Assembly Replacement: crwdns2935265:012crwdnd2935265:03crwdnd2935265:03crwdne2935265:0
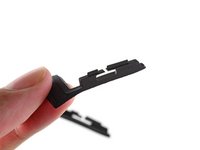
    • Remove the rubber hinge covers from the right and left display hinges.

  13. MacBook Pro 13" Retina Display Mid 2014 Display Assembly Replacement: crwdns2935265:013crwdnd2935265:01crwdnd2935265:02crwdne2935265:0 MacBook Pro 13" Retina Display Mid 2014 Display Assembly Replacement: crwdns2935265:013crwdnd2935265:02crwdnd2935265:02crwdne2935265:0
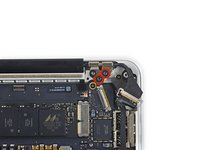
    • Remove the two 4.2 mm T5 Torx screws securing the aluminum hinge brackets (one on each side of the Macbook).

  14. MacBook Pro 13" Retina Display Mid 2014 Display Assembly Replacement: crwdns2935265:014crwdnd2935265:01crwdnd2935265:03crwdne2935265:0 MacBook Pro 13" Retina Display Mid 2014 Display Assembly Replacement: crwdns2935265:014crwdnd2935265:02crwdnd2935265:03crwdne2935265:0 MacBook Pro 13" Retina Display Mid 2014 Display Assembly Replacement: crwdns2935265:014crwdnd2935265:03crwdnd2935265:03crwdne2935265:0
    • Use a pair of tweezers to lift aluminum hinge brackets off the right and left display hinges.

    • During reassembly, the vertical portion of the bracket should be in line with the aluminum rail in the center of the Macbook.

  15. MacBook Pro 13" Retina Display Mid 2014 Display Assembly Replacement: crwdns2935265:015crwdnd2935265:01crwdnd2935265:02crwdne2935265:0 MacBook Pro 13" Retina Display Mid 2014 Display Assembly Replacement: crwdns2935265:015crwdnd2935265:02crwdnd2935265:02crwdne2935265:0
    • Remove the four outer 5.3 mm T8 Torx screws (two on each side) securing the display to the upper case.

    • Some models may use T9 Torx screws rather than T8.

    • If the rubber hinge cover adhesive is still on the screw heads, use tweezers to peel and remove it.

  16. MacBook Pro 13" Retina Display Mid 2014 Display Assembly Replacement: crwdns2935265:016crwdnd2935265:01crwdnd2935265:02crwdne2935265:0 MacBook Pro 13" Retina Display Mid 2014 Display Assembly Replacement: crwdns2935265:016crwdnd2935265:02crwdnd2935265:02crwdne2935265:0
    • Open the MacBook Pro a little wider than 90 degrees, and place it on end on the table, as shown.

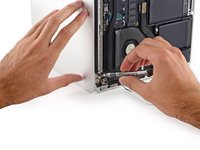
    • While holding the display with your left hand, remove the remaining T8 Torx screw from the upper display bracket.

    • Be sure the display and upper case are balanced and will not fall, potentially damaging each component.

    • Remove the last remaining T8 Torx screw securing the display to the upper case.

  17. MacBook Pro 13" Retina Display Mid 2014 Display Assembly Replacement: crwdns2935265:017crwdnd2935265:01crwdnd2935265:03crwdne2935265:0 MacBook Pro 13" Retina Display Mid 2014 Display Assembly Replacement: crwdns2935265:017crwdnd2935265:02crwdnd2935265:03crwdne2935265:0 MacBook Pro 13" Retina Display Mid 2014 Display Assembly Replacement: crwdns2935265:017crwdnd2935265:03crwdnd2935265:03crwdne2935265:0
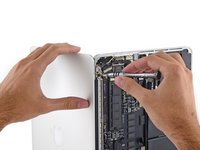
    • Grab the upper case with your right hand and rotate it slightly clockwise, toward the top of the display, so the display brackets clear the edge of the upper case.

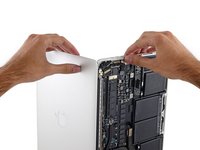
    • Rotate the display slightly away from the upper case.

    • Pull the display away from the upper case, minding any brackets or cables that may get caught.

crwdns2915888:0crwdne2915888:0

To reassemble your device, follow these instructions in reverse order.

crwdns2935229:0141crwdne2935229:0

Sam Goldheart

crwdns2935283:010/18/12crwdne2935283:0

465.252 crwdns2915208:0crwdne2915208:0

crwdns2935297:0538crwdne2935297:0

crwdns2915084:0crwdne2915084:0

iFixit crwdns2935289:0iFixitcrwdne2935289:0

Staff

crwdns2931471:0136crwdne2931471:0

crwdns2935297:016.573crwdne2935297:0

crwdns2944067:036crwdne2944067:0

Dear Ifixit. I just order a display from a mid2014 macbook 13 inch retina, for a friend of mine. Guys congrats. nice support and custumer services. hassle free. Thanks. These is why companies grow huge. Keep it up. I will try to put another other during the week. Thank for everything. I will post my experience with the product as soon is here.!!!!!! Go Ifixit!!!!

Carlos De Bernard - crwdns2934203:0crwdne2934203:0

Shipping to Sweden was super fast. The display assembly was in perfect condition and I am typing this on my repaired MacBook Pro! Whoohoo, thanks ifixit!

conradchristensen - crwdns2934203:0crwdne2934203:0

Thanks for the easy to follow guide! Worked perfectly on my Early 2015 MacBook Pro! Saved me so much money.

strauchler - crwdns2934203:0crwdne2934203:0

sorry your macbook pro is ealy 2015? I run the screen of 2014?

teofilodavid -

Great service, great list of tools required, great advice.

I completed this repair in an hour with the step by step guide. I'm a fairly mechanical guy who usually fixes his own appliances and automobiles, so this seemed simple enough up front. The guide made the entire repair straightforward and without any gaps or questions along the way.

Carlbri720 - crwdns2934203:0crwdne2934203:0

crwdns2917038:0crwdne2917038:0

crwdns2936625:0crwdne2936625:0:

crwdns2936751:024crwdne2936751:0 9

crwdns2936753:07crwdne2936753:0 51

crwdns2936753:030crwdne2936753:0 348

crwdns2942667:0crwdne2942667:0 143,905