crwdns2915892:0crwdne2915892:0
Use this guide to replace the left speaker.
When operating normally, during most of the guide it will be on the right, as your laptop will be upside down.
crwdns2942213:0crwdne2942213:0
-
crwdns2935267:0crwdne2935267:0Magnetic Project Mat$19.95
-
Remove the following ten screws securing the lower case to the upper case:
-
Two 2.3 mm P5 Pentalobe screws
-
Eight 3.0 mm P5 Pentalobe screws
-
-
-
Wedge your fingers between the upper case and the lower case.
-
Gently pull the lower case away from the upper case to remove it.
-
-
-
-
Use the flat end of a spudger to lift the battery connector straight up out of its socket on the logic board.
-
-
-
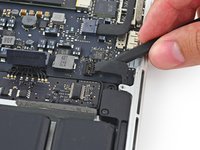
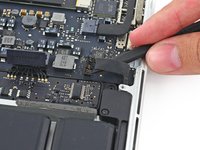
Insert the tip of a spudger under the left speaker cable near the connector and lift it up out of its socket on the logic board.
-
-
-
Remove the following screws securing the left speaker to the upper case:
-
One 5.7 mm T5 Torx screw
-
One 6.5 mm T5 Torx screw
-
One 3.8 mm T5 Torx screw
-
-
-
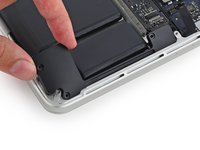
Lift the corner of the left speaker up and slide it out around the battery to remove it from the upper case.
-


To reassemble your device, follow these instructions in reverse order.
crwdns2935221:0crwdne2935221:0
crwdns2935229:066crwdne2935229:0

crwdns2947412:04crwdne2947412:0
Does anyone know the RMS/wattage of the speaker?
Excellent clear instructions. On my MacBook the cover screws were marked on the threads with white for the long ones and blue for the short. Since I couldn’t source a replacement speaker I repaired the existing one using contact glue as described by Earl Maliki on YouTube…it works; no more rattles. The sound is now lo-fi for the left speaker but good enough for speech and I never listen to music without a Bluetooth speaker. Total cost: 24 Swiss francs for a screwdriver set with a P5 pentalobe head. Much better than the 167 fr and 2 weeks in the shop I was quoted locally for repair.
Hi there,
thank you for the detailed instruction. Used it to replace rattling speakers in a “customer” laptop (I work in the Repaircafé in Bern, so not a commercial operation).
Cheers, J.
Very easy to follow instructions, the screw ID's were the biggest help, since Apple loves to rummage in their toolbox for a different one for each hole. Had a bit of trouble re-installing the speaker due to speaker cable being 'new', but with a bit of patience I got it to lie flat.