crwdns2933423:0crwdne2933423:0

MacBook Pro 13" Retina Display Early 2015 I/O Board Replacement

crwdns2942213:0crwdne2942213:0

  1. MacBook Pro 13" Retina Display Early 2015 I/O Board Replacement, Lower Case: crwdns2935265:01crwdnd2935265:01crwdnd2935265:01crwdne2935265:0
    crwdns2935267:0crwdne2935267:0
    Magnetic Project Mat
    $19.95
    crwdns2942207:0crwdne2942207:0
    • Remove the following ten screws securing the lower case to the upper case:

    • Two 2.3 mm P5 Pentalobe screws

    • Eight 3.0 mm P5 Pentalobe screws

    • Throughout this repair, keep track of each screw and make sure it goes back exactly where it came from to avoid damaging your device.

  2. MacBook Pro 13" Retina Display Early 2015 I/O Board Replacement: crwdns2935265:02crwdnd2935265:01crwdnd2935265:01crwdne2935265:0
    • Wedge your fingers between the upper case and the lower case.

    • Gently pull the lower case away from the upper case to remove it.

  3. MacBook Pro 13" Retina Display Early 2015 I/O Board Replacement: crwdns2935265:03crwdnd2935265:01crwdnd2935265:02crwdne2935265:0 MacBook Pro 13" Retina Display Early 2015 I/O Board Replacement: crwdns2935265:03crwdnd2935265:02crwdnd2935265:02crwdne2935265:0
    • The lower case is connected to the upper case with two plastic clips near its center.

    • During reassembly, gently push down the center of the lower case to reattach the two plastic clips.

  4. MacBook Pro 13" Retina Display Early 2015 I/O Board Replacement, Battery Connector: crwdns2935265:04crwdnd2935265:01crwdnd2935265:01crwdne2935265:0
    • If necessary, remove the plastic cover adhered to the battery contact board.

  5. MacBook Pro 13" Retina Display Early 2015 I/O Board Replacement: crwdns2935265:05crwdnd2935265:01crwdnd2935265:02crwdne2935265:0 MacBook Pro 13" Retina Display Early 2015 I/O Board Replacement: crwdns2935265:05crwdnd2935265:02crwdnd2935265:02crwdne2935265:0
    • Use the flat end of a spudger to lift the battery connector straight up out of its socket on the logic board.

    • Be sure you lift up only on the connector itself, not the socket, or you risk permanent damage to the logic board.

  6. MacBook Pro 13" Retina Display Early 2015 I/O Board Replacement: crwdns2935265:06crwdnd2935265:01crwdnd2935265:01crwdne2935265:0
    • Bend the battery connector up out of the way to prevent accidental contact with its socket during your repair.

  7. MacBook Pro 13" Retina Display Early 2015 I/O Board Replacement, Heat Sink: crwdns2935265:07crwdnd2935265:01crwdnd2935265:03crwdne2935265:0 MacBook Pro 13" Retina Display Early 2015 I/O Board Replacement, Heat Sink: crwdns2935265:07crwdnd2935265:02crwdnd2935265:03crwdne2935265:0 MacBook Pro 13" Retina Display Early 2015 I/O Board Replacement, Heat Sink: crwdns2935265:07crwdnd2935265:03crwdnd2935265:03crwdne2935265:0
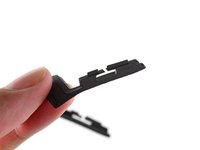
    • Carefully remove the rubber fan bumper from the edge of the heat sink.

    • The fan bumper wraps around the heat sink and fits into slots in the fan duct. During reassembly, be sure to fit the tabs into the notches in the fan duct.

  8. MacBook Pro 13" Retina Display Early 2015 I/O Board Replacement: crwdns2935265:08crwdnd2935265:01crwdnd2935265:02crwdne2935265:0 MacBook Pro 13" Retina Display Early 2015 I/O Board Replacement: crwdns2935265:08crwdnd2935265:02crwdnd2935265:02crwdne2935265:0
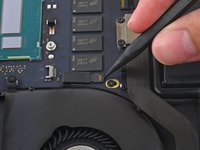
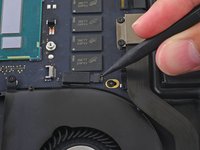
    • Use the flat end of a spudger to peel the four foam stickers off of the heat sink screws.

  9. MacBook Pro 13" Retina Display Early 2015 I/O Board Replacement: crwdns2935265:09crwdnd2935265:01crwdnd2935265:01crwdne2935265:0
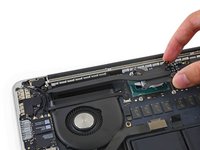
    • Remove the following screws securing the heat sink to the logic board:

    • One 2.7 mm T5 screw (silver)

    • Four T5 screws (black)
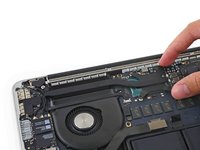
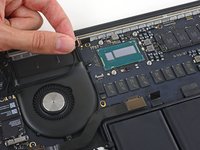
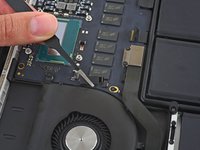
  10. MacBook Pro 13" Retina Display Early 2015 I/O Board Replacement: crwdns2935265:010crwdnd2935265:01crwdnd2935265:02crwdne2935265:0 MacBook Pro 13" Retina Display Early 2015 I/O Board Replacement: crwdns2935265:010crwdnd2935265:02crwdnd2935265:02crwdne2935265:0
  11. MacBook Pro 13" Retina Display Early 2015 I/O Board Replacement, Fan: crwdns2935265:011crwdnd2935265:01crwdnd2935265:02crwdne2935265:0 MacBook Pro 13" Retina Display Early 2015 I/O Board Replacement, Fan: crwdns2935265:011crwdnd2935265:02crwdnd2935265:02crwdne2935265:0
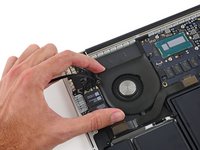
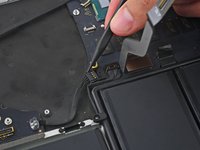
    • Use the tip of a spudger to push on either side of the the iSight camera cable connector to walk it out of its socket on the logic board.

  12. MacBook Pro 13" Retina Display Early 2015 I/O Board Replacement: crwdns2935265:012crwdnd2935265:01crwdnd2935265:02crwdne2935265:0 MacBook Pro 13" Retina Display Early 2015 I/O Board Replacement: crwdns2935265:012crwdnd2935265:02crwdnd2935265:02crwdne2935265:0
    • Peel the iSight camera cable off the fan housing to fold it out of the way.

  13. MacBook Pro 13" Retina Display Early 2015 I/O Board Replacement: crwdns2935265:013crwdnd2935265:01crwdnd2935265:03crwdne2935265:0 MacBook Pro 13" Retina Display Early 2015 I/O Board Replacement: crwdns2935265:013crwdnd2935265:02crwdnd2935265:03crwdne2935265:0 MacBook Pro 13" Retina Display Early 2015 I/O Board Replacement: crwdns2935265:013crwdnd2935265:03crwdnd2935265:03crwdne2935265:0
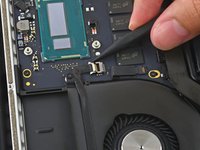
    • Use the tip of a spudger to flip the tab on the fan's ZIF connector.

    • Carefully pull the fan cable straight out of its socket.

  14. MacBook Pro 13" Retina Display Early 2015 I/O Board Replacement: crwdns2935265:014crwdnd2935265:01crwdnd2935265:01crwdne2935265:0
    • Remove the following screws securing the fan to the upper case:

    • One 5.0 mm T5 Torx screw

    • Two 3.6 mm T5 Torx screws

  15. MacBook Pro 13" Retina Display Early 2015 I/O Board Replacement: crwdns2935265:015crwdnd2935265:01crwdnd2935265:03crwdne2935265:0 MacBook Pro 13" Retina Display Early 2015 I/O Board Replacement: crwdns2935265:015crwdnd2935265:02crwdnd2935265:03crwdne2935265:0 MacBook Pro 13" Retina Display Early 2015 I/O Board Replacement: crwdns2935265:015crwdnd2935265:03crwdnd2935265:03crwdne2935265:0
    • Lift the end of the fan closest to the display hinge and remove the fan from the upper case.

  16. MacBook Pro 13" Retina Display Early 2015 I/O Board Replacement, I/O Board: crwdns2935265:016crwdnd2935265:01crwdnd2935265:03crwdne2935265:0 MacBook Pro 13" Retina Display Early 2015 I/O Board Replacement, I/O Board: crwdns2935265:016crwdnd2935265:02crwdnd2935265:03crwdne2935265:0 MacBook Pro 13" Retina Display Early 2015 I/O Board Replacement, I/O Board: crwdns2935265:016crwdnd2935265:03crwdnd2935265:03crwdne2935265:0
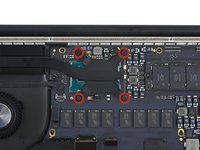
    • Insert the tip of a spudger under each of the antenna cables near their connectors and pry up to disconnect them from the AirPort board.

    • The three cables are coded with black sleeves of different lengths. During reassembly:

    • Connect the long-sleeved cable to the center socket.

    • The short-sleeved cable connects next to the screw.

    • The remaining cable has no sleeve, and connects in the last empty socket, next to the fan.

  17. MacBook Pro 13" Retina Display Early 2015 I/O Board Replacement: crwdns2935265:017crwdnd2935265:01crwdnd2935265:02crwdne2935265:0 MacBook Pro 13" Retina Display Early 2015 I/O Board Replacement: crwdns2935265:017crwdnd2935265:02crwdnd2935265:02crwdne2935265:0
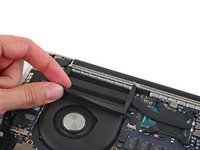
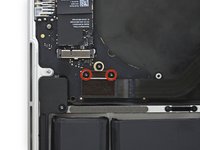
    • Remove the two 2.1 mm T5 Torx screws securing the I/O board cable bracket.

    • Remove the I/O board cable bracket.

  18. MacBook Pro 13" Retina Display Early 2015 I/O Board Replacement: crwdns2935265:018crwdnd2935265:01crwdnd2935265:03crwdne2935265:0 MacBook Pro 13" Retina Display Early 2015 I/O Board Replacement: crwdns2935265:018crwdnd2935265:02crwdnd2935265:03crwdne2935265:0 MacBook Pro 13" Retina Display Early 2015 I/O Board Replacement: crwdns2935265:018crwdnd2935265:03crwdnd2935265:03crwdne2935265:0
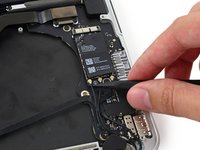
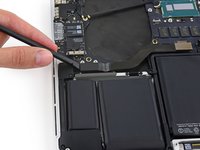
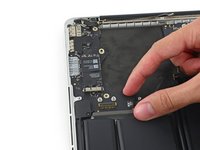
    • Use the flat end of a spudger to pop the I/O board connector straight up off its socket on the I/O board.

    • Be careful to only pry up on the cable connector, not on the socket itself or you risk damaging your I/O board.

    • Push the I/O board cable up to bend it out of the way.

  19. MacBook Pro 13" Retina Display Early 2015 I/O Board Replacement: crwdns2935265:019crwdnd2935265:01crwdnd2935265:02crwdne2935265:0 MacBook Pro 13" Retina Display Early 2015 I/O Board Replacement: crwdns2935265:019crwdnd2935265:02crwdnd2935265:02crwdne2935265:0
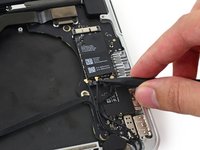
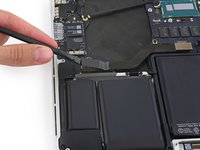
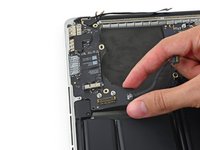
    • Use the tip of a spudger to push on either side of the I/O board connector to walk it out of its socket on the logic board.

  20. MacBook Pro 13" Retina Display Early 2015 I/O Board Replacement: crwdns2935265:020crwdnd2935265:01crwdnd2935265:01crwdne2935265:0
    • Remove the following screws securing the I/O board to the upper case:

    • One 3.5 mm T8 Torx standoff screw

    • One 3.5 mm T5 Torx screw

  21. MacBook Pro 13" Retina Display Early 2015 I/O Board Replacement: crwdns2935265:021crwdnd2935265:01crwdnd2935265:03crwdne2935265:0 MacBook Pro 13" Retina Display Early 2015 I/O Board Replacement: crwdns2935265:021crwdnd2935265:02crwdnd2935265:03crwdne2935265:0 MacBook Pro 13" Retina Display Early 2015 I/O Board Replacement: crwdns2935265:021crwdnd2935265:03crwdnd2935265:03crwdne2935265:0
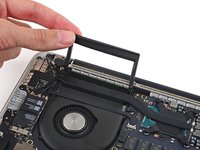
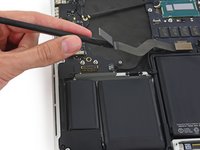
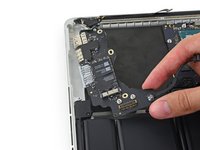
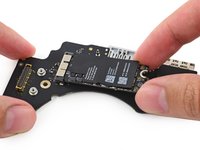
    • Lift the I/O board cable end of the I/O board and pull toward the logic board to free the ports from the upper case.

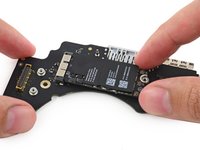
    • Remove the I/O board.

  22. MacBook Pro 13" Retina Display Early 2015 I/O Board Replacement: crwdns2935265:022crwdnd2935265:01crwdnd2935265:01crwdne2935265:0
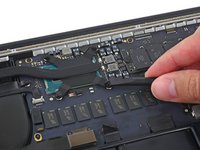
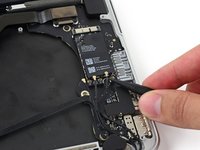
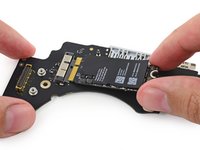
    • Remove the single 2.7 mm T5 Torx screw securing the AirPort board to the I/O board.

  23. MacBook Pro 13" Retina Display Early 2015 I/O Board Replacement: crwdns2935265:023crwdnd2935265:01crwdnd2935265:03crwdne2935265:0 MacBook Pro 13" Retina Display Early 2015 I/O Board Replacement: crwdns2935265:023crwdnd2935265:02crwdnd2935265:03crwdne2935265:0 MacBook Pro 13" Retina Display Early 2015 I/O Board Replacement: crwdns2935265:023crwdnd2935265:03crwdnd2935265:03crwdne2935265:0
    • Lift the free end of the AirPort board up slightly and pull it straight out of its socket on the I/O board.

crwdns2915888:0crwdne2915888:0

To reassemble your device, follow these instructions in reverse order.

crwdns2935229:030crwdne2935229:0

Andrew Optimus Goldheart

crwdns2935283:010/17/09crwdne2935283:0

502.332 crwdns2915208:0crwdne2915208:0

crwdns2935297:0407crwdne2935297:0

crwdns2915084:0crwdne2915084:0

iFixit crwdns2935289:0iFixitcrwdne2935289:0

Staff

crwdns2931471:0136crwdne2931471:0

crwdns2935297:016.573crwdne2935297:0

crwdns2917034:0crwdne2917034:0

What do the Pins on the IO board do? the ones that can be pressed down?

Faisal Abdullah - crwdns2934203:0crwdne2934203:0

crwdns2917038:0crwdne2917038:0

crwdns2936625:0crwdne2936625:0:

crwdns2936751:024crwdne2936751:0 2

crwdns2936753:07crwdne2936753:0 36

crwdns2936753:030crwdne2936753:0 179

crwdns2942667:0crwdne2942667:0 28,063