crwdns2915892:0crwdne2915892:0
Like brain surgery? Use this guide to replace the mind of your computer.
crwdns2942213:0crwdne2942213:0
-
-
Remove ten Phillips screws securing the lower case to the MacBook Air:
-
Six 2.8 mm screws
-
Two 3.8 mm screws
-
Two 5.4 mm screws
-
-
-
Slightly lift the lower case near the vents and push it toward the rear of the computer to free the mounting tabs.
-
-
-
Disconnect the battery connector by pulling it straight out of its socket.
-
-
-
Remove the following nine screws securing the battery to the Air:
-
Four 2.9 mm Phillips.
-
Four 3.8 mm Phillips.
-
One 7.2 mm Phillips.
-
-
-
Lift the battery out of the Air.
-
Charge it to 100%, and then keep charging it for at least 2 more hours. Then, unplug and use it normally to drain the battery. When you see the low battery warning, save your work, and keep your laptop on until it goes to sleep due to low battery. Wait at least 5 hours, then charge your laptop uninterrupted to 100%.
-
If you notice any unusual behavior or problems after installing your new battery, you may need to reset your MacBook's SMC.
-
-
-
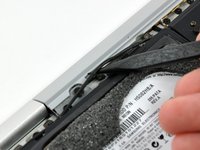
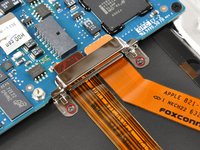
Disconnect the port hatch ribbon cable from the logic board by pulling it straight up by its black pull tab.
-
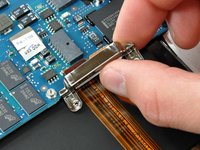
Pull the audio out ribbon cable off the adhesive securing it to the upper case.
-
Use a spudger to pry the audio out ribbon cable connector board off the hard drive bracket.
-
-
-
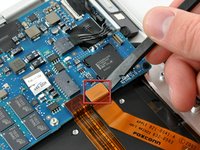
Disconnect the audio out cable from its socket on the port hatch ribbon cable.
-
-
-
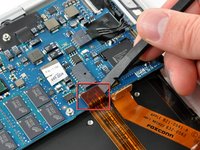
Use a spudger to pry the hard drive cable connector up off the logic board.
-
-
-
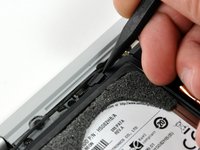
Use the sharp end of a spudger to de-route the microphone cable from the hard drive bracket.
-
Remove the cosmetic screw cover from the adhesive securing it to the hard drive bracket.
-
-
-
-
Remove the four Phillips screws securing the hard drive assembly to the upper case:
-
Two 4.7 mm screws.
-
Two 3.9 mm screws.
-
-
-
Lift the hard drive assembly out of the upper case.
-
-
-
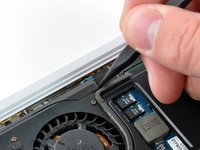
Use the tip of a spudger to pull the fan cable connector straight away from its connector on the logic board.
-
-
-
Use the tip of a spudger to move the cosmetic fan cover aside.
-
-
-
One 5.9 mm Phillips screw.
-
Two 1.9 mm Phillips screws.
-
One 1.9 mm Phillips screw.
-
One 5.0 mm Phillips screw
-
Five 1.9 mm Philips screws.
-
One 2.5 mm Phillips screw.
-
-
-
Lift the processor clamp off the heat sink.
-
-
-
Deroute the microphone cable away from the channel in the fan.
-
-
-
Lift the heat sink up off the logic board.
-
-
-
Use a spudger to pry the audio cable connector up off the logic board.
-
-
-
Disconnect the microphone cable by pulling its connector straight away from the socket on the logic board.
-
-
-
Remove the two small Phillips screws securing the logic board bracket to the upper case.
-
Lift the logic board bracket out of the upper case.
-
-
-
Use a spudger to pry the AirPort/Bluetooth and trackpad control cable connectors up off the logic board.
-
-
-
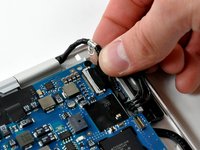
Disconnect the DC-In cable by pulling its connector straight away from the socket on the logic board.
-
-
-
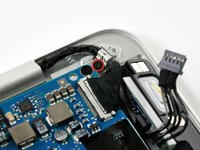
Remove the small Phillips screw securing the display data cable ground loop to the upper case.
-
Disconnect the display data cable by pulling its connector straight away from the socket on the logic board.
-
-
-
Remove the three Phillips screws securing the logic board to the upper case.
-
-
-
Lift the logic board out of the upper case.
-


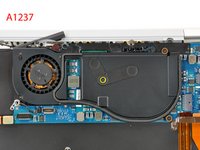


To reassemble your device, follow these instructions in reverse order.
crwdns2935221:0crwdne2935221:0
crwdns2935229:057crwdne2935229:0

crwdns2947412:05crwdne2947412:0
nice its very helpful for each other.
I currently have a 1.6ghz A1237 Original Macbook Air, and I was wondering if the logicboard is interchangeable with the late 2008 model A1304. I hope someone can answer this for me. I want to swap out the logic board for A1304.
I have the same question too. Who can help me because I want to upgrade to El Capitan instead of Lion
Tom Xu -
great work and helpful!
Can we upgrade or add, make part from new mac dumbed down? advisor meeting with your board