crwdns2933423:0crwdne2933423:0

MacBook Air 13" Retina Display 2019 Trackpad Cable Replacement

crwdns2862623:0crwdne2862623:0
crwdns2942641:0crwdne2942641:0

crwdns2942213:0crwdne2942213:0

  1. MacBook Air 13" Retina Display 2019 Trackpad Cable Replacement, Separate the trackpad cable adhesive: crwdns2935265:01crwdnd2935265:01crwdnd2935265:03crwdne2935265:0 MacBook Air 13" Retina Display 2019 Trackpad Cable Replacement, Separate the trackpad cable adhesive: crwdns2935265:01crwdnd2935265:02crwdnd2935265:03crwdne2935265:0 MacBook Air 13" Retina Display 2019 Trackpad Cable Replacement, Separate the trackpad cable adhesive: crwdns2935265:01crwdnd2935265:03crwdnd2935265:03crwdne2935265:0
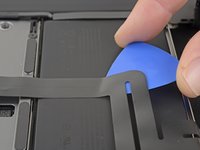
    • Carefully slide an opening pick under the trackpad cable towards the keyboard connector to separate the adhesive securing it to the upper case.

    • If you have difficulty separating the adhesive, heat it slightly with an iOpener or hair dryer to soften the adhesive.

  2. MacBook Air 13" Retina Display 2019 Trackpad Cable Replacement, Disconnect the keyboard: crwdns2935265:02crwdnd2935265:01crwdnd2935265:03crwdne2935265:0 MacBook Air 13" Retina Display 2019 Trackpad Cable Replacement, Disconnect the keyboard: crwdns2935265:02crwdnd2935265:02crwdnd2935265:03crwdne2935265:0 MacBook Air 13" Retina Display 2019 Trackpad Cable Replacement, Disconnect the keyboard: crwdns2935265:02crwdnd2935265:03crwdnd2935265:03crwdne2935265:0
    • Use the flat end of a spudger to lift the small locking flap on the keyboard ZIF connector.

    • The trackpad cable connects the logic board to both the keyboard and the trackpad.

    • Slide the keyboard cable straight out of its connector.

  3. MacBook Air 13" Retina Display 2019 Trackpad Cable Replacement, Separate the trackpad cable adhesive: crwdns2935265:03crwdnd2935265:01crwdnd2935265:02crwdne2935265:0 MacBook Air 13" Retina Display 2019 Trackpad Cable Replacement, Separate the trackpad cable adhesive: crwdns2935265:03crwdnd2935265:02crwdnd2935265:02crwdne2935265:0
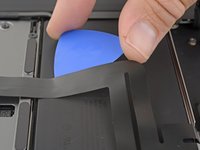
    • Carefully slide an opening pick under the trackpad cable to separate the adhesive securing it to the battery.

    • If you have difficulty separating the adhesive, heat it slightly with an iOpener or hair dryer. Be careful not to overheat the battery.

crwdns2915888:0crwdne2915888:0

To reassemble your device, follow these instructions in reverse order.

Adam O'Camb

crwdns2935283:004/11/15crwdne2935283:0

210,756 crwdns2915208:0crwdne2915208:0

crwdns2935297:0416crwdne2935297:0

crwdns2947412:00crwdne2947412:0

crwdns2917038:0crwdne2917038:0

crwdns2936625:0crwdne2936625:0:

crwdns2936751:024crwdne2936751:0 0

crwdns2936753:07crwdne2936753:0 1

crwdns2936753:030crwdne2936753:0 3

crwdns2942667:0crwdne2942667:0 106