crwdns2915892:0crwdne2915892:0
Use this guide to replace the trackpad.
crwdns2942213:0crwdne2942213:0
-
crwdns2935267:0crwdne2935267:0P5 Pentalobe Screwdriver Retina MacBook Pro and Air$5.99
-
Use a P5 Pentalobe driver to remove ten screws securing the lower case, of the following lengths:
-
Two 9 mm screws
-
Eight 2.6 mm screws
-
-
-
Wedge your fingers between the display and the lower case and pull upward to pop the lower case off the Air.
-
Remove the lower case and set it aside.
-
-
-
Grab the clear plastic pull tab attached to the battery connector and pull it toward the front edge of the Air to disconnect the battery from the logic board.
-
-
-
Remove the following five screws securing the battery to the upper case:
-
Three 6.3 mm T5 Torx screws
-
Two 2.4 mm T5 Torx screws
-
-
-
-
Lift the battery from its edge nearest the logic board and remove it from the upper case.
-
Charge it to 100%, and then keep charging it for at least 2 more hours. Then, unplug and use it normally to drain the battery. When you see the low battery warning, save your work, and keep your laptop on until it goes to sleep due to low battery. Wait at least 5 hours, then charge your laptop uninterrupted to 100%.
-
If you notice any unusual behavior or problems after installing your new battery, you may need to reset your MacBook's SMC.
-
-
-
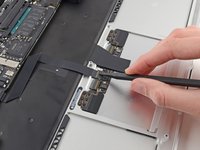
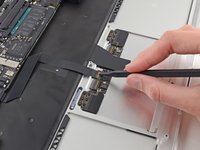
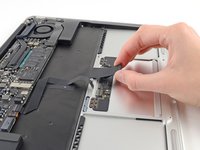
Use the tip of a spudger or your fingernail to flip up the retaining flap on the trackpad ribbon cable ZIF socket.
-
Pull the trackpad ribbon cable straight out of its socket toward the rear edge of the Air.
-
-
-
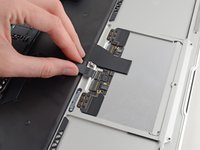
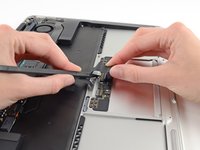
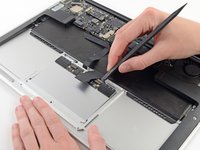
While carefully lifting the keyboard ribbon cable with one hand, use the tip of a spudger or your fingernail to flip up the retaining flap on the keyboard ribbon cable ZIF socket.
-
Pull the keyboard ribbon cable straight out of its socket toward the front edge of the Air.
-
-
-
Remove the following twelve screws:
-
Six 1.6 mm Phillips screws securing the trackpad to the upper case.
-
Six 1.6 mm Phillips screws securing the trackpad brackets to the trackpad.
-
-
-
Remove the right and left trackpad brackets from the upper case.
-
-
-
The 1.4 mm T5 Torx screw near the front edge of the case must be adjusted correctly.
-
-
-
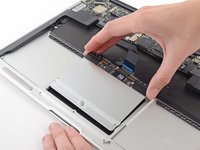
Use the flat end of a spudger to carefully lift the edge of the trackpad closest to the keyboard from its recess in the upper case by lifting it away from the brackets attached to the upper case.
-
Remove the trackpad from the upper case.
-


To reassemble your device, follow these instructions in reverse order.
To reassemble your device, follow these instructions in reverse order.
crwdns2935221:0crwdne2935221:0
crwdns2935229:031crwdne2935229:0

crwdns2947412:05crwdne2947412:0
Great write up. Where can I find the keyboard ribbon cable? (the wide one that doesn't make any 90s. I tore mine with metal tweezers. Can't find the wide cable anywhere.
shhhhh, it's called ie bAe eYe
even a 65 year old can do it! (with magnifying glasses) Thank! Fixed the dirty, sticking trackpad!
Step 10 should not be done! This is a pure adjustment screw for the clickpoint. Only readjust there, in case clicking does not feel okay after a change of the trackpad. Usually no adjusment is necessary. The trackpad comes out easily after Step 8
Schritt 10 ist falsch! Diese Schraube dient lediglich der Justage des Druckpunkts des Klicks. Sie muss nur verstellt werden, falls der Klick nach dem Wechsel des Trackpads nicht mehr ok ist. Das Trackpad lässt sich aber bereits nach Schritt 8 problemlos entnehmen.
I have replaced the trackpad but it now gives erratic behavior. Usually after booting/opening the lid it works fine for a couple of minutes. Then it stops moving or jumps around the screen after a freeze. Reset SMC does not help unfortunately. Anybody any ideas?