crwdns2915892:0crwdne2915892:0
Use this guide to replace your Air's I/O board which houses the MagSafe DC-in port, a USB socket, and the headphone jack.
crwdns2942213:0crwdne2942213:0
-
crwdns2935267:0crwdne2935267:0P5 Pentalobe Screwdriver Retina MacBook Pro and Air$5.99
-
Use a P5 Pentalobe driver to remove ten screws securing the lower case, of the following lengths:
-
Two 9 mm screws
-
Eight 2.6 mm screws
-
-
-
Wedge your fingers between the display and the lower case and pull upward to pop the lower case off the Air.
-
Remove the lower case and set it aside.
-
-
-
Grab the clear plastic pull tab attached to the battery connector and pull it toward the front edge of the Air to disconnect the battery from the logic board.
-
-
-
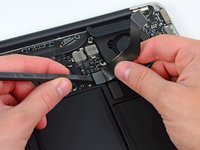
Use the flat end of a spudger to pry the I/O board cable connector upward out of its socket on the I/O board.
-
-
-
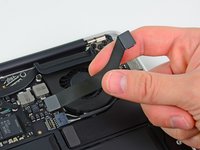
Carefully peel the I/O board cable from the top of the fan.
-
-
-
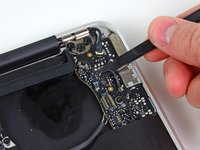
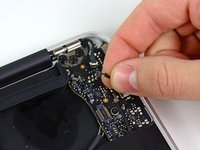
While gently pulling the I/O board cable upward near its connection to the logic board, use the tip of a spudger to pry upward on alternating sides of the connector to help "walk" it out of its socket.
-
Remove the I/O board cable.
-
-
-
-
Use the tip of a spudger to carefully flip up the retaining flap on the fan cable ZIF socket.
-
-
-
Peel the rubber gasket off the adhesive on the top of the fan.
-
-
-
Remove the following three screws securing the fan to the upper case:
-
One 3.6 mm T5 Torx screw
-
One 2.7 mm T5 Torx screw
-
One 3.6 mm T5 Torx screw with a short head
-
-
-
Lift the fan out of the upper case and carefully pull the fan ribbon cable out of its socket as you remove it from the Air.
-
-
-
Disconnect the I/O board by pulling the power cable away from its socket on the logic board.
-
-
-
Pull the camera cable parallel to the face of the I/O board toward the corner of the Air to disconnect it from its socket, using the tip of a spudger to help push the connector out of its socket.
-
-
-
Use the flat end of a spudger to pry the left speaker cable connector up and out of its socket on the I/O board.
-
De-route the left speaker cable from its retainer on the I/O board.
-
-
-
Use the flat end of a spudger to pry the microphone cable connector up and out of its socket on the I/O board.
-
-
-
Remove the single 3.6 mm T5 Torx screw securing the I/O board to the upper case.
-
-
-
Carefully lift the I/O board from its edge nearest the logic board and remove it from the upper case.
-


crwdns2935221:0crwdne2935221:0
crwdns2935229:084crwdne2935229:0

crwdns2947412:024crwdne2947412:0
just replaced i/o board,quick and easy,great guide
My I/O board USB socket was dead with a bent pin. Replaced it following this guide, everything went perfectly, and I've got working USB again.
Diagnosis procedure: shine a flashlight into your suspect USB socket. If you can see a pin against the back of the socket, there's your problem.
so easy ,tks ifixit
Step 15: had I read all the comments, I would have avoided breaking the microphone connector (thank you Lorenzo Cangiano all the same!). But the guide should have a red exclamation point warning about not prying on the front of this connector when it doesn't respond easily to prying under the cables. It is not obvious that one should not be able to pry on all sides, and the guide only has an "Information" note for this.
Just followed this guide to replace a burnt out/corroded power socket. I bought the part from this site. Now the power is fixed, but the USB socket does not seem to mount anything, as in it doesn't work. I have not tested the headphone port. An interesting observation: the first time I turned my macbook back on using battery power it said battery not available. I turned it off and on again and this resolved the issue.
Does anyone have any ideas about the USB port not working? Have I bought a faulty I/O board from IFixit?