crwdns2915892:0crwdne2915892:0
Use this guide to replace a dead or noisy fan.
crwdns2942213:0crwdne2942213:0
-
crwdns2935267:0crwdne2935267:0P5 Pentalobe Screwdriver Retina MacBook Pro and Air$5.99
-
Use a P5 Pentalobe driver to remove ten screws securing the lower case, of the following lengths:
-
Two 9 mm screws
-
Eight 2.6 mm screws
 crwdns2952109:0crwdne2952109:0
-
-
-
Wedge your fingers between the display and the lower case and pull upward to pop the lower case off the Air.
-
Remove the lower case and set it aside.
-
-
-
Grab the clear plastic pull tab attached to the battery connector and pull it toward the front edge of the Air to disconnect the battery from the logic board.
-
-
-
Use the flat end of a spudger to pry the I/O board cable connector upward out of its socket on the I/O board.
-
-
-
-
Carefully peel the I/O board cable from the top of the fan.
-
-
-
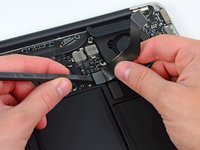
While gently pulling the I/O board cable upward near its connection to the logic board, use the tip of a spudger to pry upward on alternating sides of the connector to help "walk" it out of its socket.
-
Remove the I/O board cable.
-
-
-
Use the tip of a spudger to carefully flip up the retaining flap on the fan cable ZIF socket.
-
-
-
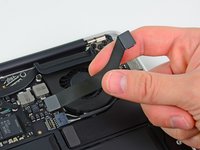
Peel the rubber gasket off the adhesive on the top of the fan.
-
-
-
Remove the following three screws securing the fan to the upper case:
-
One 3.6 mm T5 Torx screw
-
One 2.7 mm T5 Torx screw
-
One 3.6 mm T5 Torx screw with a short head
-
-
-
Lift the fan out of the upper case and carefully pull the fan ribbon cable out of its socket as you remove it from the Air.
-


crwdns2935221:0crwdne2935221:0
crwdns2935229:047crwdne2935229:0

crwdns2947412:06crwdne2947412:0
i accidentaly ripped of the socket of the fan cabel,
can i just glue it back ate the contacts where it was ?
dani96an - crwdns2934203:0crwdne2934203:0 crwdns2950251:0crwdne2950251:0
I did the same thing I broke the retaining flap. I posted for assistance at this site a while back but I have had no answer. Is the retaining flap a replaceable item? I ordered a new fan thinking with would come included but nada
asini1 - crwdns2934203:0crwdne2934203:0 crwdns2950251:0crwdne2950251:0
I also broke the retaining flap. For now, I just reinserted the ribbon. Is the function of the retaining flap just to hold the ribbon in place? Since then my computer has been entering sleep mode/shutting down during use, but I also did a battery replacement recently.
bee.chelsie - crwdns2934203:0crwdne2934203:0 crwdns2950251:0crwdne2950251:0
Good stuff! Thanks.
VFRDon
Don Swanner - crwdns2934203:0crwdne2934203:0 crwdns2950251:0crwdne2950251:0
Got it flawlessly! Thanks!
Juan Cuevas - crwdns2934203:0crwdne2934203:0 crwdns2950251:0crwdne2950251:0