crwdns2915892:0crwdne2915892:0
Use this guide to safely remove and replace the battery from a Late 2020 MacBook Air (M1).
To minimize risk of damage, turn on your MacBook and allow the battery to fully discharge before starting this procedure. A charged lithium-ion battery can be very dangerous if accidentally punctured. If your battery looks puffy or swollen, take extra precautions.
This procedure involves removing both speakers. You will need new adhesive to properly reinstall the speakers to avoid excess vibrations or rattling.
crwdns2942213:0crwdne2942213:0
-
-
If your MacBook is running Big Sur v11.1 or later, disabling Auto Boot may not work. You can proceed normally, but make sure to disconnect the battery as soon as you're inside.
-
Use a P5 driver to remove the following screws:
-
Two 7.9 mm screws
-
Two 7.3 mm screws
-
Six 2.6 mm screws
-
-
-
Wedge your fingers between the display and the lower case and pull upward to pop off the lower case.
-
Remove the lower case.
-
Set it in place and press firmly to engage the two hidden clips underneath. You should feel and hear them snap into place.
-
-
-
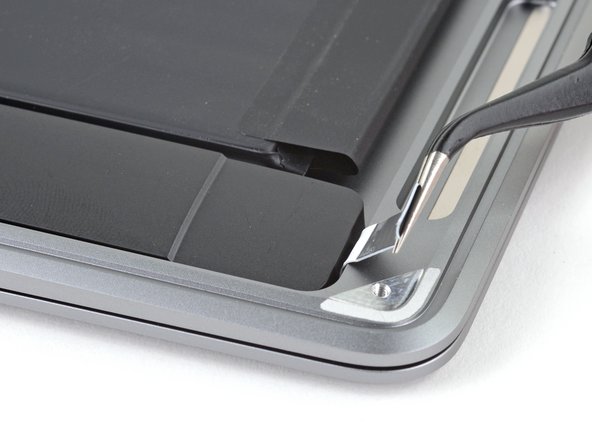
Use the flat end of a spudger to pry up and unlatch the metal locking arm on the battery connector.
-
Lift straight up on the metal locking arm to pull the battery connector out of its socket on the logic board.
-
If necessary, push the rear, wire side of the connector into place first, then rock the front of the connector into place.
Reassembly: I had difficulty going straight down. The connector has some angled edges that made it difficult. Instead, I slotted the wire side in first, then rocked it forward towards the hinge into position.
If having difficulty in flipping the bar up, place the machine vertical and not that there is a small “locking nib” that the bar has to clear. You may have to give the bar honest persuasion to clear the nib.
The bar can lock backwards making it very hard to even see let alone move. Great care is needed to shift it. I had to use two thumbnails, one on each side, then once flipped forward it takes more push than I expected to clip it in place. Ensure the plug is fully seated first !
-
-
-
Use a T3 Torx driver to remove the three 1.4 mm screws securing the audio board connector cover.
-
-
-
Remove the audio board connector cover.
-
-
-
Slide the pointed end of a spudger underneath the right speaker cable and pry straight up to disconnect it from the audio board.
-
-
-
Use a T3 Torx driver to remove the 4.2 mm screw securing the right speaker to the case.
-
-
-
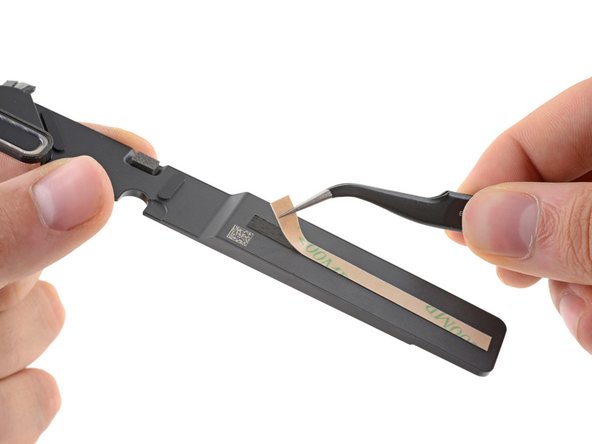
Use a pair of tweezers to peel back the black pull tab on the speaker's stretch-release adhesive until you can grip it with your fingers.
-
-
-
-
Grab the adhesive strip's pull tab and slowly pull the adhesive strip out from underneath the speaker.
-
Pull the adhesive strip until it's freed from under the speaker.
-
Apply heat to the speaker to soften the adhesive underneath.
-
Carefully slide a spudger or opening pick underneath the speaker to separate the adhesive.
-
-
-
Remove the right speaker.
-
-
-
Slide the pointed end of a spudger underneath the left speaker cable and pry straight up to disconnect it from the logic board.
-
-
-
Use a T3 Torx driver to remove the 4.2 mm screw securing the left speaker to the case.
-
-
-
Use a pair of tweezers to peel back the black pull tab on the speaker's stretch-release adhesive until you can grip it with your fingers.
-
-
-
Grab the adhesive strip's pull tab and slowly pull the adhesive strip out from underneath the speaker.
-
Pull the adhesive strip until it's freed from under the speaker.
-
Apply heat to the speaker to soften the adhesive underneath.
-
Carefully slide a spudger or opening pick underneath the speaker to separate the adhesive.
-
-
-
Remove the left speaker.
-
-
-
Use a T3 Torx driver to remove the two 1.4 mm screws securing the trackpad cable cover.
-
-
-
Use the flat end of a spudger to pry the trackpad cable connector up and out of its socket.
-
-
-
Carefully peel the trackpad cable off of the battery.
-
-
-
Use a T3 Torx driver to remove the two 2.6 mm screws securing the battery tray to the case.
-
-
-
On the left side of the MacBook, use a pair of tweezers to peel back the three black pull tabs on the battery's stretch-release adhesive strips until you can grip them with your fingers.
-
-
-
Grab an adhesive strip's pull tab and slowly pull it out from underneath the battery.
-
Pull the adhesive strip until it's freed from under the battery.
-
Repeat for the two remaining adhesive strips on the battery's left side.
What happens if you don't put this tape back the way it was? Can it cause the battery to have any sort of issue?
Can I replace the strips under the battery with the same suggested adhesive tape (Tesa 61395) as the speakers?
-
-
-
Repeat and remove the three adhesive strips from the right side of the battery.
-
-
-
Remove the battery assembly.
-
Charge it to 100%, and keep charging it for at least 2 more hours.
-
Unplug and use it normally to drain the battery.
-
When you see the low battery warning, save your work, and keep your laptop on until it goes to sleep due to low battery.
-
Wait at least 5 hours, then charge your laptop uninterrupted to 100%.
On boot after reinstallation, the fans go crazy during the Apple logo/progress bar, and the bar is very slow. Machine unuseable. I've reset SMC to no avail. Any other ideas?
Solved my own problem: I didn't have the battery connector pushed in far enough. Its edge really sits flush with the containing latch, though it isn't really obvious from the way it connects.
matt -
Matt, glad to hear you got it sorted! Thanks for giving an update on your comment—connectors can be tricky! Hopefully it helps other users that have the same problem in the future. Happy fixing!
-


Compare your new replacement part to the original part—you may need to transfer remaining components or remove adhesive backings from the new part before installing.
To reassemble your device, follow the above steps in reverse order.
Once you've completed your repair, your laptop may not power back on until connected to power.
Take your e-waste to an R2 or e-Stewards certified recycler.
Repair didn’t go as planned? Check out our Answers community for troubleshooting help.
crwdns2935221:0crwdne2935221:0
crwdns2935229:044crwdne2935229:0


crwdns2944067:017crwdne2944067:0
You’ve gotta be kidding me…
Hard to believe, but true.. this is an improvement from a couple generations ago, when you had to disassemble the entire computer or futz about with isopropyl alcohol and credit cards (or dental floss) to remove swollen but still glued in batteries. If this has you feeling overwhelmed, go look at the 74-step guide for the 2015 15” MacBook Pro Battery Replacement.
I concur with that. Made the fix for a Macbook Pro 13" 2014 some times ago and it looks really more difficult and stressing, especially with potentially destructive steps. I felt a bit lucky that it worked fine after that and since then...
Ok I have the battery out but where do you buy replacement adhesive strips? Everywhere I look they say they are for iphones or generic lcd repair. I had to take the battery out for other reasons and want to put the same battery back in.
Stephen, the linked adhesive is a generic solution & should work just fine. Apple-specific adhesives are sometimes hard to source. You could also cut and adapt stretch-release adhesive strips to fit. Best of luck on your repair!
Might as well go to apple themselves and get the battery replaced for 129...
Does anyone know for sure if the Macbook Air M1 will turn on with the battery disconnected, only with the power connected? Not sure if my motherboard is broken or only battery.
I have the same question. My macbook air won't turn on even with battery disconnected and power connected. would love an answer
Kiradon -
Does the battery capacity show 100% after replacing the battery in System Preferences?
This is a pretty simple process compared to the older models. My 2015 MBP practically taught me more about performing surgery more than medical school did.
I had Air 2015 and changing battery was as simple as possible. No unscrewing speakers, no adhesive strips removing. Just FIVE easy steps.
дякую! ця інструкція врятувала мені бюджет.
Does replacing the battery effect any system functions?? Like does it stop the finger print reader from working or anything like that ?
If you would just use the battery-tray screws and not replace the adhesive, would it work? Would it be safe?
If the battery rattles a bit under vibration but doesn't introduce a fire hazard, I'd be OK with it.
now if they only had a simple solution to replace the memory and SSD.
Great guide! Completed in about an hour. The Fix Kit DOES include at card adhesion/tape so there is no need to purchase that separately.
What if you don't use the adhesives when you reassemble?
Would it really be much of an issue?
ESD safe mat, plugged into ground, with a wrist strap, also grounded, are the best best to protect the logic board.
Robin Ray - crwdns2934203:0crwdne2934203:0
Re-Assembly Tip: Before putting the screws back in, snap the lower case on and test to make sure the MacBook powers up. When I first re-assembled, I became very nervous I did something wrong because it would not power on. It turns out I just needed to plug the laptop into a power source for it to power up (despite having a good charge before disassembly). It was the perfect way to test the new USB-C ports!
Austin - crwdns2934203:0crwdne2934203:0
Big points to this one, especially for mentioning needing to plug the laptop in. The bottom case needs to be screwed in and laptop needs to be plugged in before it will boot.
Bayden Yazalina -
Wiha 4PL driver for these screws.
Greg Worrel - crwdns2934203:0crwdne2934203:0
Printing out all the images from this Ifixit guide prior to starting and using duct tape help me keep track of screws.
raju midjdeya - crwdns2934203:0crwdne2934203:0