crwdns2915892:0crwdne2915892:0
Use this guide to replace your Air's I/O board which houses the MagSafe DC-in port, a USB socket, and the headphone jack.
crwdns2942213:0crwdne2942213:0
crwdns2936621:0crwdne2936621:0
-
crwdns2935267:0crwdne2935267:0P5 Pentalobe Screwdriver Retina MacBook Pro and Air$5.99
-
Remove the following ten screws:
-
Two 9 mm 5-point Pentalobe screws
-
Eight 2.6 mm 5-point Pentalobe screws
-
-
-
Wedge your fingers between the display and the lower case and pull upward to pop the lower case off the Air.
-
Remove the lower case and set it aside.
-
-
-
Grab the clear plastic pull tab attached to the battery connector and pull it toward the front edge of the Air to disconnect the battery from the logic board.
-
-
-
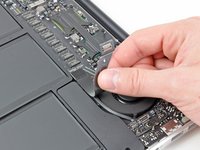
Use the flat end of a spudger to pry the I/O board cable connector upward out of its socket on the I/O board.
-
-
-
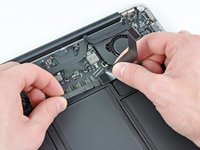
Carefully peel the I/O board cable from the top of the fan.
-
While gently pulling the I/O board cable upward near its connection to the logic board, use the tip of a spudger to pry upward on alternating sides of the connector to help "walk" it out of its socket.
-
Remove the I/O board cable.
-
-
-
-
Use the tip of a spudger to carefully flip up the retaining flap on the fan cable ZIF socket.
-
-
-
Peel the rubber gasket off the adhesive on the top of the fan.
-
-
-
Remove the following three screws securing the fan to the upper case:
-
One 3.6 mm T5 Torx screw
-
One 2.7 mm T5 Torx screw
-
One 3.6 mm T5 Torx screw with a short head
-
-
-
Lift the fan out of the upper case and carefully pull the fan ribbon cable out of its socket as you remove it from the Air.
-
-
-
Disconnect the I/O board by pulling the power cable away from its socket on the logic board.
-
-
-
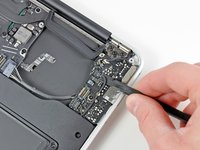
Pull the camera cable parallel to the face of the I/O board toward the corner of the Air to disconnect it from its socket, using the tip of a spudger to help push the connector out of its socket.
-
-
-
Use the flat end of a spudger to pry the left speaker cable connector up and out of its socket on the I/O board.
-
De-route the left speaker cable from its retainer on the I/O board.
-
-
-
Use the flat end of a spudger to pry the microphone cable connector up and out of its socket on the I/O board.
-
-
-
Remove the single 3.6 mm T5 Torx screw securing the I/O board to the upper case.
-
-
-
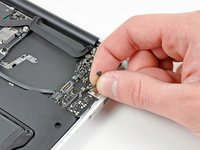
Carefully lift the I/O board from its edge nearest the logic board and remove it from the upper case.
-


To reassemble your device, follow these instructions in reverse order.
To reassemble your device, follow these instructions in reverse order.
crwdns2935221:0crwdne2935221:0
crwdns2935229:022crwdne2935229:0

crwdns2947412:03crwdne2947412:0
The Microphone (3pin) and Audio cables (2pin) should be lift upwards, not backwards like the camera part. If you break the holder in the socket that connects the pins to connector, then you can still connect them manually like I did.
Superb instructions - made it easy!
Thanks! It saved me $250 dollars doing this. One thing I want to mention to anyone doing this, be careful with the dis-attachment of some smaller cables. They are very sensitive and have tiny parts sometimes that can come off. Fortunately for me, it didn’t prevent it from working, but just a warning. Notice how you are detaching those little cables very carefully before putting them back. I’m thinking about the microphone cable connector up and out of its socket on the I/O boar specifically.