crwdns2915892:0crwdne2915892:0
In this guide we will successfully install a new keyboard.
crwdns2942213:0crwdne2942213:0
-
-
Before we begin it is advised to carefully read through the whole guide to get the full idea on the processes involved.
-
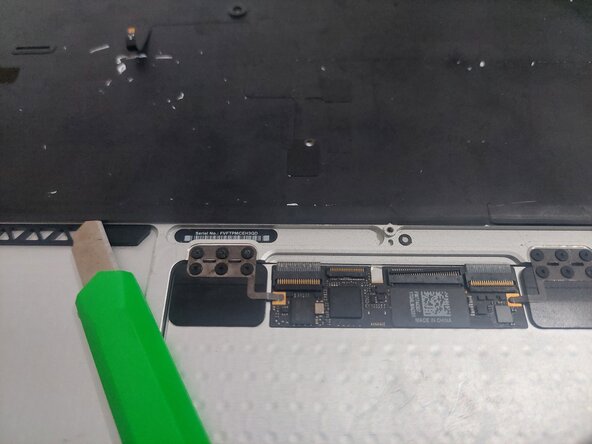
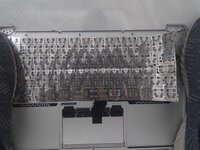
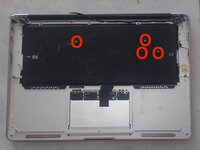
We begin at the stage where the top case with all its components have already been removed, except for the microphone, backlight and keyboard. We can now begin the process to remove them, install a new keyboard & if necessary a new backlight.
-
It is optional if you want to remove the touch pad but it is not necessary to do so, I have always left it as it is without any issues.
-
-
-
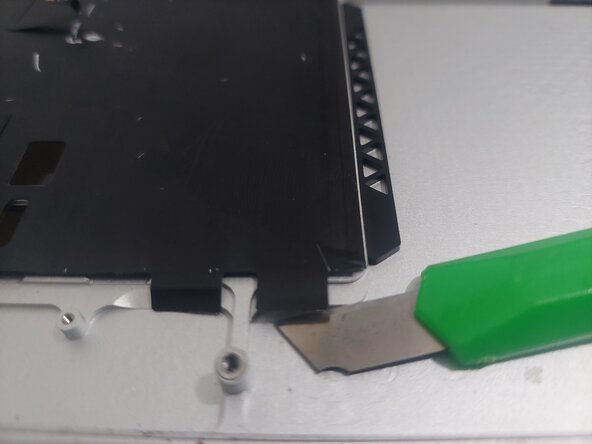
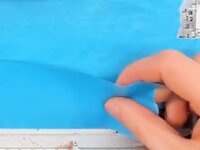
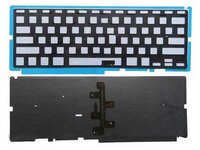
We have to remove the backlight carefully as not to damage it, if you are replacing this component then you can simply pull it off.
-
The backlight consists of 3 layers, the very fragile backlight covering, a clear plastic layer and a very fragile keyboard layout template. We DO NOT want to damage these in any way if we are to use them again, so ultimate care is needed. They are stuck together but with plenty of care they can be separated.
-
Using a sharp small craft knife or similar, very carefully lift up the surrounding edge of the backlight by running the blade underneath where the adhesive is located, as we do not want to tear this extremely fragile component.
-
Some may suggest to use a heat gun but this will more than likely deform the backlight from the heat, rendering it useless.
-
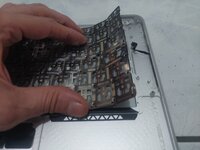
Once we have a fair sized area lifted we can very gently pull away the backlight using extra care not to tear it. We can use the strength of the middle plastic sheet to assist in lifting it away. Once removed put it to the side as it will be used again in a later stage.
-
We can gently brush or wipe off any stains or debris that may have built up over time using a soft brush or cloth with some alcohol making the part nice and clean ready for re-installation.
-
-
-
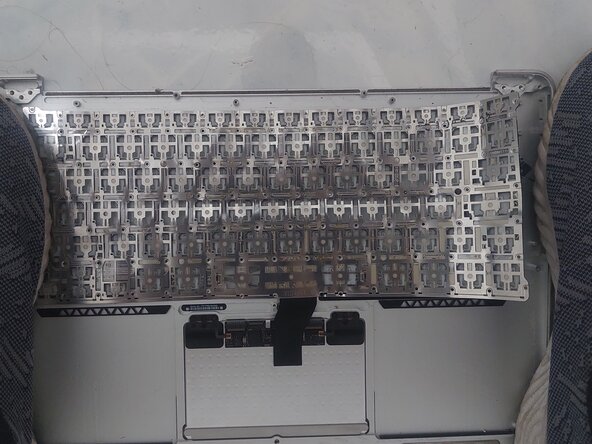
Once the backlight has been removed from the case we can now proceed to remove all the tiny screws that run around the outer edges of the keyboard.
-
Using a small screwdriver undo and remove ALL of the tiny screws that are around the edges of the keyboard, There are about 40 of them in total.
-
It is imperative to double check that ALL of the screws have been removed otherwise the keyboard will not come out of the case.
-
-
-
-
Once all of the screws are removed we are almost ready to remove the keyboard. We DO NOT want to bend the top case in any way shape or form, so we will FIRMLY STAND on the edges to prevent it lifting or moving as this could bend or deform the case which of course we do not want to happen.
-
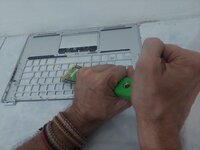
It is STRONGLY advised to to put on a good pair of strong thick gloves so we can first lift up the edge of the keyboard and gently bend it back enough to get a good strong grip on it. The edges of the Keyboard are VERY SHARP and will easily slice through weak materials or skin, so EXTRA CAUTION is required.
-
You can alternatively just use an old rag or a thick strong cloth to protect yourself against what can be potentially severe cuts to your fingers and knuckles when removing the keyboard.
-
* It is a good idea also to remove as many key caps as possible including their fixtures beforehand as it is always good to have some spares of these, especially if you are into repairing apple laptops or just in case your new keyboard suffers a damaged key in the future, as they will fly off everywhere when removing the keyboard.
-
* You can also put a sheet of paper or plastic under the laptop to help prevent any scratches that may occur if the case moves during the big pull, a cloth or rag will allow some flex during the violent pulling away of the keyboard which can potentially disfigure the case, something we definitely need to avoid from happening.
-
Use can use some masking tape to completely cover the backside of the keyboard as this can help to catch all the rivet bits that will pop off when tearing out the keyboard.
-
Once you are set, get a TIGHT FIRM GRIP and just count to three.... 1-2-3 & RIP IT OUT in one go as fast as you can. Keys and rivets will fly everywhere so be prepared! The slower you do it the more chance there is of bending the casing or injury. Again, the edge of the keyboard is VERY SHARP and shows no mercy to hands & fingers.
-
Try not to pull upwards to much, instead pull at a level to the keyboard, as this will reduce upward stress on the case.
-
-
-
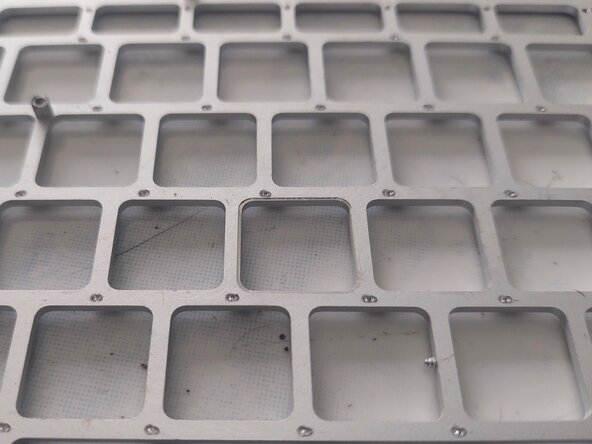
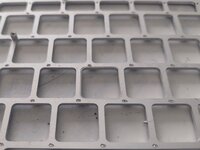
Once we have successfully ripped out the keyboard we will have to remove all the remains from the rivets from the casing. This is not as daunting as it seems, and can take just a few minutes to complete.
-
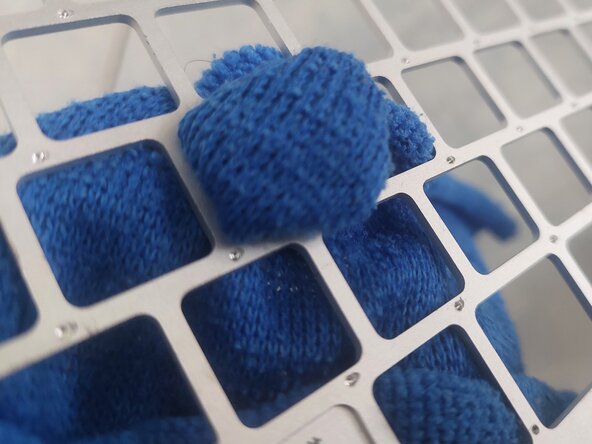
Place the empty top case on a cloth to prevent any scratches & position it against a wall. This way the case CANNOT move while we PUNCH OUT the rivets. Avoid if possible placing it against kitchen tiles as they could easily get cracked when we are punching against them!
-
Using a flat edged tool such as a scraper, we lay the tool as flat as we can as not to cut into the casing itself and put it to the rivets and just punch them out. It is possible to get 2 or 3 out with each hit and sometimes more.
-
Some may suggest to grind of the old rivet heads with a grinder, but this takes way to long to do and may hinder removing the remaining parts of the rivets as they may become to shallow. The aim is to get the rivets to pop out leaving behind a hole in which to screw into.
-
You will notice that when the rivets fly out they will leave a perfectly sized hole for all the tiny screws that we must use to firmly secure the keyboard to the case.
-
Double check that ALL of the rivets have been successfully removed. A good idea is to run your finger where all the rivets once were to check everything is nice and smooth and that the holes are clean and ready to house a screw, otherwise the new keyboard will not sit tightly in the casing.
-
* If in the worst case scenario some of the rivets have remained and have not fully popped out of their hole or have been sheered off, we may need to use a tiny thin drill bit to drill a hole, but take care to go no deeper than 1mm, otherwise we may risk drilling right through to the other side of the case.
-
* It is also a good time to get a cloth and give a good clean out of the key holes on the casing as they are prone to collect dirt or debris from sticky fingers in the past.
-
-
-
It is recommended to place the case on something that will raise it a little (I use the speakers to do this) that will allow the keyboard to fully drop into the slots before screwing anything down. This will make the keyboard sit comfortably and flat to the case at all times.
-
Place the new keyboard into the casing and start by screwing the 4 corners and the center of the edges with a few screws.
-
The screws are very small and can easily get lodged inside the keyboard, so a tip is to loosely cover the back of the keyboard with some tape or the like, gently pulling it back when you need to access the hole that is next to be screwed to into.
-
It is important to occasionally check that no keys are getting stuck when pressed. If this happens then we need to loosen all of the screws so that the keyboard can move a fraction preventing any rub on the case. This is rare as the keyboards are a precise fit. It is a good idea to check on this before too many screws have been secured.
-
Once satisfied all is in perfectly, we can start screwing the screws into where the rivets once were from the center outwards. There are around 110 tiny screws in all that we must secure to make a perfect tight keyboard that will have zero flex when typing.
-
-
-
Once we are satisfied with the keyboards fit and there are no sticky keys, especially the top rows smaller function keys, as they are the ones that are most common to do so if ever, we can now prepare to install the old or a new backlight to the casing.
-
It is actually possible to change the color of your backlight at this stage by inserting a thin plastic covering layer between the backlight and the middle clear plastic. Colored bin liner (Trash can bags) work well as they are thin enough not to absolve to much light. Various colors are available at the local convenience store or supermarket.
-
Using the 3M tape carefully go around the edges where the old tape was leaving as less space as possible, this will help in case of any dirt, dust or worst case scenario of a water spill getting inside and onto the logic board, or at least it will help to minimize that risk.
-
A new backlight usually comes with adhesive tape preinstalled, if so there will be no need to use the 3M tape,
-
It is also possible to customize the backlight color by adding a thin layer of transparent colored plastic replacing the existing clear panel or overlaying it, this will work well as long as they are thin enough not to absolve to much light.
-
You can also apply the tape covering all the screws along the center rows, but do not peel back to expose the sticky surface otherwise you will have trouble positioning the backlight! This will just help to contain any screw that may decide to come lose and wedging itself under a key!
-
Gently put the backlight in its correct alignment and position, making sure that it is laying nicely flat and even, observing that the 4 alignment lugs or mounts for the logic board are not covered, then gently run your finger around the edges of the backlight pushing it down to firmly secure it to the case.
-
Once you are satisfied that everything is nice and secure, we are now ready to re-assemble the laptop. Job done.
-


crwdns2935221:0crwdne2935221:0
crwdns2935227:0crwdne2935227:0
