crwdns2933423:0crwdne2933423:0

MacBook Air 11" Mid 2013 I/O Board Replacement

crwdns2862623:0crwdne2862623:0
crwdns2942641:0crwdne2942641:0

crwdns2942213:0crwdne2942213:0

  1. MacBook Air 11" Mid 2013 I/O Board Replacement, I/O Board: crwdns2935265:01crwdnd2935265:01crwdnd2935265:03crwdne2935265:0 MacBook Air 11" Mid 2013 I/O Board Replacement, I/O Board: crwdns2935265:01crwdnd2935265:02crwdnd2935265:03crwdne2935265:0 MacBook Air 11" Mid 2013 I/O Board Replacement, I/O Board: crwdns2935265:01crwdnd2935265:03crwdnd2935265:03crwdne2935265:0
    • Remove the small rubber gasket from the corner of the upper case nearest the the I/O board.

    • Remove the gasket from the corner nearest display cable connector.

  2. MacBook Air 11" Mid 2013 I/O Board Replacement: crwdns2935265:02crwdnd2935265:01crwdnd2935265:02crwdne2935265:0 MacBook Air 11" Mid 2013 I/O Board Replacement: crwdns2935265:02crwdnd2935265:02crwdnd2935265:02crwdne2935265:0
    • If necessary, use tweezers to remove any tape covering the microphone cable ZIF connector.

  3. MacBook Air 11" Mid 2013 I/O Board Replacement: crwdns2935265:03crwdnd2935265:01crwdnd2935265:03crwdne2935265:0 MacBook Air 11" Mid 2013 I/O Board Replacement: crwdns2935265:03crwdnd2935265:02crwdnd2935265:03crwdne2935265:0 MacBook Air 11" Mid 2013 I/O Board Replacement: crwdns2935265:03crwdnd2935265:03crwdnd2935265:03crwdne2935265:0
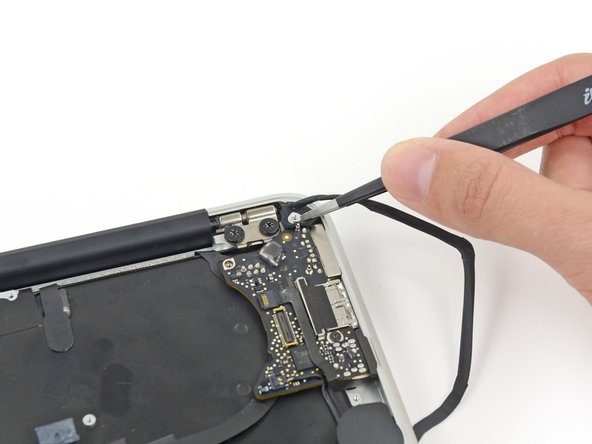
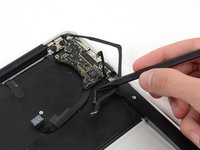
    • Use the tip of a spudger to carefully flip up the retaining flap on the microphone cable ZIF socket.

    • Be sure you are prying up on the retaining flap, not the socket itself.

    • With a pair of tweezers, pull the microphone ribbon cable straight out of its socket.

  4. MacBook Air 11" Mid 2013 I/O Board Replacement: crwdns2935265:04crwdnd2935265:01crwdnd2935265:03crwdne2935265:0 MacBook Air 11" Mid 2013 I/O Board Replacement: crwdns2935265:04crwdnd2935265:02crwdnd2935265:03crwdne2935265:0 MacBook Air 11" Mid 2013 I/O Board Replacement: crwdns2935265:04crwdnd2935265:03crwdnd2935265:03crwdne2935265:0
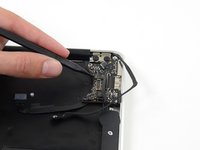
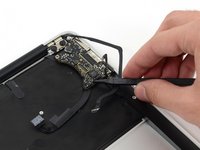
    • Use the tip of a spudger to pry under the speaker cable near the connector, lifting it straight up from its socket.

    • De-route the cable from its notch in the logic board.

  5. MacBook Air 11" Mid 2013 I/O Board Replacement: crwdns2935265:05crwdnd2935265:01crwdnd2935265:01crwdne2935265:0
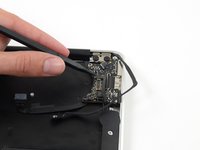
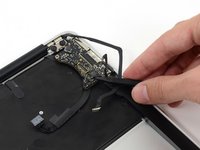
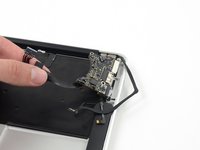
    • Remove the single 3.6 mm T5 Torx screw securing the I/O board to the upper case.

  6. MacBook Air 11" Mid 2013 I/O Board Replacement: crwdns2935265:06crwdnd2935265:01crwdnd2935265:03crwdne2935265:0 MacBook Air 11" Mid 2013 I/O Board Replacement: crwdns2935265:06crwdnd2935265:02crwdnd2935265:03crwdne2935265:0 MacBook Air 11" Mid 2013 I/O Board Replacement: crwdns2935265:06crwdnd2935265:03crwdnd2935265:03crwdne2935265:0
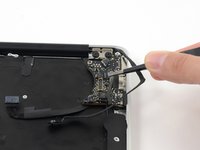
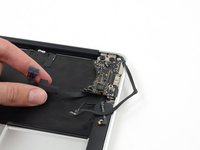
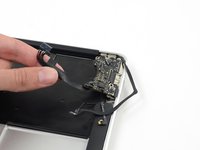
    • Carefully lift the I/O board by its power cable and pull it away from the edge of the case.

crwdns2915888:0crwdne2915888:0

To reassemble your device, follow these instructions in reverse order.

Sam Goldheart

crwdns2935283:010/18/12crwdne2935283:0

465,762 crwdns2915208:0crwdne2915208:0

crwdns2935297:0538crwdne2935297:0

crwdns2915084:0crwdne2915084:0

iFixit crwdns2935289:0iFixitcrwdne2935289:0

Staff

crwdns2931471:0135crwdne2931471:0

crwdns2935297:016,817crwdne2935297:0

crwdns2944067:00crwdne2944067:0

crwdns2917038:0crwdne2917038:0

crwdns2936625:0crwdne2936625:0:

crwdns2936751:024crwdne2936751:0 0

crwdns2936753:07crwdne2936753:0 0

crwdns2936753:030crwdne2936753:0 0

crwdns2942667:0crwdne2942667:0 88