crwdns2933423:0crwdne2933423:0
crwdns2947577:0crwdnd2947577:0crwdne2947577:0

MacBook Air 11" Late 2010 Fan Replacement

crwdns2942213:0crwdne2942213:0

    1. MacBook Air 11" Late 2010 Fan Replacement, Lower Case: crwdns2935265:01crwdnd2935265:01crwdnd2935265:01crwdne2935265:0
      crwdns2935267:0crwdne2935267:0
      P5 Pentalobe Screwdriver Retina MacBook Pro and Air
      $5.99
      • Before proceeding, close your computer and lay it on a soft surface top-side down.

      • Remove the following ten screws:

      • Two 8 mm 5-point Pentalobe screws

      • Eight 2.5 mm 5-point Pentalobe screws

      • The special screwdriver needed to remove the eight 5-point Pentalobe screws can be found here.

      crwdns2952109:0crwdne2952109:0

      crwdns2917038:0crwdne2917038:0

    2. MacBook Air 11" Late 2010 Fan Replacement: crwdns2935265:02crwdnd2935265:01crwdnd2935265:01crwdne2935265:0
      • Wedge your fingers between the display and the lower case and pull upward to pop the lower case off the Air.

      • Remove the lower case and set it aside.

      crwdns2952109:0crwdne2952109:0

      crwdns2917038:0crwdne2917038:0

    1. MacBook Air 11" Late 2010 Fan Replacement, Battery: crwdns2935265:03crwdnd2935265:01crwdnd2935265:02crwdne2935265:0 MacBook Air 11" Late 2010 Fan Replacement, Battery: crwdns2935265:03crwdnd2935265:02crwdnd2935265:02crwdne2935265:0
      • In this step you will disconnect the battery to help avoid shorting out any components during service.

      • Use the flat end of a spudger to pry both short sides of the battery connector upward to disconnect it from its socket on the logic board.

      • Bend the battery cable slightly away from the logic board so the connector will not accidentally contact its socket.

      crwdns2952109:0crwdne2952109:0

      crwdns2917038:0crwdne2917038:0

    1. MacBook Air 11" Late 2010 Fan Replacement, Solid-State Drive: crwdns2935265:04crwdnd2935265:01crwdnd2935265:01crwdne2935265:0
      • Remove the single 2.9 mm T5 Torx screw securing the SSD to the logic board.

      crwdns2952109:0crwdne2952109:0

      crwdns2917038:0crwdne2917038:0

    2. MacBook Air 11" Late 2010 Fan Replacement: crwdns2935265:05crwdnd2935265:01crwdnd2935265:02crwdne2935265:0 MacBook Air 11" Late 2010 Fan Replacement: crwdns2935265:05crwdnd2935265:02crwdnd2935265:02crwdne2935265:0
      • Use a spudger to help lift the free end of the SSD just enough to grab it with your other hand.

      • Do not lift the end of the SSD excessively.

      • Pull the drive straight out of its socket and remove it from the logic board.

      • When reinstalling the SSD, be sure it is properly seated before reinstalling its retaining screw.

      crwdns2952109:0crwdne2952109:0

      crwdns2917038:0crwdne2917038:0

    1. MacBook Air 11" Late 2010 Fan Replacement, I/O Board Cable: crwdns2935265:06crwdnd2935265:01crwdnd2935265:01crwdne2935265:0
      • Use the flat end of a spudger to pry the I/O board cable connector upward out of its socket on the I/O board.

      crwdns2952109:0crwdne2952109:0

      crwdns2917038:0crwdne2917038:0

    2. MacBook Air 11" Late 2010 Fan Replacement: crwdns2935265:07crwdnd2935265:01crwdnd2935265:01crwdne2935265:0
      • The following connector has an especially deep socket. Use care when disconnecting it.

      • While gently pulling the I/O board cable upward near its connection to the logic board, use the tip of a spudger to pry upward on alternating sides of the connector to help "walk" it out of its socket.

      • Remove the I/O board cable.

      crwdns2952109:0crwdne2952109:0

      crwdns2917038:0crwdne2917038:0

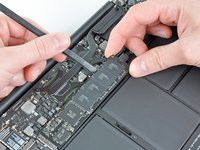
    1. MacBook Air 11" Late 2010 Fan Replacement, Fan: crwdns2935265:08crwdnd2935265:01crwdnd2935265:01crwdne2935265:0
      • Use the tip of a spudger to carefully flip up the retaining flap on the fan cable ZIF socket.

      • Be sure you are prying up on the hinged retaining flap, not the socket itself.

      crwdns2952109:0crwdne2952109:0

      crwdns2917038:0crwdne2917038:0

    2. MacBook Air 11" Late 2010 Fan Replacement: crwdns2935265:09crwdnd2935265:01crwdnd2935265:01crwdne2935265:0
      • Remove the following three screws securing the fan to the upper case:

      • Two 5.2 mm T5 Torx screws

      • One 3.6 mm T5 Torx screw

      crwdns2952109:0crwdne2952109:0

      crwdns2917038:0crwdne2917038:0

    3. MacBook Air 11" Late 2010 Fan Replacement: crwdns2935265:010crwdnd2935265:01crwdnd2935265:01crwdne2935265:0
      • Lift the fan out of the upper case and carefully pull the fan ribbon cable out of its socket as you remove it from the Air.

      crwdns2952109:0crwdne2952109:0

      crwdns2917038:0crwdne2917038:0

crwdns2915888:0crwdne2915888:0

To reassemble your device, follow these instructions in reverse order.

crwdns2935221:0crwdne2935221:0

crwdns2935229:010crwdne2935229:0

crwdns2947410:01crwdne2947410:0

thanks a million—clear and accessible.And we did it!

gigi marks - crwdns2934203:0crwdne2934203:0 crwdns2950251:0crwdne2950251:0

crwdns2917038:0crwdne2917038:0

crwdns2936625:0crwdne2936625:0:

crwdns2936751:024crwdne2936751:0 4

crwdns2936753:07crwdne2936753:0 22

crwdns2936753:030crwdne2936753:0 115

crwdns2942667:0crwdne2942667:0 13,779