crwdns2915892:0crwdne2915892:0
Use this guide to remove the MacBook Air 11" Early 2015 trackpad for adjustment or replacement.
crwdns2942213:0crwdne2942213:0
-
crwdns2935267:0crwdne2935267:0P5 Pentalobe Screwdriver Retina MacBook Pro and Air$5.99
-
Remove the following ten screws:
-
Two 8 mm 5-point Pentalobe screws
-
Eight 2.5 mm 5-point Pentalobe screws
-
-
-
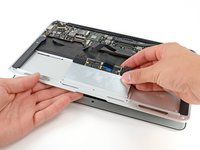
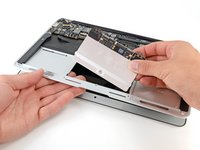
Wedge your fingers between the display and the lower case and pull upward to pop the lower case off the Air.
-
-
-
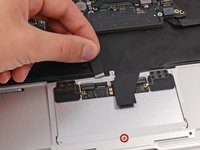
Use the flat end of a spudger to pry both short sides of the battery connector upward to disconnect it from its socket on the logic board.
-
Bend the battery cable slightly away from the logic board so the connector will not accidentally bend back and make contact with its socket.
-
-
-
-
Remove the following five screws securing the battery to the upper case:
-
Two 5.2 mm T5 Torx screws
-
One 6 mm T5 Torx screw
-
Two 2.6 mm T5 Torx screws
-
-
-
Lift the battery from its edge nearest the logic board and remove it from the upper case.
-
Charge it to 100%, and then keep charging it for at least 2 more hours. Next, unplug and use it normally to drain the battery. When you see the low battery warning, save your work, and keep your laptop on until it goes to sleep due to low battery. Wait at least 5 hours, then charge your laptop uninterrupted to 100%.
-
If you notice any unusual behavior or problems after installing your new battery, you may need to reset your MacBook's SMC.
-
-
-
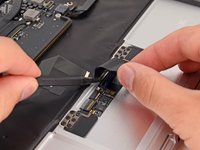
Use the point of a spudger to lift the ZIF connector retaining flap on the trackpad data cable.
-
Gently slide the ribbon cable out of the ZIF connector.
-
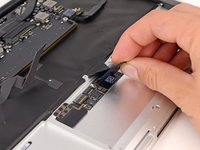
Adjust, but do not remove the T5 Trackpad Sensitivity Screw to change the trackpad's depth sensitivity.
-
-
-
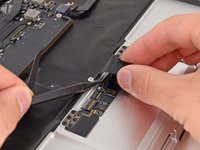
With one hand, push the keyboard ribbon cable in slightly to access the ZIF connector beneath it.
-
Use a spudger to flip up the retaining flap.
-
Gently slide the cable out of the connector.
-
-
-
Remove the six 1.5 mm Phillips #00 screws holding the trackpad in place.
-
-
-
Open the device about 10 degrees.
-
While holding the bottom of the trackpad, press up on the side of the trackpad closest to the logic board to free it from the upper case.
-
Remove the trackpad from the device.
-


To reassemble your device, follow these instructions in reverse order.
crwdns2935221:0crwdne2935221:0
crwdns2935229:09crwdne2935229:0


crwdns2947412:04crwdne2947412:0
Hi. After my trackpad “click” started failing (it wouldn’t physically feel like a click when pressed and it wouldn’t respond unless you pushed hard and in certain areas) I went through the whole above replacement process with a trackpad I bought off of Amazon. The new trackpad has a better click on the right hand side but the left hand side is not working still.
Could it be that the new trackpad I got also doesn’t work? The reviews on Amazon indicated that the trackpads from this seller sometimes also failed.
Or is there another problem? I noticed there are two black rubber pads (made of a thin foam) that are between the base of the trackpad and the body of the macbook frame, and that in my computer they are worn/frayed. Could this be the problem?
If anyone has any knowledge about this, or advice about how to go about with this repair and trying different things, I would appreciate your help.
I’d love to know the answers to the above questions before I take mine apart!
this was very easy thanks
Hola. Después de que el "clic" de mi trackpad empezara a fallar (no se sentía físicamente como un clic al presionarlo y no respondía a menos que presionaras con fuerza y en ciertas áreas), pasé por todo el proceso de reemplazo anterior con un trackpad que compré en Amazon. El nuevo trackpad tiene un mejor clic en el lado derecho, pero el lado izquierdo sigue sin funcionar.
¿Podría ser que el nuevo trackpad que compré tampoco funcione? Las reseñas en Amazon indicaban que los trackpads de este vendedor a veces también fallaban.
¿O hay otro problema? Noté que hay dos almohadillas de goma negras (hechas de una espuma delgada) que están entre la base del trackpad y el cuerpo del marco del Macbook, y que en mi computadora están desgastadas/deshilachadas. ¿Podría ser este el problema?
Si alguien tiene algún conocimiento sobre esto, o consejo sobre cómo llevar a cabo esta reparación y probar cosas diferentes, agradecería su ayuda.