crwdns2915892:0crwdne2915892:0
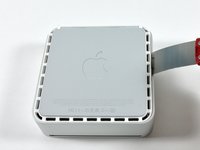
We tried to put a whopping terabyte worth of storage in a Mac mini -- and succeeded!
This guide walks you through the process of replacing the stock hard drive and optical drive with TWO 500 GB hard drives.
Warning: Although you're welcome to do this at home, this surgery is at your own risk. Make sure to back up any important data prior to working on your mini's hard drive. We'll post more information regarding heat and performance as soon as we have it available.
crwdns2942213:0crwdne2942213:0
-
-
We decided to see if we could stuff a full terabyte worth of storage into our new Mac mini. Why would anyone possibly want this much storage?
-
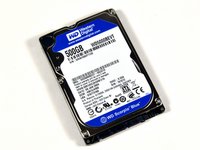
Bragging rights. Mac minis come with either 120, 250, or 320 GB standard. Yours has 1 TERABYTE.
-
Built-in Time Machine. Sure, you can hook up an external drive, but it's sure nice not to have cables everywhere.
-
RAID -- mirroring, striping, concatenating -- take your pick.
-
And seriously, with that much space, who needs an optical drive?
-
-
-
We're going to:
-
Swap out a the existing hard drive for a 500 GB drive.
-
Then remove the optical drive and install another new 500 GB drive in its place.
-
Carefully insert a putty knife into the crevice between the top cover and bottom housing. Start on the left side first.
-
Gently enlarge the existing crevice by twisting the putty knife downward and away from the mini.
-
Repeat the prying motion until a portion of the bottom housing has been nudged upward.
-
-
-
Repeat the same prying procedure on the right side.
-
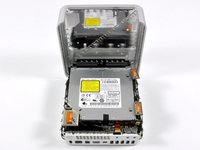
The top cover should now be marginally separated from the bottom housing. Use your fingers to completely separate the two, starting with the I/O side of the mini.
-
The top cover does not have any cables attaching it to the bottom housing; it should now be completely detached from the bottom.
It’s easier to do this if the computer is right side up. It’s weight tends to push it back together. Using the edge of a table works well.
-
-
-
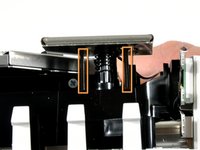
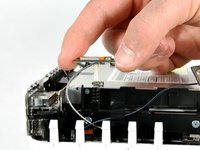
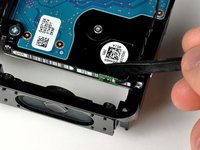
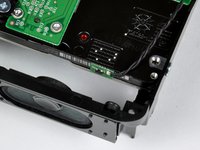
All three antennas need to be removed before accessing the hardware underneath.
-
Remove the large antenna by squeezing both black posts together and gently lifting the antenna board from the posts.
-
Remove the other two antennas by pulling them directly upward.
the smaller two antennae in my mini do not have the two black locking posts like the larger one in the picture. Would somebody please describe how to release the smaller antennae from the sprung posts that mount them? Thanks.
Ok, I figured it out myself, on a different page here; the smaller antennae's main posts have prongs at the bottom inside the black cylinder that you can't see. They release themselves if you pull up perfectly vertically. I recommend using four fingers two each on opposite corners, and other fingers to push against the drive and chassis to ensure your pressure is vertical, and pull straight up. Be careful, I'm sure it's easy to break the boards or posts with any angled force.
-
-
-
Rotate the mini 180 degrees.
-
Use a spudger to peel back the black tape and release the antenna cable.
-
Carefully lift the remaining two antennas from the right side of the mini.
-
-
-
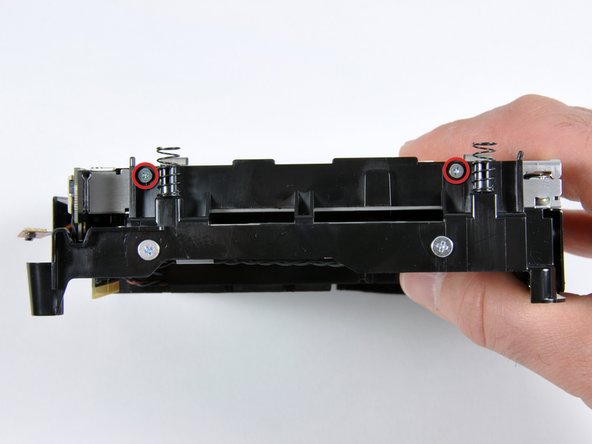
Remove the four black Phillips screws holding the internal frame to the bottom housing.
-
Remove the black Phillips screw from the bottom left corner.
-
Remove the black Phillips screw from the top left corner. This particular screw is hidden from view.
-
-
-
Remove the black Phillips screw located on the upper right corner.
-
Remove the black Phillips screw located on the bottom right corner.
What's missing here? Ahhh, yes, step 7a:
Disconnect the orange ribbon cable attached to the interconnect board from the sound card
Lift Upper part of assembly from the lower
Mine also had a wire connection probably for the fan, diagonally opposite the ribbon cable and under the disk slot. Pull up to disconnect from board.
-
-
-
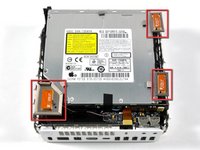
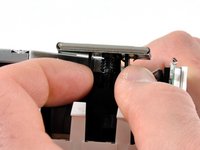
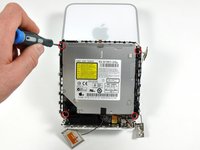
Remove the two silver Phillips screws holding the SuperDrive to the internal frame.
-
Rotate the internal frame 180 degrees and remove two more silver Phillips screws.
-
Rotate the internal frame so that the interconnect board connector is facing you.
-
Remove the two silver Phillips screws holding the SuperDrive to the interconnect board connector.
-
-
-
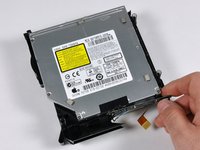
Use a spudger to remove the black tape securing the SuperDrive to the interconnect board.
-
Detach the interconnect board connector from the SuperDrive.
-
Lift the SuperDrive out of the internal frame.
-
-
-
-
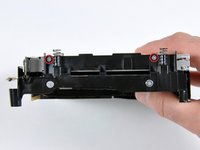
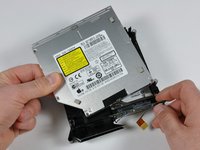
The SuperDrive should now be removed from the internal frame.
-
-
-
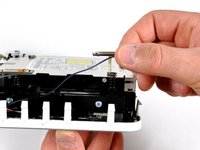
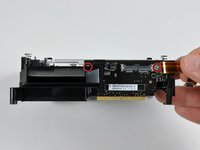
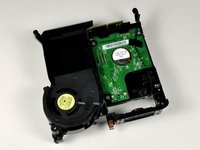
Flip the frame and then rotate it 180 degrees so that the speakers are facing you.
-
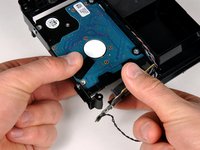
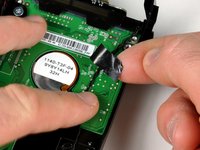
Use a spudger to gently disconnect the thermal sensor from the hard drive.
-
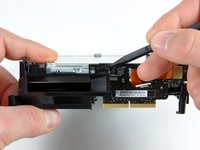
Peel back the black tape and free the double-stranded wire from the drive.
-
Gently deroute the wire from the small notch on the frame (third picture).
-
-
-
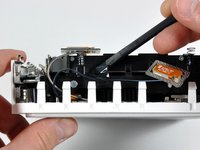
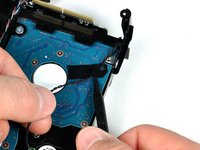
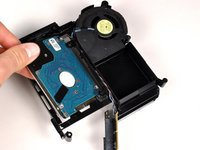
Unplug the interconnect board from the hard drive.
-
Remove the four Phillips screws that hold the drive in place.
-
The stock hard drive can now be removed.
-
-
-
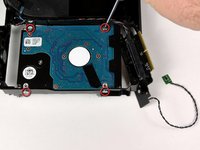
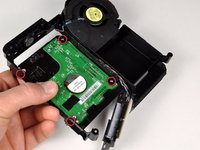
Hold the new drive in place and attach it to the frame using the four Phillips screws.
-
Plug the interconnect board into the new drive, making sure that all wires are in their original place.
-
Route the black thermal sensor wire back through the notch.
Something terrible happened here for me. I tried to take the sensor cable thing out and it just wouldn't come up so i used my putty knife and ended up taking it and the place it connects off. Am i screwed???
crwdns2936937:0Jcrediblecrwdne2936937:0
Something terrible happened here for me. I tried to take the sensor cable thing out and it just wouldn't come up so i used my putty knife and ended up taking it and the place it connects off. Am i screwed???
I am not quite sure I understand what you did. The sensor board (the board that is attached to the black wire in Step 13) is glued to the hard drive. Did you separate the board from the drive, or did you separate the wire from the board? What do you mean by "taking the place it connects off"?
Just to be super clear, in Step 13 we have the hard drive, the sensor board, the sensor board wire, and the spudger (black tool used to separate the board from drive). Please let us know what was separated so we can determine if there was any damage done.
Sorry. There is a black wire that is connected to the board and on the other end it has the green sensor thing i guess. Well i pulled the black end from the board off as well as the part that is connected to the board. I used some krazy glue to sit it back on the board but it was connected up there with like silver stuff.
It took about 5 minutes to boot and the fan was going crazy. Oh yeah it wouldn't shut off, so i took it back to the Apple store and i guess i got lucky. They gave me another one. LOL! Next time i will be extra careful.
crwdns2936937:0Jcrediblecrwdne2936937:0
Sorry. There is a black wire that is connected to the board and on the other end it has the green sensor thing i guess. Well i pulled the black end from the board off as well as the part that is connected to the board. I used some krazy glue to sit it back on the board but it was connected up there with like silver stuff.
It took about 5 minutes to boot and the fan was going crazy. Oh yeah it wouldn't shut off, so i took it back to the Apple store and i guess i got lucky. They gave me another one. LOL! Next time i will be extra careful.
Check out step 12 of the Mac Mini tear-down instructions elsewhere on this site. You are not alone.
Would it be possible to remove the internal hard drive altogether, attach cables to the hard drive interconnect board and run them out the bottom of the mini to an external 3.5 inch 1TB SATA drive? Do you know of a cable adapter that would plug into the hard drive interconnect board? It looks like a different size than your optical drive cable adapter. I'd like to keep my optical drive but attach a 3.5 inch SATA drive externally.
crwdns2936937:0bcccrwdne2936937:0
Would it be possible to remove the internal hard drive altogether, attach cables to the hard drive interconnect board and run them out the bottom of the mini to an external 3.5 inch 1TB SATA drive? Do you know of a cable adapter that would plug into the hard drive interconnect board? It looks like a different size than your optical drive cable adapter. I'd like to keep my optical drive but attach a 3.5 inch SATA drive externally.
There certainly wouldn't be any easy way to do this. The hard drive connector is a standard SATA connection, but getting the cable out of the mini would be very challenging. The new mini does have a Firewire 800 port, so that's probably your best bet for fast external storage.
-
-
-
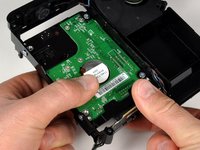
Secure the thermal sensor to the new hard drive. The original adhesive on the back of the thermal sensor should hold the sensor in place.
-
Reuse the black tape from the old drive to secure the thermal sensor wire to the new drive.
-
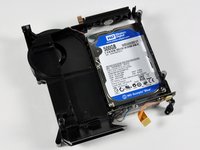
Your newly-installed drive should look very similar to the third picture.
-
-
-
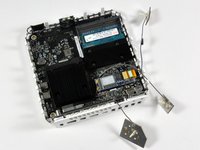
Flip over the internal framework with the newly attached drive. It should look like the first picture
-
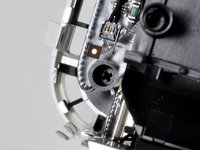
Prepare the bottom housing for connection with the internal framework by connecting the antenna cables to the Broadcom AirPort card as shown
-
Arranging the antennas as pictured will ensure a smooth connection of the two large components
-
When setting the internal framework into the bottom housing, make sure the male connector on the interconnect board finds its way into the female connector on the logic board
-
-
-
Snap the antenna boards back into their respective posts.
-
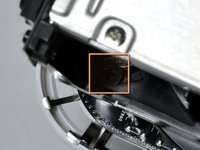
Tape the upper right antenna cable to the side of the internal framework (circled in green).
-
Route the bottom left antenna cable through the guides on the internal framework (marked in yellow).
-
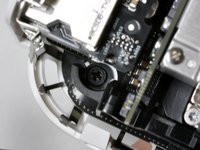
Connect the orange ribbon cable from the interconnect board to the sound card (indicated in red).
-
-
-
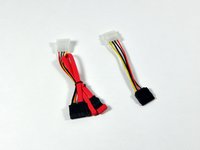
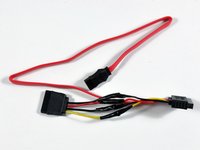
To connect the new hard drive, we need to modify some cables.
-
The hard drive has a standard 15 pin SATA power connection, but the logic board has a 6 pin slim SATA power connection. A cable to connect them doesn't exist (yet), so we're going to make one.
-
The two cables you need are:
-
15 pin Female SATA power to 4 pin Male Molex power.
-
13 pin Male Slimline SATA to 7 pin Female SATA / 4 pin Male Molex power.
-
Cut the white Molex connectors off both cables. The excess cable has to fit inside the mini, so just leave 3-4" on each cable.
have you tried approaching some cable vendors and seeing if they will do you a custom job? all it seems to require is a slightly unusual combination of standard connectors so I'd imgaine it should be doable in moderate volume.
crwdns2936937:0plugwashcrwdne2936937:0
have you tried approaching some cable vendors and seeing if they will do you a custom job? all it seems to require is a slightly unusual combination of standard connectors so I'd imgaine it should be doable in moderate volume.
We have approached some vendors in regard to a custom cable. However, the prices that vendors are asking makes the cables quite unattractive to buyers. The only way to offset this equation is to get a bunch more requests for the cables. This would enable us to order a much higher quantity and pass the savings on to the buyer.
My cable that i have bought only has two wires for the power. Black and red. Is this ok? Or does it need 4?
crwdns2936937:0dangerrrrcrwdne2936937:0
My cable that i have bought only has two wires for the power. Black and red. Is this ok? Or does it need 4?
You do not need four wires -- black and red should suffice.
crwdns2936937:0mirocrwdne2936937:0
We have approached some vendors in regard to a custom cable. However, the prices that vendors are asking makes the cables quite unattractive to buyers. The only way to offset this equation is to get a bunch more requests for the cables. This would enable us to order a much higher quantity and pass the savings on to the buyer.
Is this the type of cable being fabricated here?
http://kingwin.com/products/cate/accesso...
Thanks for the great "how-ya-do-it."
So if I were only upgrading to the 500 GB hard drive and not going for the 1 TB I could stop at step 16 and just reassemble?
Does anyone know of a part number for the cable in the UK? Cannot source on anywhere over here!
crwdns2936937:0Miroslav Djuriccrwdne2936937:0
We have approached some vendors in regard to a custom cable. However, the prices that vendors are asking makes the cables quite unattractive to buyers. The only way to offset this equation is to get a bunch more requests for the cables. This would enable us to order a much higher quantity and pass the savings on to the buyer.
This guide is great -- but now a bit old by internet standards. Is there still no 15 pin standard SATA to 6-pin slim SATA adapter available today? If someone has spied one, product # and/or links to vendors would be super!
A more expensive but more elegant solution which is likely known by many laptop owners:
http://newmodeus.com/shop/index.php?main...
The insert is a perfect fit after you remove the unneeded front bezel. The model linked above accommodates 2.5" laptop drives up to 12.7mm tall.
I thank a helpful member of the forums at 123macmini.com for this tip. I'm not affiliated w/ the vendor but am happily using their product.
For the 6 to 4 connector, I ordered this from newegg:
http://www.newegg.com/Product/Product.as...
Now I've noticed that it doesn't have the four wires shown - red, yellow, and two black - but just one red and one black.
Can I still use this somehow?
Thanks!
Nevermind! Read above! :0
crwdns2936937:0toosimplecrwdne2936937:0
A more expensive but more elegant solution which is likely known by many laptop owners:
http://newmodeus.com/shop/index.php?main...
The insert is a perfect fit after you remove the unneeded front bezel. The model linked above accommodates 2.5" laptop drives up to 12.7mm tall.
I thank a helpful member of the forums at 123macmini.com for this tip. I'm not affiliated w/ the vendor but am happily using their product.
I purchased this bay/carrier and just installed it into the Mini. It was a perfect fit and such an easy install. Thanks toosimple for the tip!!!!
crwdns2936937:0jrmonlinecrwdne2936937:0
I purchased this bay/carrier and just installed it into the Mini. It was a perfect fit and such an easy install. Thanks toosimple for the tip!!!!
This solution worked for me as well. I needed a way to secure the 2nd HD within the case because I'm going to ship my Mini for colocation.
crwdns2936937:0Miroslav Djuriccrwdne2936937:0
You do not need four wires -- black and red should suffice.
Can you recommend the type of connector that needs to connect to the riser board? I purchase a s15 pin Slim Line SATA power to 4 pin Molex power cable. The Molex only had black and red wires. The 15 pin connector forced me to do a lot of triming to make it fit. In the end, my drive got power, so I believe I need four wire Molex and a differnt slim line 15 pin connector.
-
-
-
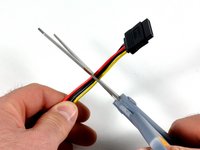
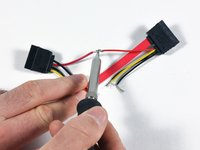
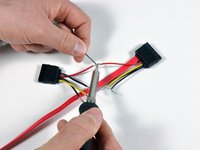
Strip half an inch of insulation from the end of each wire.
-
Connect each loose wire with the matching color wire on the other cable. Red-red, black-black, yellow-yellow, black-black.
-
To our knowledge, both black wires are ground, so just make sure you have black to black.
-
Tightly twist each pair of wires together.
-
-
-
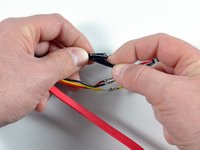
Solder each pair of wires together to make a solid connection.
-
See if you can make your cable look prettier than ours.
-
-
crwdns2935267:0crwdne2935267:0Heat Shrink Tubing Assortment$7.99
-
Wrap electrical tape around each connection so that they don't short out.
-
Voila! Instant cable. Well, maybe not instant. But it's going to work great!
Rather than using electrical tape a neater solution would be to use some heat shrink tubing. Just remember to slide it onto the cable before soldering.
In fact I would recommend that you add some heat shrink tubing to your 1TB kit!
since you don't need the shock protection you can try the same hd ST9500420AS instead and save some $
as someone already mentioned, using electrial tape is a bad idea, you should use heat shrink tubing. It's much cleaner, it doesn't make a mess, it lasts longer, and most of all it holds the cables together. The solder could be omitted entirely if the proper size tubing was used.
Using heat shrink tubing instead of electrical tape is definitely another way to go. However, we still suggest to solder the wires together -- we wouldn't trust the tubing to hold them in place.
Is this the type of cable being fabricated here?
http://kingwin.com/products/cate/accesso...
Thanks for the great "how-ya-do-it."
Well, I guess I will answer my own question -- NO. The combination SATA connector I linked to above is a "standard" size connector. What's needed is a "SlimSATA" connector common for DVD optical drives. :(
-
-
-
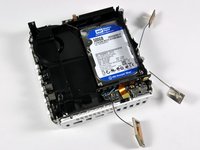
Another 500 gigs ready to go... Now it's just plug and play.
-
Plug in the full-size SATA connectors into the hard drive.
-
-
-
Attach the other end of your new cable to the logic board where the optical drive was connected.
-
Carefully wrap up the extra cable and store it to the side of the hard drive.
Looking at a friend's Mini today. With careful planning, there seems to be *just* enough room left to squeeze in an additional 1.8" drive+usb adapter -- the hard part is *how to route the USB cable*, since in this instance it needs to ran outside the case and plugged into one of the ports on the back. Not really a *good* idea, and it wouldn't look very neat with a cable hanging out and plugged into the back - but there *is* room left over. Rather than a 1.8" drive, maybe a CF card+adapter (keep the system files on CF? dunno. If I had a mini, *I* would try it.)
is the second drive just loose in the case or is it mounted somehow (and if so how?)
I wonder the same thing as plugwash. This angle isn't very good. Could you provide a description as to how you secured the new secondary drive?
Thanks!
The drive is not held in place by any brackets. The mini's case, internal frame, and extra wiring prevent the second drive from moving around.
I believe that you can get caddies which are the same size as an optical drive for easy swap-out.
I'm looking into putting one in my macbook pro, haven't had a disk through that slot since January.
crwdns2936937:0bishopdantecrwdne2936937:0
I believe that you can get caddies which are the same size as an optical drive for easy swap-out.
I'm looking into putting one in my macbook pro, haven't had a disk through that slot since January.
Just don't trust loose parts rattling around in anything that spends time on the road.
Where is the OS installation step?
Wouldn't this adding of an extra HDD also work for the older mini ?? (A1176)
Connector looks the same...
Thx in advance!
Guido
-
-
-
Put the upper case back on!
-
You'll feel the tabs 'snick' to secure the case once you get it all the way down. If the tabs don't engage, check to make sure nothing is sticking out and blocking the case (you don't want to crush your new hard drive).
-
-
-
Time Machine just works!
-
It recognizes the new drive immediately. Always-on, no-hassle, no-cable backups. Who could ask for anything more?
-
-
-
The one drawback to this hack is that we removed the optical drive. Fortunately, Apple's provided an easy solution, thanks to the MacBook Air.
-
You can use Remote Disc to share the optical drive of a nearby Mac or PC.
-
Remote Disc is not activated on the mini, but fortunately turning it on is simple. Just type the following two commands in Terminal:
-
defaults write com.apple.NetworkBrowser EnableODiskBrowsing -bool true
-
defaults write com.apple.NetworkBrowser ODSSupported -bool true
-
Restart, and you're all set.
I was wondering I have a 24" 2.8 Ghz iMac and have an 20X Iomega Super DVD external drive can I type in those commands so the the OS se the second Drive as a secondary Bootable drive? I used your sites info to put a 500GB 7200 RPM HD in my New 15" Macbook Pro and it works great... I now have a 250GB External Drive> I cannot wait when they come out with a TB 2.5" HD. I may look into getting a 512GB SSD drive if the prices go down LOL... Great Site will check back later thanks again Kristyanna
An issue I don't see getting discussed here is SATA 1.5 vs. SATA 3.0.
Is the mini still using the ICH7-M AHCI which is SATA 1.5 (according to a spec I have)?
Apparently some SATA 3.0 drives will auto-switch to 1.5 -- but it's more reliable for heavy data transfer to set it manually (with jumpers or software config app depending on the drive maker).
You could get the macbook air USB optical drive too. It has the same length and width as the mini, so it should look fine sitting on top or below it.
Would it be possible to find an external USB case for the removed Superdrive so that I can still use it on the rare occasions that i need it?
-
-
-
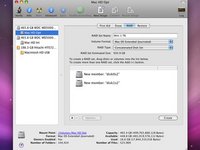
If you're like us and Time Machine just isn't enough, you can RAID the two drives together to make a single 1 TB drive.
-
Instructions are elsewhere online to do this, but the basic steps are:
-
Back any data up, then boot off a different startup disc.
-
Format both drives as Mac OS Extended.
-
Create a new 'RAID set', and add both drives to it. You can choose 'Concatenated Set', mirrored RAID 1, or striped RAID 0.
-
After you create the drive array, you can copy an OS onto it from a backup (as we did), or you can install OS X from scratch.
Warning: combining the drive capacities means that if either drive develops a problem, you will lose all the data from both drives (they become mutually dependent when concatenated or striped).
crwdns2936937:0douglasgbcrwdne2936937:0
Warning: combining the drive capacities means that if either drive develops a problem, you will lose all the data from both drives (they become mutually dependent when concatenated or striped).
You're correct. I think the time machine option is more sane, but two striped drives is going to be significantly faster (and of course less reliable).
Is RAID 0 configuration roughly equivalent to halving the access times (read and Write) to one drive on it's own?
Has anyone else used RAID 0 here? Is there a noticeable performance difference with the RAID 0 setup as opposed to a just a single 7200rpm drive?
Yes, There is. You gain a boost of speed equal to that of your native speed.
-
-
-
There you have it: 930 GB of usable space!
-
Why are we 70 GB short? It depends on how you define a terabyte.
-


To reassemble your device, follow these instructions in reverse order.
To reassemble your device, follow these instructions in reverse order.
crwdns2935221:0crwdne2935221:0
crwdns2935229:021crwdne2935229:0

crwdns2947412:03crwdne2947412:0
Perfect Cable Found:
Http://www.microsatacables.com
Search for this item:
This is the standard 22 pin Female SATA connector to a 13 pin Slimline SATA Male connector.
Item # ADPC22PFWV13PM
It's $7.75 and is a perfect fit. With this cable, the difficulty of this endeavor goes down to "just a little" :-)
It completely eliminates steps 17 to 20
I just replaced my hand soldered adventurous one with the one above and that's a clean and reliable solution.
Enjoy the 2 drives in the mini.
-Jo.
Dear friends, it is necessary that they are of different RPM HDD, my question is if I can use both disks of equal speed???
It's necessary to use the same drive of your going to RAID it. At least in size, not sure about speed.
Does anyone know if the SATA controller supports port multiplication?
asjogren - crwdns2934203:0crwdne2934203:0
Isn't this hack available for previous minis? I've got the mini mid-2007, 2.0GHz. Thanks!
andresskl - crwdns2934203:0crwdne2934203:0
I don't think so because the previous minis the optical drive and the hard drive did differ in the interface. One had Parallel ATA and one had SATA. But if you find a matching harddrive with the right conection type you might still succeed.
andreas7 - crwdns2934203:0crwdne2934203:0
Earlier minis use an IDE cd drive. This raises 2 issues.
Firstly i'm not aware of anyone who makes an adaptor/cable from the slimline IDE CD connector in the mini to a hard drive (there are plenty of adaptors for connecting a slimine IDE CD drive to a normal IDE cable but i've never seen one going the other way). Making a custom adaptor would be a major PITA (you would probablly have to get a custom pcb made).
Secondly 2.5 inch IDE hard drives seem to top out at 250G so the maximum you could get in such a mini would be 750G (500GB sata in place of the original hard drive and 250GB IDE in place of the CD drive).
plugwash - crwdns2934203:0crwdne2934203:0
The largest storage of 2.5" IDE HDD is 320G.
JerryTsai -
Help! Is it possible to put in a 1 TB Sata Drive instead of two 500GB drives?
waypts - crwdns2934203:0crwdne2934203:0
It's a notebook hard drive, and the largest drives currently available are 500 GB. Eventually they'll make notebook drives with that much capacity.
Kyle Wiens - crwdns2934203:0crwdne2934203:0
Would it be possible to connect a 3.5" internal 1TB SATA drive and just leave the case open (since it won't fit inside like a notebook drive would)?
macthemike - crwdns2934203:0crwdne2934203:0
Sorry, but WD is shipping 750GB and 1TB 2.5" drives now. And I think Toshiba has a 640GB 2.5" drive as well (19SEP09)
cjc1959au - crwdns2934203:0crwdne2934203:0
Anyone else try this recently?
Thinking of giving it a shot on my late 2009 2.53.
Brian Mandell - crwdns2934203:0crwdne2934203:0
I'm awaiting the slim- to regular-SATA cables (from Amazon) to do my late '09 2.53. Have a WD 640GD installed and am replacing the optical drive w/ an OCZ SSD. Follow a print version of the instructions while doing it and you'll be fine.
toosimple - crwdns2934203:0crwdne2934203:0
Cool - thanks.
SSD is a great idea!
At first the directions looked pretty hairy, but now it is just too tempting not too. Surprised that newegg didn't have the slim power sata cable in stock, so Amazon it is.
Brian Mandell - crwdns2934203:0crwdne2934203:0
Would someone please post a link to where I can purchase the 6 pin SATA power to 4 pin Molex power cable? I've been searching for it, but can't find it anywhere. Thanks.
mosburger - crwdns2934203:0crwdne2934203:0
Ugh. Just soldered it together, only to realize my cable has a slimline SATA *female* instead of male.
Brian Mandell - crwdns2934203:0crwdne2934203:0
Any chance you guys can post a link to the slim line version please? Thanks
Andy Denis - crwdns2934203:0crwdne2934203:0
Yikes! Can't seem to find it all! The key is that you need molex / slim sata MALE. Newegg and amazon have the female version, which will not work, but the male version seems to have vanished! Especially off of newegg - i can swear it was there two weeks ago but now it's not even listed.
Thoughts from the ifixit staff?
Brian Mandell - crwdns2934203:0crwdne2934203:0
For instance, to all aspiring mini customizers, this is NOT the correct cable, and will not work:
http://www.newegg.ca/Product/Product.asp...
Brian Mandell - crwdns2934203:0crwdne2934203:0
I can't find this cable, not one to be found. And here I sit with my Mini torn apart. Has anyone been able to locate one or do they have another suggestion?
Robin Moore - crwdns2934203:0crwdne2934203:0
This solution is mentioned later on in the discussion for this guide and I decided to go this route since I needed something that would physically secure the 2nd HD in the case. It is a more expensive than going the cable route, but is very easy to install.
http://newmodeus.com/shop/index.php?main...
mosburger - crwdns2934203:0crwdne2934203:0
I wonder whether it is better to add 2 x 2.5" drives or 1 big 2.5" drives or maybe this:
http://www.macintouch.com/specialreports...
Does anybody know whether it is possible simply to install this drive in the mini please?
http://www.wdc.com/en/products/Products....
Any thoughts please?
Thanks
Rich
cregy - crwdns2934203:0crwdne2934203:0
hi, i have a HD Toshiba with 650 gb; i want to replace that, with a SSD WD 120gb, and put the old HD on the superdrive space. The point is install the osx and soft on the SSD , and data (photo, and pdf… im student) on the old HD… its possible? thanks! Esteban
Esteban Gonzalez - crwdns2934203:0crwdne2934203:0