crwdns2915892:0crwdne2915892:0
Upgrade your hard drive for more storage capacity.
crwdns2942213:0crwdne2942213:0
crwdns2936621:0crwdne2936621:0
-
-
Power down your Mac mini, disconnect all of the cables, and flip it over.
-
Insert the Jimmy into the crack between the aluminum top housing and the plastic lower housing.
-
The Jimmy should reach a stop about 3/8" down.
 crwdns2952109:0crwdne2952109:0
-
-
-
Gently bend the Jimmy outwards to pry the crack open a little larger and lift the lower housing up a small amount.
-
-
-
Once you have the first side free, rotate the Mac mini and start prying up on the front edge.
-
Use the same prying motion to both bend the clips inward and lift the lower housing up out of the top housing.
-
-
-
You may need to move the Jimmy along the edge to pry up all of the clips. Be patient and do a little bit at a time.
-
-
-
Keep working around the perimeter, freeing the clips along the final edge.
-
-
-
Flip the Mac mini back over and lift the top housing off of the lower housing.
-
-
-
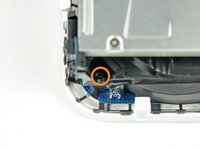
Slightly squeeze the two retaining arms toward each other and lift the AirPort antenna off its post.
-
-
-
-
Use the tip of a spudger to slightly lift the left side of the ZIF cable lock up from its socket.
-
-
-
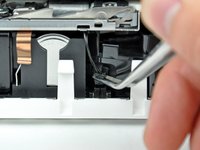
Lift the audio board ribbon cable up out of its socket.
-
-
crwdns2935267:0crwdne2935267:0Tweezers$4.99
-
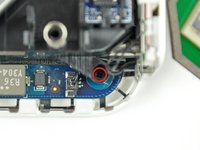
Use a pair of tweezers to lift the hard drive thermal sensor cable connector up off its socket on the logic board.
-
-
-
Remove the recessed Phillips screw near the power button securing the internal frame to the bottom housing.
-
-
-
Remove the recessed Phillips screw near the sleep light securing the internal frame to the bottom housing.
-
-
-
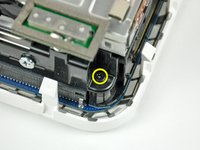
Remove the Phillips screw from the internal frame near the Bluetooth antenna.
-
-
-
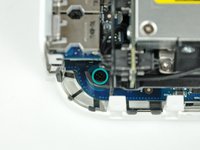
Remove the Phillips screw near the audio ports securing the internal frame to the bottom case.
-
-
-
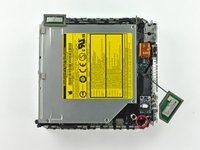
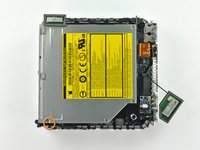
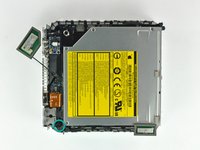
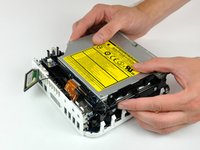
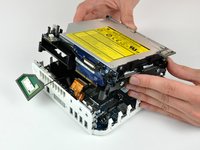
Gently lift the internal frame up from the bottom housing, minding the AirPort antenna and any other cables that may get caught.
-
-
-
Remove the two Phillips screws securing the side of the hard drive to the internal frame.
-
-
-
Remove the two Phillips screws securing the bottom of the hard drive to the internal frame.
-
-
-
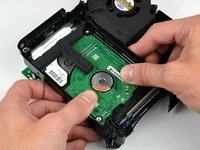
Use your thumbs to slide the hard drive toward the speaker, disconnecting it from the interconnect board.
-
-
-
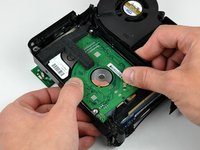
Maneuver the hard drive out of the internal frame.
-


To reassemble your device, follow these instructions in reverse order.
crwdns2935221:0crwdne2935221:0
crwdns2935229:0548crwdne2935229:0

crwdns2947412:017crwdne2947412:0
The foam on the harddrive is attached with an adhesive tape - be careful to peel up the tape from the harddrive, rather than the foam from the tape.
robert - crwdns2934203:0crwdne2934203:0 crwdns2950251:0crwdne2950251:0
I seemed to succeed - until I discovered my optical drive had broken. Disks do not mount, after some tries they eject. There was a LOT of dust inside my Mini, I think some got in the optical drive. A cleaning DVD and compressed gas didn't fix it. I wonder if it would be wise to seal the opening to the optical drive -- certainly before cleaning.
This was a failure for me, even though the memory and drive change went well.
John Faughnan - crwdns2934203:0crwdne2934203:0 crwdns2950251:0crwdne2950251:0
Can't fault this guide.
* if you don't have a putty knife & you don't mind some scratches, a thin butter knife will do the trick for getting the case off.
*if you plan to replace hdd with an ssd - you may need to rejig some of the internal wires that run around the edges of the hdd/ssd: after I installed the ssd, and returned the wires to the tight track around the side and socket port end of the ssd, and turned the machine back on, there was a high pitch interference noises coming out the internal speaker every time the drive was active.
The solution: make sure the speaker wire isn't where it's *supposed* to be! There are three sets of wires, include the speaker pair. I reversed the positioning of these with respect to the SSD, i.e. I moved the speaker pair to be furthest away from the SSD, and *didn't* tuck them back in under the plastic lip beside the ssd connector port. I turned it back on, and no more high frequency whining whenever the drive is active
Rodders - crwdns2934203:0crwdne2934203:0 crwdns2950251:0crwdne2950251:0
I upgraded my 2007 A1176 Mac Mini with a 2 TB M9T drive that I broke out of Seagate Backup Plus Ext. HD and increased my RAM from 2 GB to 3 GB! Success!
Toshi Tazawa - crwdns2934203:0crwdne2934203:0 crwdns2950251:0crwdne2950251:0
Be very careful with the audio cable removal the ZIF cable lock is VERY DELICATE!!!
Matt Canepa Jo Canales - crwdns2934203:0crwdne2934203:0 crwdns2950251:0crwdne2950251:0