crwdns2915892:0crwdne2915892:0
Use this guide to replace the bottom cover in your Mac mini (2024).
crwdns2942213:0crwdne2942213:0
-
-
Fully shut down your Mac mini and unplug all cables from it.
-
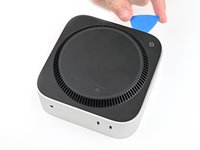
Flip over your Mac mini and place it on a clean, flat surface to avoid scratching the chassis.
-
-
-
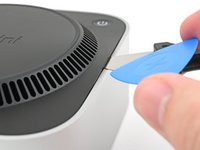
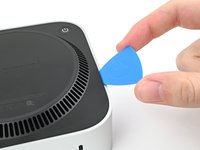
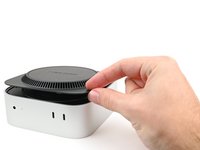
Insert a Jimmy into the gap between the bottom cover and the chassis.
-
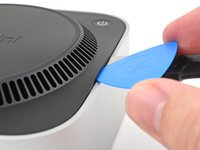
Pry up the bottom cover to create a gap.
-
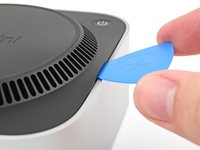
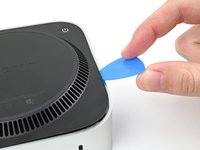
Keep the Jimmy inserted under the bottom cover.
It is much easier to get the plastic "pick" under the cover by inserting it UNDER the metal blade (between the blade and the aluminum case) while the blade is more vertical, then bringing the blade down on top of the pick, forcing the fan cover edge up higher. From that position, the pick can easily be pushed in further under the cover and to one side. In other words, instead of putting the pick in OVER the metal blade as shown, put it UNDER. This also protects the aluminum from damage marks of the blade.
-
-
-
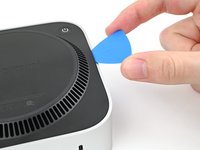
Insert an opening pick into the gap created by the Jimmy.
-
Remove the Jimmy.
-
-
-
-
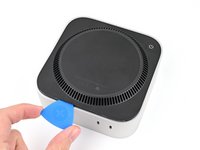
Slide the opening pick along the bottom cover until you feel it snag on a pin.
-
Twist the pick to lift the pin out of its slot.
-
-
-
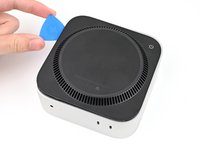
Continue sliding and prying with the pick along the perimeter of the bottom cover to release the remaining pins.
"Don't insert the pick more than an inch near the power button" is incorrect wording.
I think you mean "Don't insert the pick less than an inch from the power button".
Hi David!
For that warning, it's about not inserting the pick too deep under the bottom cover that you risk hitting the cable as you work around the perimeter. The wording is confusing though, so I'll change it!
-
-
-
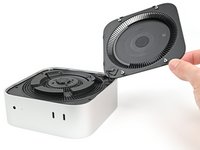
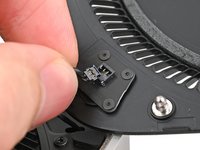
Lift the edge of the bottom cover opposite the power button and flip it over to expose the power button cable.
There are three electrical connectors in this disassembly operation. Having experienced the fragility of these connectors on previous macs, I chose to NOT DISCONNECT any of them, and it actually SAVES TIME fiddling with them.
IT IS NOT ESSENTIAL to disconnect ANY of these connectors. And it is safer, particularly if you are not experienced. Just take your time and be gentle moving the cover and fan out of the way and resting to the side to get to the SSD screw. It REALLY IS UNNECESSARY TO DISCONNECT ANY CONNECTORS. -
-
-
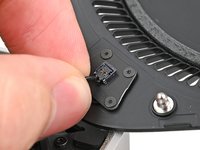
Grip the power button cable close to the head and pull it away from its socket to disconnect it.
It's not necessary to remove the power connector and remove the bottom cover (the next step), just flip it over gently to take out the 3 screws underneath (in Step 9).
Skip this step, really fragile connector
it tore open immediately. DO NOT TRY THIS.
Nicht notwenig man kann den Bodenteil einfach "überlegen"
Change these instructions, I also damaged my connector.
This one is different from other connectors, pull up, not along the length of the cable.Or even better just move it aside or use the 4 Torx to remove it.
How did you fix the connector afterwards? I‘ve the same problem. I broke the connector…
Christof -
Please change these instructions I just ripped the cable out before reading the comments
And one more connector just died!
Sorry, what do you do if the connector pulls apart? Utterly evil design. This step needs a rewrite and a serious warning on it!!!!!
Achtung, den Connector auf keinen Fall lösen. Bei mir ging dieser kaputt - hoffe, ich kann ihn noch reparieren!
another wrecked connector come on fix it change this step
Broke mine as well. DON'T DO THIS STEP!!!!!!!!!!!!!!!!!!!!!
The 13 comments on this step should've tipped me off, but alas, another one bites the dust. On the bright side, I can see this as a grand opportunity to DIY my own power button and glue it onto a sensible place instead of the underside like a psychopath lol
I didn't see the comments at first... was consternated about the direction "...pull it away from it's connector", which isn't clear. As others have said: don't pull it sideways/along the wire, lift it upward, towards your face. Like a Lego block. I was lucky - I didn't break my connector, but was using a small tool to lightly help pry it up.
Another broken connector! Really bad instruction.
Hätte ich nur die Kommentare gelesen! One more broken connector...
-
-
-
Remove the bottom cover.
The power button is better to be completely unscrewed then to pull at the connector as it shattered in a 8th of a second.
-


To reassemble your device, follow these instructions in reverse order.
Repair didn’t go as planned? Try some basic troubleshooting, or ask our Mac mini (2024) Answers Community for help.
To reassemble your device, follow these instructions in reverse order.
Repair didn’t go as planned? Try some basic troubleshooting, or ask our Mac mini (2024) Answers Community for help.
crwdns2935221:0crwdne2935221:0
crwdns2935229:03crwdne2935229:0


crwdns2947412:03crwdne2947412:0
I ripped the crimps off of my power cable because I was pulling out instead of up. Is a new power button cable available for sale somewhere?
@alexdk I created a draft update to the guide with some text with an easier way to open this without potentially marring the aluminum with the Jimmy.
Can you take a look and maybe reword it and give it a test yourself using just a pair of normal spudgers, one in a vent slot to gently lift the edge and one to pry close to the "pins" next to the edge alignment plastic clips (which is a misnomer because they are only for alignment and don't clip anything, only the pins hold things together)?
You can always determine the correct orientation to pry near the pins because they are on the "ends" of the mac mini text, aka left and right as you are reading the words.
Hello!
Thank you for the suggestions! I tried out the double spudger technique, and it worked somewhat well. I had to really dig the tip of a spudger into the vent, which will have varying mileage for people with dull tips. It was also difficult to get a good enough angle so I could pry up on the edge of the Mac Mini without holding it down with another hand. With that said, I'll incorporate it as alternative procedure for people who want to avoid marring the aluminum (because you're 100% right it will probably happen). I'll make that clear.
Den Mac vorm ausschalten noch vom Account trennen. Sonst kann es zu Schwierigkeiten bei der Neuanmeldung kommen.
MacGyverModeOn - crwdns2934203:0crwdne2934203:0