crwdns2933423:0crwdne2933423:0

Mac Pro Late 2013 Power Supply Replacement

crwdns2942213:0crwdne2942213:0

  1. Mac Pro Late 2013 Power Supply Replacement, Outer Case: crwdns2935265:01crwdnd2935265:01crwdnd2935265:02crwdne2935265:0 Mac Pro Late 2013 Power Supply Replacement, Outer Case: crwdns2935265:01crwdnd2935265:02crwdnd2935265:02crwdne2935265:0
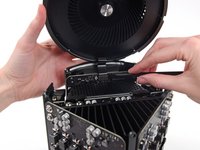
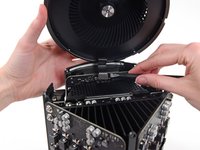
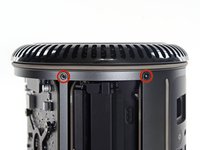
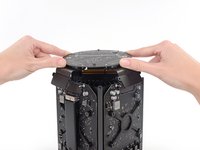
    • Slide the lock switch to the right, to the unlocked position.

  2. Mac Pro Late 2013 Power Supply Replacement: crwdns2935265:02crwdnd2935265:01crwdnd2935265:03crwdne2935265:0 Mac Pro Late 2013 Power Supply Replacement: crwdns2935265:02crwdnd2935265:02crwdnd2935265:03crwdne2935265:0 Mac Pro Late 2013 Power Supply Replacement: crwdns2935265:02crwdnd2935265:03crwdnd2935265:03crwdne2935265:0
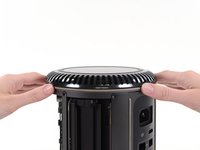
    • Lift the outer case straight up off the Mac Pro.

    • It may help to push down on the center of the fan while lifting the case up.

  3. Mac Pro Late 2013 Power Supply Replacement, Fan Assembly: crwdns2935265:03crwdnd2935265:01crwdnd2935265:03crwdne2935265:0 Mac Pro Late 2013 Power Supply Replacement, Fan Assembly: crwdns2935265:03crwdnd2935265:02crwdnd2935265:03crwdne2935265:0 Mac Pro Late 2013 Power Supply Replacement, Fan Assembly: crwdns2935265:03crwdnd2935265:03crwdnd2935265:03crwdne2935265:0
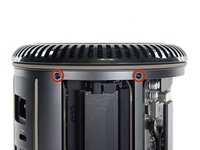
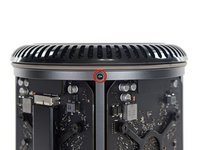
    • Remove five 5.1 mm T10 Torx screws from around the outer perimeter of the fan assembly.

  4. Mac Pro Late 2013 Power Supply Replacement: crwdns2935265:04crwdnd2935265:01crwdnd2935265:02crwdne2935265:0 Mac Pro Late 2013 Power Supply Replacement: crwdns2935265:04crwdnd2935265:02crwdnd2935265:02crwdne2935265:0
    • The fan assembly is attached to the rest of the computer by two cables on the IO board side.

    • Tilt the assembly up away from the IO board.

    • Do not try to remove the fan assembly yet, as it is still attached by two cables.

  5. Mac Pro Late 2013 Power Supply Replacement: crwdns2935265:05crwdnd2935265:01crwdnd2935265:01crwdne2935265:0
    • While supporting the fan assembly with one hand, loosen the two T8 captive screws in the fan cable bracket.

    • These screws are captive in the Mac Pro. Do not try to remove these screws from your Mac Pro.

  6. Mac Pro Late 2013 Power Supply Replacement: crwdns2935265:06crwdnd2935265:01crwdnd2935265:01crwdne2935265:0
    • Use a pair of tweezers to pull the fan cable bracket away from the fan assembly.

  7. Mac Pro Late 2013 Power Supply Replacement: crwdns2935265:07crwdnd2935265:01crwdnd2935265:02crwdne2935265:0 Mac Pro Late 2013 Power Supply Replacement: crwdns2935265:07crwdnd2935265:02crwdnd2935265:02crwdne2935265:0
    • Use the flat end of a spudger to disconnect the fan assembly ribbon cable from the IO board.

  8. Mac Pro Late 2013 Power Supply Replacement: crwdns2935265:08crwdnd2935265:01crwdnd2935265:01crwdne2935265:0
    • Disconnect the fan assembly antenna cable from the IO board.

    • Remove the fan assembly from the Mac Pro.

  9. Mac Pro Late 2013 Power Supply Replacement, Lower Case: crwdns2935265:09crwdnd2935265:01crwdnd2935265:03crwdne2935265:0 Mac Pro Late 2013 Power Supply Replacement, Lower Case: crwdns2935265:09crwdnd2935265:02crwdnd2935265:03crwdne2935265:0 Mac Pro Late 2013 Power Supply Replacement, Lower Case: crwdns2935265:09crwdnd2935265:03crwdnd2935265:03crwdne2935265:0
    • Flip the Mac Pro upside down, 180 degrees.

    • Remove five 5.1 mm T10 Torx screws from the outer perimeter of the lower case.

  10. Mac Pro Late 2013 Power Supply Replacement: crwdns2935265:010crwdnd2935265:01crwdnd2935265:02crwdne2935265:0 Mac Pro Late 2013 Power Supply Replacement: crwdns2935265:010crwdnd2935265:02crwdnd2935265:02crwdne2935265:0
    • Carefully lift the lower case up and remove it from the Mac Pro.

  11. Mac Pro Late 2013 Power Supply Replacement, Interconnect Board: crwdns2935265:011crwdnd2935265:01crwdnd2935265:02crwdne2935265:0 Mac Pro Late 2013 Power Supply Replacement, Interconnect Board: crwdns2935265:011crwdnd2935265:02crwdnd2935265:02crwdne2935265:0
    • Use the flat end of a spudger and a twisting motion to gently separate one side of the graphics card data connection.

  12. Mac Pro Late 2013 Power Supply Replacement: crwdns2935265:012crwdnd2935265:01crwdnd2935265:03crwdne2935265:0 Mac Pro Late 2013 Power Supply Replacement: crwdns2935265:012crwdnd2935265:02crwdnd2935265:03crwdne2935265:0 Mac Pro Late 2013 Power Supply Replacement: crwdns2935265:012crwdnd2935265:03crwdnd2935265:03crwdne2935265:0
    • Gently separate the other side as well.

    • Flip the connector up and out of the way of the graphics card.

    • Repeat this procedure on the other graphics card.

  13. Mac Pro Late 2013 Power Supply Replacement: crwdns2935265:013crwdnd2935265:01crwdnd2935265:01crwdne2935265:0
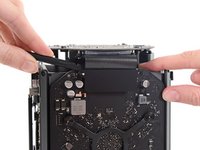
    • Remove the two 6.0 mm T8 Torx screws securing the interconnect board to the heat sink.

  14. Mac Pro Late 2013 Power Supply Replacement: crwdns2935265:014crwdnd2935265:01crwdnd2935265:03crwdne2935265:0 Mac Pro Late 2013 Power Supply Replacement: crwdns2935265:014crwdnd2935265:02crwdnd2935265:03crwdne2935265:0 Mac Pro Late 2013 Power Supply Replacement: crwdns2935265:014crwdnd2935265:03crwdnd2935265:03crwdne2935265:0
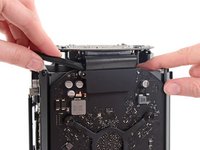
    • Gently walk the interconnect board straight up off the logic board's slot connection.

    • It is recommended to lift one side and then the other.

    • Do not try to remove the interconnect board from the Mac Pro yet, as it is still connected to the IO board.

  15. Mac Pro Late 2013 Power Supply Replacement: crwdns2935265:015crwdnd2935265:01crwdnd2935265:02crwdne2935265:0 Mac Pro Late 2013 Power Supply Replacement: crwdns2935265:015crwdnd2935265:02crwdnd2935265:02crwdne2935265:0
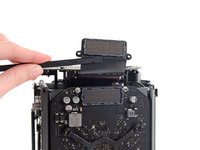
    • Flip the interconnect board up and over, exposing the IO board data cable.

    • Use the same sort of twisting and spreading motion with the flat end of a spudger to separate one side of the IO board data cable.

  16. Mac Pro Late 2013 Power Supply Replacement: crwdns2935265:016crwdnd2935265:01crwdnd2935265:02crwdne2935265:0 Mac Pro Late 2013 Power Supply Replacement: crwdns2935265:016crwdnd2935265:02crwdnd2935265:02crwdne2935265:0
    • Use the flat end of a spudger to separate the other side of the IO board data cable.

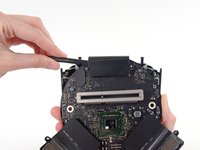
    • Bend the cable out of the way and remove the interconnect board from the Mac Pro.

  17. Mac Pro Late 2013 Power Supply Replacement, Power Supply Assembly: crwdns2935265:017crwdnd2935265:01crwdnd2935265:01crwdne2935265:0
    • Flip the Mac Pro back over and set it gently on a flat surface.

    • We recommend laying the Mac Pro on the corner of the heat sink and the two standoff screw posts that attach to the interconnect board.

  18. Mac Pro Late 2013 Power Supply Replacement: crwdns2935265:018crwdnd2935265:01crwdnd2935265:02crwdne2935265:0 Mac Pro Late 2013 Power Supply Replacement: crwdns2935265:018crwdnd2935265:02crwdnd2935265:02crwdne2935265:0
    • Remove the two 3.6 mm T5 Torx screws from the sides of the power supply cage (one on each side).

  19. Mac Pro Late 2013 Power Supply Replacement: crwdns2935265:019crwdnd2935265:01crwdnd2935265:01crwdne2935265:0
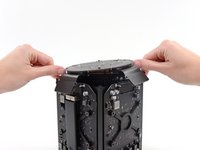
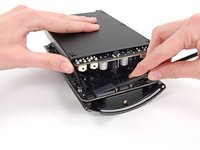
    • Remove the power supply cage from the top of the power supply.

    • By removing this cage, you are exposing internal components of the power supply. Be very careful not to touch any of the power supply components or circuitry.

    • Be careful not to drop any screws or tools into the power supply, as this may damage the power supply.

  20. Mac Pro Late 2013 Power Supply Replacement: crwdns2935265:020crwdnd2935265:01crwdnd2935265:01crwdne2935265:0
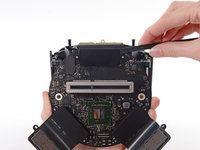
    • Remove the four 5.5 mm T8 Torx screws securing the power supply assembly to the Mac Pro.

  21. Mac Pro Late 2013 Power Supply Replacement: crwdns2935265:021crwdnd2935265:01crwdnd2935265:01crwdne2935265:0
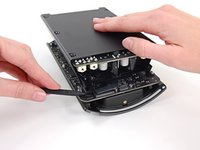
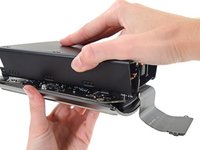
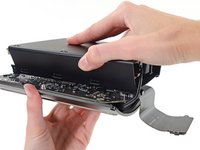
    • Remove the power supply assembly from the Mac Pro.

  22. Mac Pro Late 2013 Power Supply Replacement, Power Supply: crwdns2935265:022crwdnd2935265:01crwdnd2935265:03crwdne2935265:0 Mac Pro Late 2013 Power Supply Replacement, Power Supply: crwdns2935265:022crwdnd2935265:02crwdnd2935265:03crwdne2935265:0 Mac Pro Late 2013 Power Supply Replacement, Power Supply: crwdns2935265:022crwdnd2935265:03crwdnd2935265:03crwdne2935265:0
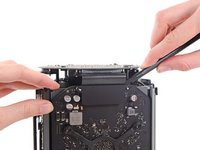
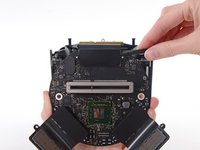
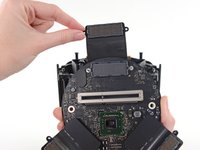
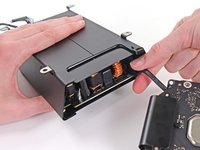
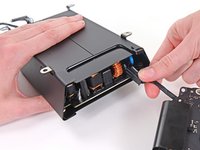
    • Use the flat end of a spudger to disconnect the power supply DC-Out connector from its socket on the IO board.

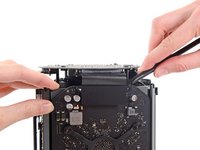
    • Use the tip of a spudger to disconnect the power supply data cable from its socket on the IO board.

    • For both cables, make sure to pry straight up on the connector, and not the socket.

  23. Mac Pro Late 2013 Power Supply Replacement: crwdns2935265:023crwdnd2935265:01crwdnd2935265:02crwdne2935265:0 Mac Pro Late 2013 Power Supply Replacement: crwdns2935265:023crwdnd2935265:02crwdnd2935265:02crwdne2935265:0
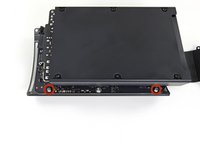
    • Remove the four 9.0 mm silver T10 Torx screws from the sides of the power supply.

    • The power supply overhangs these screws somewhat, so you'll need to use a fixed screwdriver at a bit of an angle.

  24. Mac Pro Late 2013 Power Supply Replacement: crwdns2935265:024crwdnd2935265:01crwdnd2935265:02crwdne2935265:0 Mac Pro Late 2013 Power Supply Replacement: crwdns2935265:024crwdnd2935265:02crwdnd2935265:02crwdne2935265:0
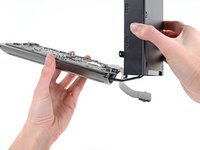
    • Gently shift the power supply to free the AC power inlet cable out of its plastic clip.

    • Be careful not to try to separate the power supply from the IO board assembly just yet, as it is still connected by the AC power inlet cable.

  25. Mac Pro Late 2013 Power Supply Replacement: crwdns2935265:025crwdnd2935265:01crwdnd2935265:02crwdne2935265:0 Mac Pro Late 2013 Power Supply Replacement: crwdns2935265:025crwdnd2935265:02crwdnd2935265:02crwdne2935265:0
    • Flip the power supply back to expose the AC power inlet cable.

  26. Mac Pro Late 2013 Power Supply Replacement: crwdns2935265:026crwdnd2935265:01crwdnd2935265:02crwdne2935265:0 Mac Pro Late 2013 Power Supply Replacement: crwdns2935265:026crwdnd2935265:02crwdnd2935265:02crwdne2935265:0
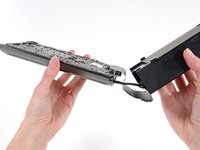
    • Squeeze the AC power inlet cable connector and pull it straight out of its socket in the power supply.

crwdns2915888:0crwdne2915888:0

To reassemble your device, follow these instructions in reverse order.

crwdns2935229:025crwdne2935229:0

Andrew Optimus Goldheart

crwdns2935283:010/17/09crwdne2935283:0

502.656 crwdns2915208:0crwdne2915208:0

crwdns2935297:0407crwdne2935297:0

crwdns2915084:0crwdne2915084:0

iFixit crwdns2935289:0iFixitcrwdne2935289:0

Staff

crwdns2931471:0135crwdne2931471:0

crwdns2935297:016.718crwdne2935297:0

crwdns2944067:07crwdne2944067:0

Hey so any advice on how to test the psu once it’s out to confirm it is in fact in need of replacement?

John Doe - crwdns2934203:0crwdne2934203:0

How do I purchase the Power Supply Module?

boinkboink - crwdns2934203:0crwdne2934203:0

how did you make out? i just took my old PSU out, I was testing myself because I didn’t think I could actually take it apart!!! anyway, now I need to buy a new one. any suggestions?

samuel culper -

Hi, please where can I buy the PSU ?

Michael Tasker -

crwdns2917038:0crwdne2917038:0

crwdns2936625:0crwdne2936625:0:

crwdns2936751:024crwdne2936751:0 6

crwdns2936753:07crwdne2936753:0 55

crwdns2936753:030crwdne2936753:0 272

crwdns2942667:0crwdne2942667:0 23,116