crwdns2933423:0crwdne2933423:0

Mac Pro First Generation Power Supply Unit Replacement

crwdns2942213:0crwdne2942213:0

  1. Mac Pro First Generation Power Supply Unit Replacement, Case Panel: crwdns2935265:01crwdnd2935265:01crwdnd2935265:01crwdne2935265:0
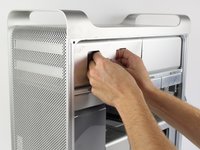
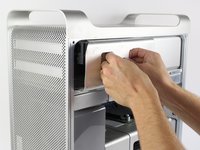
    • Lift the lever to unlock the case.

  2. Mac Pro First Generation Power Supply Unit Replacement: crwdns2935265:02crwdnd2935265:01crwdnd2935265:01crwdne2935265:0
    crwdns2935267:0crwdne2935267:0
    Anti-Static Wrist Strap
    $7.95
    crwdns2942207:0crwdne2942207:0
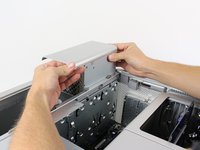
    • Remove the side panel of the Mac Pro.

    • Discharge any static electricity by touching a grounded surface prior to working on any internal components. Touching the metal PCI slot covers works great, or any other grounded metal surface. You can also wear a anti-static wrist strap.

  3. Mac Pro First Generation Power Supply Unit Replacement, Removing the Disk Drive: crwdns2935265:03crwdnd2935265:01crwdnd2935265:03crwdne2935265:0 Mac Pro First Generation Power Supply Unit Replacement, Removing the Disk Drive: crwdns2935265:03crwdnd2935265:02crwdnd2935265:03crwdne2935265:0 Mac Pro First Generation Power Supply Unit Replacement, Removing the Disk Drive: crwdns2935265:03crwdnd2935265:03crwdnd2935265:03crwdne2935265:0
    • The optical drive must be removed to access the power supply unit

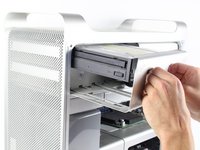
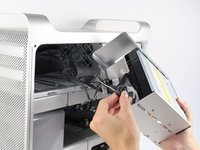
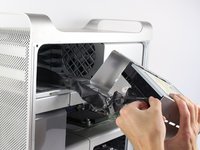
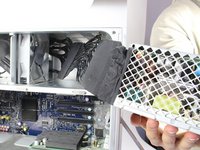
    • Firmly grasp the handles of the shown compartment and pull out firmly to remove the optical drive bay.

  4. Mac Pro First Generation Power Supply Unit Replacement, Unplugging the Disk Drive: crwdns2935265:04crwdnd2935265:01crwdnd2935265:02crwdne2935265:0 Mac Pro First Generation Power Supply Unit Replacement, Unplugging the Disk Drive: crwdns2935265:04crwdnd2935265:02crwdnd2935265:02crwdne2935265:0
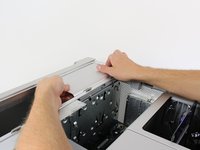
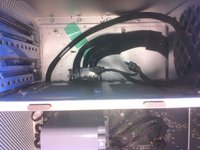
    • Firmly hold each of the two connectors and pull them out of their respective sockets.

  5. Mac Pro First Generation Power Supply Unit Replacement, Un-Mounting the Power Supply Unit: crwdns2935265:05crwdnd2935265:01crwdnd2935265:02crwdne2935265:0 Mac Pro First Generation Power Supply Unit Replacement, Un-Mounting the Power Supply Unit: crwdns2935265:05crwdnd2935265:02crwdnd2935265:02crwdne2935265:0
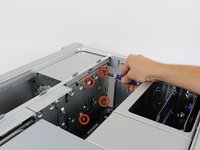
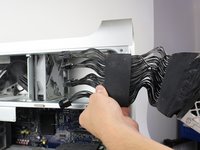
    • Remove the 4 marked 6-32 hex screws with a 2mm Phillips hex screwdriver.

    • There are a number of Phillips head screws underneath. These don't need to be removed to remove the power supply.

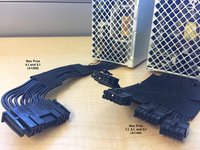
    • Note the different PSU for Mac Pro 1,1 through 3,1 versus Mac Pro 4,1 and 5,1.

  6. Mac Pro First Generation Power Supply Unit Replacement, Removing the Power Supply: crwdns2935265:06crwdnd2935265:01crwdnd2935265:03crwdne2935265:0 Mac Pro First Generation Power Supply Unit Replacement, Removing the Power Supply: crwdns2935265:06crwdnd2935265:02crwdnd2935265:03crwdne2935265:0 Mac Pro First Generation Power Supply Unit Replacement, Removing the Power Supply: crwdns2935265:06crwdnd2935265:03crwdnd2935265:03crwdne2935265:0
    • Be careful when pulling the power supply out, as it has several attached cables which don't have much slack.

    • Grip the handle on the left side of the power supply casing while gripping the right side of the power supply casing and pull upwards firmly to to take it out.

  7. Mac Pro First Generation Power Supply Unit Replacement, If power Supply only comes out a few Inches.: crwdns2935265:07crwdnd2935265:01crwdnd2935265:02crwdne2935265:0 Mac Pro First Generation Power Supply Unit Replacement, If power Supply only comes out a few Inches.: crwdns2935265:07crwdnd2935265:02crwdnd2935265:02crwdne2935265:0
    • For the Mac Pro (Early 2008/9), a.k.a. MacPro3,1 In the MacPro3,1, the power supply screws are 2.5mm hex, not T-10. Also, there is a cover plate behind the superdrive that has to be removed (2 phillips screws) to expose the power cable connections and those connectors must be detached and slid under fan before the power supply can be removed.

  8. Mac Pro First Generation Power Supply Unit Replacement, Disconnecting the Power Supply: crwdns2935265:08crwdnd2935265:01crwdnd2935265:02crwdne2935265:0 Mac Pro First Generation Power Supply Unit Replacement, Disconnecting the Power Supply: crwdns2935265:08crwdnd2935265:02crwdnd2935265:02crwdne2935265:0
    • Locate the four marked cables

    • Push down on the clip that is above each cable connector while firmly grasping each connector and pull each one back to remove each clip.

crwdns2915888:0crwdne2915888:0

To reassemble your device, follow these instructions in reverse order.

crwdns2935229:076crwdne2935229:0

Eric Kuhta

crwdns2935283:010/12/14crwdne2935283:0

1 201 crwdns2915208:0crwdne2915208:0

crwdns2935295:0crwdne2935295:0

crwdns2915084:0crwdne2915084:0

Cal Poly, Team 6-24, Maness Fall 2014 crwdns2935289:0Cal Poly, Team 6-24, Maness Fall 2014crwdne2935289:0

CPSU-MANESS-F14S6G24

crwdns2931471:04crwdne2931471:0

crwdns2935297:013crwdne2935297:0

crwdns2944067:023crwdne2944067:0

Hi

Very difficult to find the exact size of the bit for the screwdriver. And it is very tight to unscrew one of the screws.

Maybe I had spoiled the head of the screw.

What is the solution?

Thank you in advance.

Michel

Michel - crwdns2934203:0crwdne2934203:0

missing a very crucial step before step 6. if you don't remove the cover (where cd rom is) and unplug the PSU cable, you'll damage something.

for screws, 2.5mm didn't work for me, but i used a 3/32 hex with ball end, and at an angle, it will loosen screws.

Tino - crwdns2934203:0crwdne2934203:0

Doesn't work for a micron. Step 6 is impossible. Can't get the power supply out of its place more than a few centimeters. The side closest to the backplate of the casing can't come up only some millimeters, while also the fixed!! power cord is a serious obstruction.

Moreover there are nowhere cover plates left, so this is not a comparable situation as described in step 7.

Hugo Walg - crwdns2934203:0crwdne2934203:0

My last remark should be forgotten. The power cord has been connected to the Mac pro to give the impression that it's mounted fixedly to the power supply. But if you pull with very much force (an attempt of despair), it then again appears to be a 3-hole connector like is the case for common computers. If you don't know these systems, this is very treacherous.

Hugo Walg - crwdns2934203:0crwdne2934203:0

crwdns2917038:0crwdne2917038:0

crwdns2936625:0crwdne2936625:0:

crwdns2936751:024crwdne2936751:0 8

crwdns2936753:07crwdne2936753:0 47

crwdns2936753:030crwdne2936753:0 244

crwdns2942667:0crwdne2942667:0 80,759