crwdns2943259:0crwdnd2943259:0crwdnd2943259:0crwdnd2943259:0crwdne2943259:0
crwdns2915892:0crwdne2915892:0
适用本指南来更换硬盘。
crwdns2942213:0crwdne2942213:0
-
-
将您的拇指放在底盖的凹陷处。
-
逆时针旋转底盖,直到底盖上的白点与外壳上刻的环对准。
-
-
-
卸下天线板附近,把风扇固定在逻辑板上的两颗11.3 mm T6 Torx螺丝。
-
-
-
将风扇提升的足够到的高度来将连接器分离。
-
小心的将风扇排线连接器从逻辑板的插座中拔出。
-
移除风扇。
-
-
-
从散热器附近移除固定整流罩的一颗 3.5 mm T6 Torx螺丝。
-
-
-
-
卸下下列固定天线板的螺丝。
-
两颗6.6 mm T8 Torx 螺丝。
-
两颗5.0 mm T8 Torx螺丝或者2.0 mm Hex screws 任意一把螺丝刀都会起作用。
-
当装回的时候:
-
-
-
用尖锐的工具或者撬棒小心地将天线连接器从 AirPort /蓝牙板上的插座上撬开。
-
-
-
移除下列三颗螺丝。
-
一颗5.0 mm T8 Torx 或者 2.0 mm Hex screw
-
一颗16.2 mm T6 Torx screw
-
一颗26 mm T6 Torx 螺丝
-
-
-
将逻辑板拆卸工具插入标红的两个孔中。再继续进行下一步时请 确保,工具与逻辑板下的外壳顶部接触。
-
小心的将工具拉向I/O板。 此时逻辑板和I/O板组件应该稍微滑出外壳。
-
移除逻辑板拆卸工具。
-
-
-
同时将I/O板最左侧和右侧的两个塑料卡推向中间,然后将I/O板拉离外壳。
-
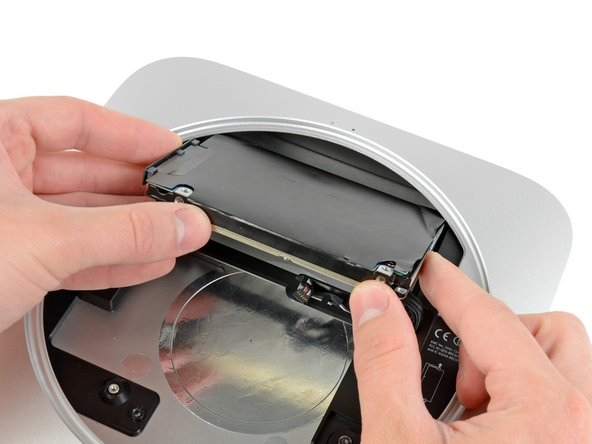
直到I/O板边缘远离外壳边缘大约0.5英寸时将逻辑板从外壳拉出。
-
-
-
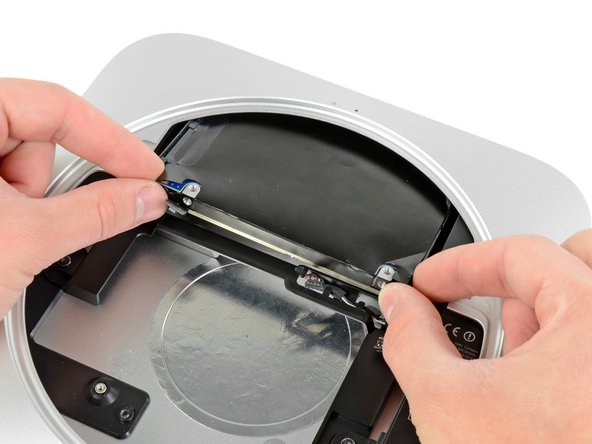
卸下硬盘驱动器电缆。
-
从硬盘驱动器侧面卸下两颗 6.2毫米 T8 梅花螺丝。
-
-
-
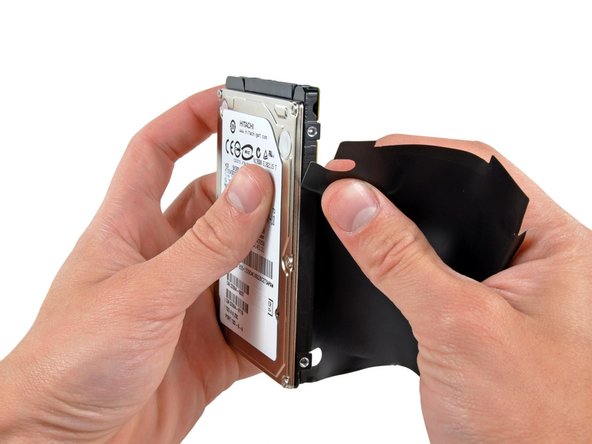
小心的将硬盘上的保护层撕掉
-
硬盘仍然在
-
如果您安装一块新的硬盘,参考我们的教程安装。安装Mac OS X 10.5 Leopard
-


要重新组装您的设备,请按照本指南的相反顺序进行操作。
要重新组装您的设备,请按照本指南的相反顺序进行操作。
crwdns2935221:0crwdne2935221:0
crwdns2935229:0374crwdne2935229:0
crwdns2934873:0crwdne2934873:0
50%

crwdns2934885:0crwdne2934885:0 crwdns2934875:0crwdne2934875:0
crwdns2934877:0crwdne2934877:0 ›

crwdns2944067:056crwdne2944067:0
Just a note, the OS X Install Guide is for 10.5 Snow Leopard. Maybe also include a install guide for 10.6 Lion?
That's right, steps 10-11 and 13-16 are not necessary.
It suffices to rotate the antenna plate out of the way without detaching its cable.
And after disconnecting the hard drive you can wiggle it out of the enclosure
without dealing with the logic board. Muc less hassle, and much less intimidating.
This is great advice! It worked fine for me, thanks!
This also worked for me. Follow machobbes advice - whole process took about 10 minutes. Easy peasy.
The one difficulty I had was getting the new SSD (or HDD) to lock back into the fixings inside of the casing. Best solution if you are having this problem is to turn the Mini upside down, ensuring that the antenna cable isn't stretched too far, and aided by the wonderful powers of gravity, get the new HDD unit fixed into place properly.
Good advice. I too just moved the antenna plate to the side and the drive was easily accessible.