crwdns2933423:0crwdne2933423:0

MSI GT70 MS-1763 Screen Replacement

crwdns2942213:0crwdne2942213:0

  1. MSI GT70 MS-1763 Screen Replacement, Battery: crwdns2935265:01crwdnd2935265:01crwdnd2935265:02crwdne2935265:0 MSI GT70 MS-1763 Screen Replacement, Battery: crwdns2935265:01crwdnd2935265:02crwdnd2935265:02crwdne2935265:0
    • Power off the laptop and turn it over.

  2. MSI GT70 MS-1763 Screen Replacement: crwdns2935265:02crwdnd2935265:01crwdnd2935265:02crwdne2935265:0 MSI GT70 MS-1763 Screen Replacement: crwdns2935265:02crwdnd2935265:02crwdnd2935265:02crwdne2935265:0
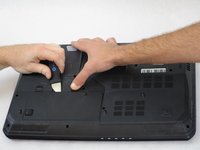
    • Release the safety latches that hold the battery in place. The left latch will stay moved up, while the right side is spring activated and will have to be held.

  3. MSI GT70 MS-1763 Screen Replacement: crwdns2935265:03crwdnd2935265:01crwdnd2935265:02crwdne2935265:0 MSI GT70 MS-1763 Screen Replacement: crwdns2935265:03crwdnd2935265:02crwdnd2935265:02crwdne2935265:0
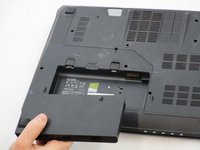
    • While holding up the left latch, use a Jimmy and slide the old battery out of its compartment.

  4. MSI GT70 MS-1763 Screen Replacement, Screen: crwdns2935265:04crwdnd2935265:01crwdnd2935265:02crwdne2935265:0 MSI GT70 MS-1763 Screen Replacement, Screen: crwdns2935265:04crwdnd2935265:02crwdnd2935265:02crwdne2935265:0
    • Remove the rubber guards covering the two 3mm screws on the bottom of the screen. Next, remove the screws with a Phillips #0 screwdriver.

  5. MSI GT70 MS-1763 Screen Replacement: crwdns2935265:05crwdnd2935265:01crwdnd2935265:02crwdne2935265:0 MSI GT70 MS-1763 Screen Replacement: crwdns2935265:05crwdnd2935265:02crwdnd2935265:02crwdne2935265:0
    • Using a Jimmy, remove the outside cover around the screen.

  6. MSI GT70 MS-1763 Screen Replacement: crwdns2935265:06crwdnd2935265:01crwdnd2935265:03crwdne2935265:0 MSI GT70 MS-1763 Screen Replacement: crwdns2935265:06crwdnd2935265:02crwdnd2935265:03crwdne2935265:0 MSI GT70 MS-1763 Screen Replacement: crwdns2935265:06crwdnd2935265:03crwdnd2935265:03crwdne2935265:0
    • Remove the six Phillips #0 screws holding the screen in place.

    • Separate screen from the assembly with a Jimmy.

    • Remove the display cable from its connector on the back of the screen.

    • Remove the screen.

crwdns2915888:0crwdne2915888:0

To reassemble your device, follow these instructions in reverse order.

crwdns2935227:0crwdne2935227:0

Cruz Uribe

crwdns2935283:008/22/19crwdne2935283:0

267 crwdns2915208:0crwdne2915208:0

crwdns2935297:02crwdne2935297:0

crwdns2915084:0crwdne2915084:0

South Arkansas Community College, Team S1-G2, Mitchell Fall 2019 crwdns2935289:0South Arkansas Community College, Team S1-G2, Mitchell Fall 2019crwdne2935289:0

SACC-MITCHELL-F19S1G2

crwdns2931471:03crwdne2931471:0

crwdns2935297:06crwdne2935297:0

crwdns2944067:00crwdne2944067:0

crwdns2917038:0crwdne2917038:0

crwdns2936625:0crwdne2936625:0:

crwdns2936751:024crwdne2936751:0 0

crwdns2936753:07crwdne2936753:0 2

crwdns2936753:030crwdne2936753:0 19

crwdns2942667:0crwdne2942667:0 1,020