crwdns2915892:0crwdne2915892:0
Solid state drives are built to make the device super fast. Don't be content waiting minutes for something that would take seconds. If you believe you need to replace your SSD, here is how to do it.
crwdns2942213:0crwdne2942213:0
-
-
Use the spudger to separate the back plate from the rest of the computer with the screen up like in the picture.
-
Once the back plate is loose, close the screen for an easier time properly removing it.
-
-
-
Using a Phillips Head #1 screwdriver, unscrew the 15 screws on the bottom of the device
-
After all the screws are unscrewed, remove the bottom plate. If this is the first time that you are removing this back cover, the last screw is hidden under the "factory seal" label. You will need to break that label to reach that screw.
What if I didn't keep track of the screw placement? Right now, all I know is that there are 8 screws slightly shorter than the other 6 (excluding screw under factory seal).
Hoping for an answer to the screw placement as well. I originally did keep track of it, but accidentally mixed up the screws together. Also noticed 8 were of one size and 6 of another.
Same here .. i mix them .. and i ask msi too.. but i don`t get a mail.. do you find the answer ?
I’m looking for the same answer. 2 different screw sizes. Which screws go in which holes?
Which screws go where?
When I swapped out the battery, I noticed the slightly longer screws were at the center back between the hinges and the interior area screws, (two located between fan vents, one under the factory seal and the other in approximately the same location on other side). I didn’t actually check the one under the seal - the tape held that one in place, but assumed it was similar to the other interior screws. All the perimeter screws except the back center were shorter ones.
-
-
-
Locate the battery.
-
Wedge the spudger underneath the battery, and apply pressure to lift it away from the rest of the device.
-
Gently pull and wiggle the multiple colored wired connector out from the socket.
If you are to simply replace the HDD, this step is pointless. There is no need to remove the battery to replace the HDD.
-
-
-
Locate the hard drive.
-
Using a spudger lift the ribbon cable connector.
-
-
-
-
Use the tweezers to lift the back tab and pull it back until the ribbon cable disconnects.
-
Wedge the spudger between the hard drive and the device and apply pressure to pry the two apart, and then remove the hard drive.
It is much easier to disconnect the cable from the HDD instead of from the motherboard.
-
-
-
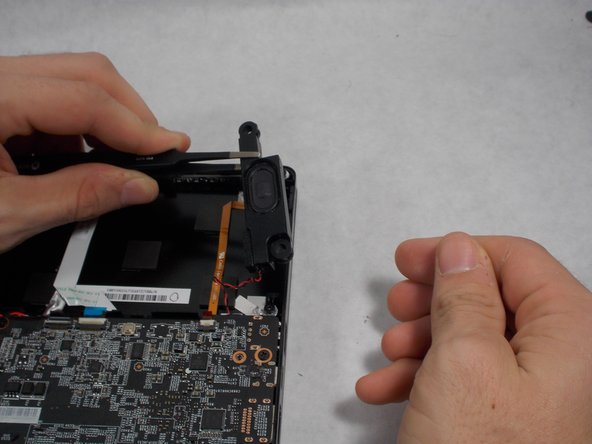
First locate the speaker(s).
-
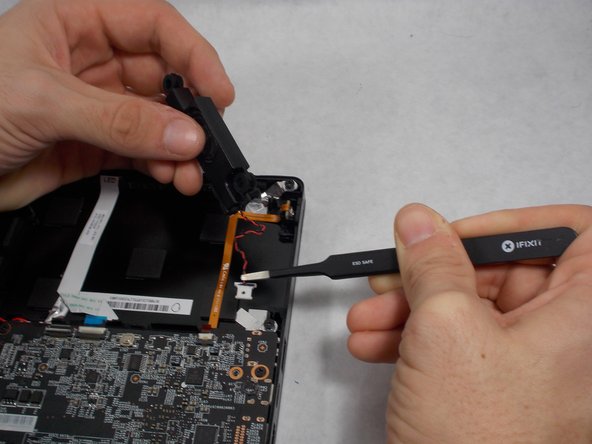
Use the tweezers to lift the speaker from its position.
-
Grab the multi-colored wire with the tweezers and gently pull back until the speakers releases from its socket.
-
-
-
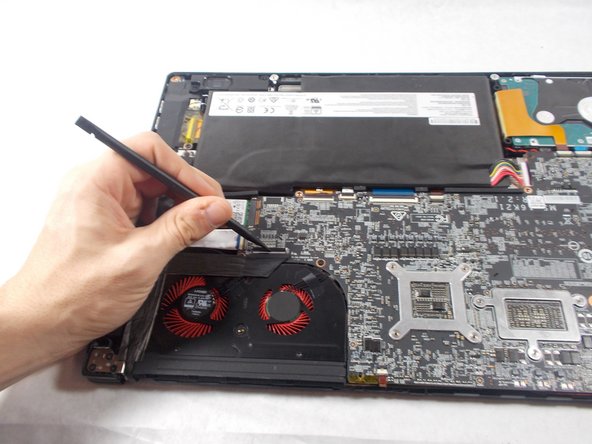
First, locate all the ribbon cables that are connected to the motherboard.
-
Lift the ribbon cable connector tabs with the spudger gently.
-
Using the tweezers, gently pull back on the ribbon cable until it is completely out of the socket.
-
-
-
First, locate all the screws holding down the Motherboard.
-
Remove all the screws using the #1 Phillips head screw driver.
-
-
-
Next, locate the Wi-Fi chip.
-
Use the #1 Phillips head screwdriver to remove the screw attaching the Wi-fi chip to the motherboard.
-
-
-
Use the spudger to lift the motherboard up and remove it from the laptop, then flip the now separated motherboard over.
-
Using tweezers, disconnect the red wire circled in the picture; where the hard drive would be.
-
Locate the SSD and the screw holding it in.
-
Unscrew the one Screw using a #1 Phillips Head screwdriver.
-
The SSD will want to lift with that screw being removed, from here grab it and pull it out gently.
-


To reassemble your device, follow these instructions in reverse order.
To reassemble your device, follow these instructions in reverse order.
crwdns2935221:0crwdne2935221:0
crwdns2935229:013crwdne2935229:0
crwdns2915084:0crwdne2915084:0

UMass Dartmouth, Team S2-G1, Julie Fall 2017 crwdns2935289:0UMass Dartmouth, Team S2-G1, Julie Fall 2017crwdne2935289:0
UMASSD-JULIE-F17S2G1
crwdns2931471:03crwdne2931471:0
crwdns2935297:05crwdne2935297:0
crwdns2944067:05crwdne2944067:0
This was not super hard. I’d say moderate since the mobo needs little finesse to pull out. Some firm gentleness.
Thanks. I’ve seen some videos on YouTube regarding the MSI Stealth Pro GS63VR. This helps a lot.
I notice the stock SSD is an M-B key type. Does the board support M-key SSDs?
This was a great guide. My only suggestion for Step 9 would be to clarify removing the wifi chip. I found that lifting the motherboard helped me better access the chip for removal. It’s a tight fit.
Thanks for the guide, I need some replacement screws for my MSI GS73VR Stealth Pro. Any idea what size they are? Or where I could find out? Thanks you, I’d really appreciate any help!
For those with a GS63VR 7RG, do not pry the back plate loose first, as there are little tabs in the center of the back plate that will break if you do. Take the bottom plate off first, and then release the clips holding the back plate to the bottom plate. Also, the part number for the GS63VR 7RG is BTY-M6K.
mjf24 - crwdns2934203:0crwdne2934203:0
I confirm mjf24 comment.
I have a GS63 Stealth 8RE and the back plate can’t be removed 1st. Otherwise it breaks.
Bottom plate 1st.
Actually when the bottom plate is removed, the hdd is accessible and there is no need to remove the back plate.
Remi - crwdns2934203:0crwdne2934203:0
I regret attempting to remove the back plate before showing these comments. I unnecessarily broke a few tabs in the process.
Terry B Smith - crwdns2934203:0crwdne2934203:0