crwdns2933423:0crwdne2933423:0

Lorex LW2742 Speaker Replacement

crwdns2942213:0crwdne2942213:0

  1. Lorex LW2742 Speaker Replacement, Back Panel: crwdns2935265:01crwdnd2935265:01crwdnd2935265:03crwdne2935265:0 Lorex LW2742 Speaker Replacement, Back Panel: crwdns2935265:01crwdnd2935265:02crwdnd2935265:03crwdne2935265:0 Lorex LW2742 Speaker Replacement, Back Panel: crwdns2935265:01crwdnd2935265:03crwdnd2935265:03crwdne2935265:0
    • Remove the battery cover on the back of the LCD monitor by unscrewing one 5mm Phillips #1 screw.

    • Slide the battery out of the housing. Lightly tap the opposite end of the monitor if the battery does not come right out.

  2. Lorex LW2742 Speaker Replacement: crwdns2935265:02crwdnd2935265:01crwdnd2935265:01crwdne2935265:0
    • Remove the four 6mm Phillips #1 screws on the back of the LCD monitor.

  3. Lorex LW2742 Speaker Replacement: crwdns2935265:03crwdnd2935265:01crwdnd2935265:02crwdne2935265:0 Lorex LW2742 Speaker Replacement: crwdns2935265:03crwdnd2935265:02crwdnd2935265:02crwdne2935265:0
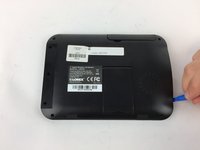
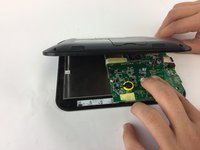
    • Using a plastic opening tool, gently separate the back panel from the front panel, working the tool around the panel to disconnect it.

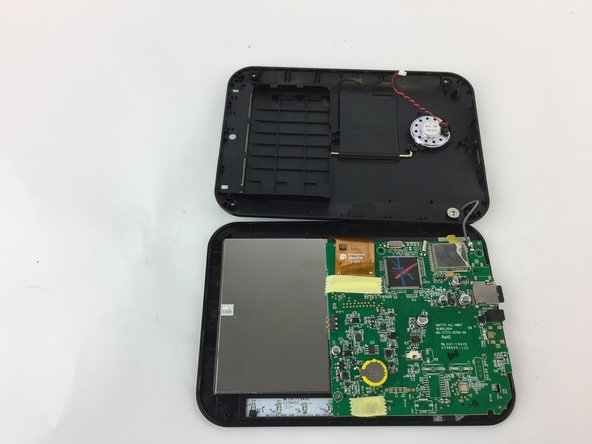
    • Carefully remove the back panel

    • The speaker wire is connected to the motherboard so DO NOT rip back panel away from the monitor.

  4. Lorex LW2742 Speaker Replacement, Speaker: crwdns2935265:04crwdnd2935265:01crwdnd2935265:03crwdne2935265:0 Lorex LW2742 Speaker Replacement, Speaker: crwdns2935265:04crwdnd2935265:02crwdnd2935265:03crwdne2935265:0 Lorex LW2742 Speaker Replacement, Speaker: crwdns2935265:04crwdnd2935265:03crwdnd2935265:03crwdne2935265:0
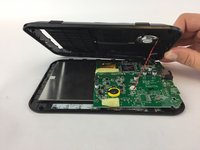
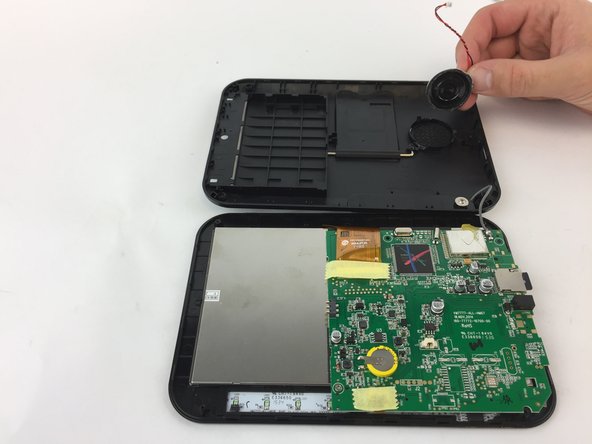
    • Locate the motherboard and carefully pull the red and black speaker wires out of their harness.

  5. Lorex LW2742 Speaker Replacement: crwdns2935265:05crwdnd2935265:01crwdnd2935265:02crwdne2935265:0 Lorex LW2742 Speaker Replacement: crwdns2935265:05crwdnd2935265:02crwdnd2935265:02crwdne2935265:0
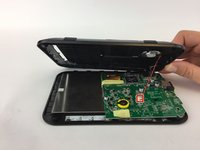
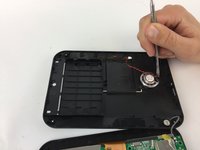
    • Using a metal spudger, pry the melted black plastic away from the speaker.

    • Carefully pull the speaker out of its housing by the wires.

crwdns2915888:0crwdne2915888:0

To reassemble your device, follow these instructions in reverse order.

crwdns2935227:0crwdne2935227:0

Alex Kusmierz

crwdns2935283:009/26/16crwdne2935283:0

601 crwdns2915208:0crwdne2915208:0

crwdns2935297:05crwdne2935297:0

crwdns2915084:0crwdne2915084:0

USF Tampa, Team 16-1, Eyestone Fall 2016 crwdns2935289:0USF Tampa, Team 16-1, Eyestone Fall 2016crwdne2935289:0

USFT-EYESTONE-F16S16G1

crwdns2931471:04crwdne2931471:0

crwdns2935297:012crwdne2935297:0

crwdns2944067:00crwdne2944067:0

crwdns2917038:0crwdne2917038:0

crwdns2936625:0crwdne2936625:0:

crwdns2936751:024crwdne2936751:0 0

crwdns2936753:07crwdne2936753:0 7

crwdns2936753:030crwdne2936753:0 12

crwdns2942667:0crwdne2942667:0 201