crwdns2915892:0crwdne2915892:0
This guide is showing you how to correctly disassemble the Logitech Performance MX mouse, so you can replace any part or fix any issues that appear.
-
-
Peel off the three thin, plastic mouse feet on the bottom of the mouse. Make sure to carefully remove the adhesive along with the pad.
-
Use a thin flat object such as a flathead screwdriver to help remove if necessary.
-
-
-
Using a screwdriver, unscrew the four screws that were under the mouse feet.
-
Remove the battery from the mouse if not done already.
-
-
-
Gently pull the top of the mouse off from the base, making sure the wires and components are in place.
-
Carefully pull out the white enclosure from its port to safely take the top apart from the bottom.
-
-
-
-
Pull out the plastic pin in-between the scroll wheel and the battery enclosure and pull up on the scroll wheel base to remove.
-
-
-
Remove the 2 small springs underneath the scroll wheel base.
-
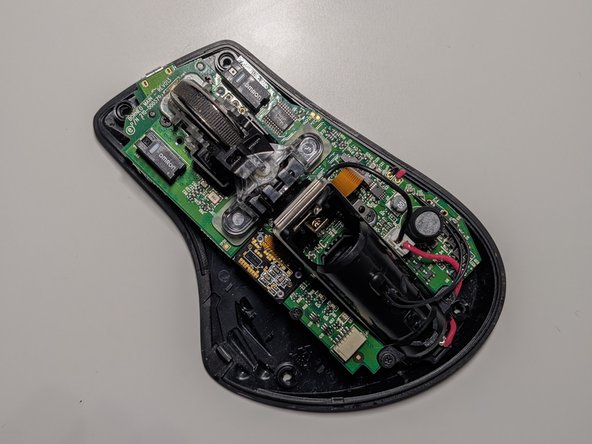
Unscrew the four screws holding the battery capsule onto the PCB.
There are only 3 screws securing the battery compartment; the forth screw is holding down the PCB. The top-left red circle in the picture is in the wrong position - if you look to 8o'clock you'll see it at the edge of the PCB.
-
-
-
Unplug the ribbon cable from the circuit board. Be careful to not remove the cable’s locking mechanism.
-
-
-
Unscrew the four screws to take out the black scroll wheel support in the center and the two black pads that lie on both sides of the support.
-
-
-
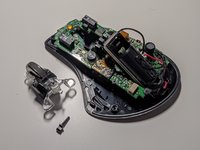
Pull the circuit board up to find the on and off switch. Take out the clear plastic bit that held the springs.
-
-
-
All parts should be visible to repair or for replacement.
If the board doesn't fit flat during reassembly make sure the on/off switch is properly fit onto the tab of the surface mount switch on the underside of the main board.
-


To reassemble your device, follow these instructions in reverse order.
To reassemble your device, follow these instructions in reverse order.
crwdns2935221:0crwdne2935221:0
crwdns2935229:03crwdne2935229:0

crwdns2947410:01crwdne2947410:0
Although useful, sadly this guide does not show how to disassemble the upper parts where the 3 switches for zoom, back and forward are located. Step 3 is the only place that shows this area, but only focuses on the disconnection of it.