crwdns2933423:0crwdne2933423:0
crwdns2947577:0crwdnd2947577:0crwdne2947577:0

Logitech Mouse MX1000 Disassembly

crwdns2942213:0crwdne2942213:0

  1. Logitech Mouse MX1000 Disassembly, Open the housing: crwdns2935265:01crwdnd2935265:01crwdnd2935265:02crwdne2935265:0 Logitech Mouse MX1000 Disassembly, Open the housing: crwdns2935265:01crwdnd2935265:02crwdnd2935265:02crwdne2935265:0
    • There are four screws hidden on the bottom part of the mouse. Two are below the sticker, the last two are below the bottom pads.

    crwdns2952109:0crwdne2952109:0
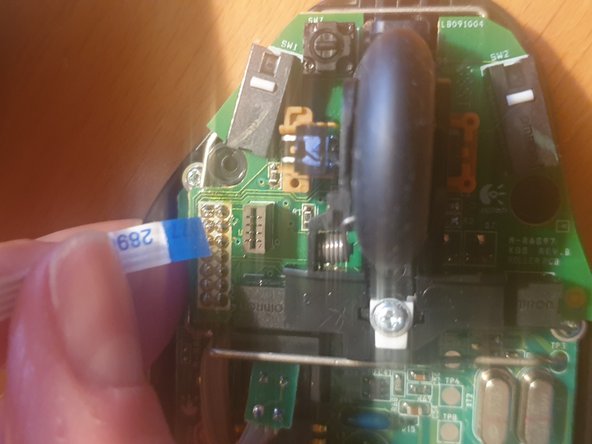
  2. Logitech Mouse MX1000 Disassembly, Disconnect the cables: crwdns2935265:02crwdnd2935265:01crwdnd2935265:03crwdne2935265:0 Logitech Mouse MX1000 Disassembly, Disconnect the cables: crwdns2935265:02crwdnd2935265:02crwdnd2935265:03crwdne2935265:0 Logitech Mouse MX1000 Disassembly, Disconnect the cables: crwdns2935265:02crwdnd2935265:03crwdnd2935265:03crwdne2935265:0
    • Once the scews removed, carefully open the housing. Some cables hold both pieces together

    • First remove the tricolor battery cable

    • Then carefully remove the ribbon cable

    crwdns2952109:0crwdne2952109:0
  3. Logitech Mouse MX1000 Disassembly, Remove the battery: crwdns2935265:03crwdnd2935265:01crwdnd2935265:01crwdne2935265:0
    • To remove the battery cover, two more screws need to be removed.

    • The battery is then held in place with a sticker within the housing.

    crwdns2952109:0crwdne2952109:0
  4. Logitech Mouse MX1000 Disassembly, Remove the board from the housing: crwdns2935265:04crwdnd2935265:01crwdnd2935265:03crwdne2935265:0 Logitech Mouse MX1000 Disassembly, Remove the board from the housing: crwdns2935265:04crwdnd2935265:02crwdnd2935265:03crwdne2935265:0 Logitech Mouse MX1000 Disassembly, Remove the board from the housing: crwdns2935265:04crwdnd2935265:03crwdnd2935265:03crwdne2935265:0
    • Remove the three screws (red circles) holding the board in place

    • Remove the wheel and the white piece of plastic holding it down

    • A clip (yellow circle) further holds it down

    • Finally you need to unsolder the charging pads (orange circles)

    crwdns2952109:0crwdne2952109:0
  5. Logitech Mouse MX1000 Disassembly, You are done: crwdns2935265:05crwdnd2935265:01crwdnd2935265:01crwdne2935265:0
    • Congrats, you now fully dissassembled your logitech mouse!

    crwdns2952109:0crwdne2952109:0
crwdns2915888:0crwdne2915888:0

To reassemble your device, follow these instructions in reverse order.

lija31415

crwdns2935283:012/17/20crwdne2935283:0

313 crwdns2915208:0crwdne2915208:0

crwdns2935295:0crwdne2935295:0

crwdns2947412:00crwdne2947412:0

crwdns2917038:0crwdne2917038:0

crwdns2936625:0crwdne2936625:0:

crwdns2936751:024crwdne2936751:0 2

crwdns2936753:07crwdne2936753:0 20

crwdns2936753:030crwdne2936753:0 93

crwdns2942667:0crwdne2942667:0 1,659