crwdns2933423:0crwdne2933423:0

Logitech Harmony Smart Control Remote Buttons Replacement

crwdns2942213:0crwdne2942213:0

  1. Logitech Harmony Smart Control Remote Buttons Replacement, Remote Buttons: crwdns2935265:01crwdnd2935265:01crwdnd2935265:02crwdne2935265:0 Logitech Harmony Smart Control Remote Buttons Replacement, Remote Buttons: crwdns2935265:01crwdnd2935265:02crwdnd2935265:02crwdne2935265:0
    • With both thumbs, slide the grooved cover off the end of the remote.

    • Remove the battery once cover is removed.

  2. Logitech Harmony Smart Control Remote Buttons Replacement: crwdns2935265:02crwdnd2935265:01crwdnd2935265:02crwdne2935265:0 Logitech Harmony Smart Control Remote Buttons Replacement: crwdns2935265:02crwdnd2935265:02crwdnd2935265:02crwdne2935265:0
    • With the PH00 bit, remove both of the 4mm Phillip screws on the remote.

  3. Logitech Harmony Smart Control Remote Buttons Replacement: crwdns2935265:03crwdnd2935265:01crwdnd2935265:02crwdne2935265:0 Logitech Harmony Smart Control Remote Buttons Replacement: crwdns2935265:03crwdnd2935265:02crwdnd2935265:02crwdne2935265:0
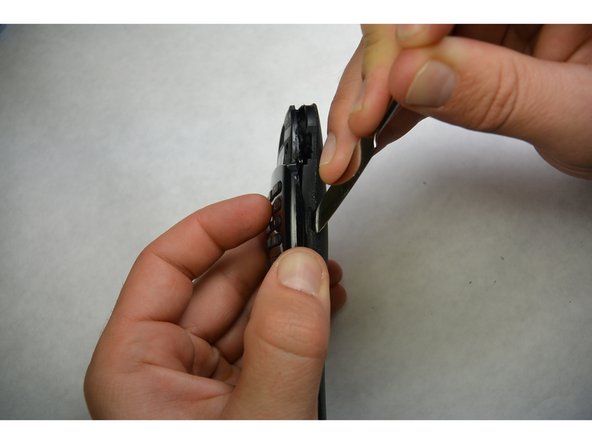
    • Using a metal spudger, pry the remote. Maneuver around to separate both sides.

  4. Logitech Harmony Smart Control Remote Buttons Replacement: crwdns2935265:04crwdnd2935265:01crwdnd2935265:03crwdne2935265:0 Logitech Harmony Smart Control Remote Buttons Replacement: crwdns2935265:04crwdnd2935265:02crwdnd2935265:03crwdne2935265:0 Logitech Harmony Smart Control Remote Buttons Replacement: crwdns2935265:04crwdnd2935265:03crwdnd2935265:03crwdne2935265:0
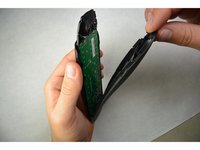
    • Manualy separate the two pieces of plastic.

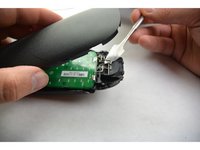
    • Using the metal piece from the housing, pry up the circuit board. Do not disconnect anything.

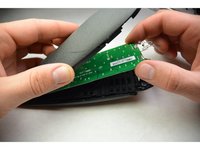
    • When the circuit board is pried, slide the circuit board out of the housing.

  5. Logitech Harmony Smart Control Remote Buttons Replacement: crwdns2935265:05crwdnd2935265:01crwdnd2935265:01crwdne2935265:0
    • From the front of the remote, remove the buttons. Clean or replace the necessary buttons.

crwdns2915888:0crwdne2915888:0

To reassemble your device, follow these instructions in reverse order.

crwdns2935229:02crwdne2935229:0

Josh Hendricks

crwdns2935283:009/17/15crwdne2935283:0

464 crwdns2915208:0crwdne2915208:0

crwdns2935297:04crwdne2935297:0

crwdns2915084:0crwdne2915084:0

IUPUI, Team 3-2, Harley Fall 2015 crwdns2935289:0IUPUI, Team 3-2, Harley Fall 2015crwdne2935289:0

IUPUI-HARLEY-F15S3G2

crwdns2931471:04crwdne2931471:0

crwdns2935297:05crwdne2935297:0

crwdns2944067:09crwdne2944067:0

Excellent guide. However, I can’t find a supplier for the button pad. Any suggestions?

fhaist - crwdns2934203:0crwdne2934203:0

Hi there,

My son dropped mine in water. I opened it and dried it off but it still doesn’t work.

I could give you my button pad if you want.

Benoit Lagarde -

Where do you purchase button replacements?

Steve Lutes - crwdns2934203:0crwdne2934203:0

Where do you purchase button replacements?

Flavio Campos - crwdns2934203:0crwdne2934203:0

Excellent! I wasn’t sure if it was possible to crack it open or not. Thanks, I was able to clean it up.

John Wall - crwdns2934203:0crwdne2934203:0

crwdns2917038:0crwdne2917038:0

crwdns2936625:0crwdne2936625:0:

crwdns2936751:024crwdne2936751:0 2

crwdns2936753:07crwdne2936753:0 7

crwdns2936753:030crwdne2936753:0 47

crwdns2942667:0crwdne2942667:0 5,653