crwdns2933423:0crwdne2933423:0

Logitech Harmony Smart Control Battery Contact Replacement

crwdns2942213:0crwdne2942213:0

  1. Logitech Harmony Smart Control Battery Contact  Replacement, Battery Contact: crwdns2935265:01crwdnd2935265:01crwdnd2935265:02crwdne2935265:0 Logitech Harmony Smart Control Battery Contact  Replacement, Battery Contact: crwdns2935265:01crwdnd2935265:02crwdnd2935265:02crwdne2935265:0
    • Use both thumbs to slide the grooved cover off of the remote

    • Once the cover is off, remove the battery.

  2. Logitech Harmony Smart Control Battery Contact  Replacement: crwdns2935265:02crwdnd2935265:01crwdnd2935265:02crwdne2935265:0 Logitech Harmony Smart Control Battery Contact  Replacement: crwdns2935265:02crwdnd2935265:02crwdnd2935265:02crwdne2935265:0
    • Locate both of the 4mm Phillips screws on the remote. Using the PH00 bit, remove the screws.

  3. Logitech Harmony Smart Control Battery Contact  Replacement: crwdns2935265:03crwdnd2935265:01crwdnd2935265:03crwdne2935265:0 Logitech Harmony Smart Control Battery Contact  Replacement: crwdns2935265:03crwdnd2935265:02crwdnd2935265:03crwdne2935265:0 Logitech Harmony Smart Control Battery Contact  Replacement: crwdns2935265:03crwdnd2935265:03crwdnd2935265:03crwdne2935265:0
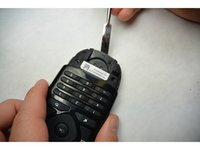
    • Use a flat screwdriver or a prying tool to split the remote and separate the two pieces. Start from the bottom.

  4. Logitech Harmony Smart Control Battery Contact  Replacement: crwdns2935265:04crwdnd2935265:01crwdnd2935265:02crwdne2935265:0 Logitech Harmony Smart Control Battery Contact  Replacement: crwdns2935265:04crwdnd2935265:02crwdnd2935265:02crwdne2935265:0
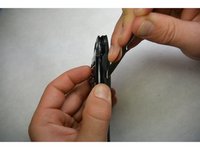
    • Using the metal piece from the housing, pry the circuit board upwards. Do not disconnect it from the board.

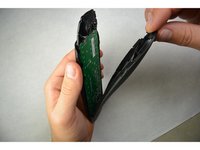
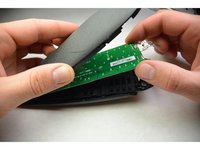
    • Slide the circuit board out from the housing .

  5. Logitech Harmony Smart Control Battery Contact  Replacement: crwdns2935265:05crwdnd2935265:01crwdnd2935265:01crwdne2935265:0
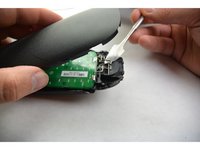
    • Locate the battery contacts on the circuit board.

    • Using a soldering iron, remove the old solder and the battery contacts. Install new battery contacts and solder them.

crwdns2915888:0crwdne2915888:0

To reassemble your device, follow these instructions in reverse order.

Josh Hendricks

crwdns2935283:009/17/15crwdne2935283:0

464 crwdns2915208:0crwdne2915208:0

crwdns2935297:04crwdne2935297:0

crwdns2915084:0crwdne2915084:0

IUPUI, Team 3-2, Harley Fall 2015 crwdns2935289:0IUPUI, Team 3-2, Harley Fall 2015crwdne2935289:0

IUPUI-HARLEY-F15S3G2

crwdns2931471:04crwdne2931471:0

crwdns2935297:05crwdne2935297:0

crwdns2917034:0crwdne2917034:0

do you know where can i buy the springs?

IOANNIS KARAKOGLOU - crwdns2934203:0crwdne2934203:0

crwdns2917038:0crwdne2917038:0

crwdns2936625:0crwdne2936625:0:

crwdns2936751:024crwdne2936751:0 0

crwdns2936753:07crwdne2936753:0 5

crwdns2936753:030crwdne2936753:0 26

crwdns2942667:0crwdne2942667:0 4,936