crwdns2915892:0crwdne2915892:0
This is a guide to do a partial disassembly of the left-side of a Logitech G935. This is my daily-use headset, so I went as far as I was comfortable with knowing I could safely disassemble and reassemble without breaking tabs, glue, wires, or anything else like that.
After disassembly, reassembly is easy reversing these steps.
-
-
Remove the ear cup. It is slightly elastic and may be gently stretched off, starting at one point and gently working around the perimeter. A spudger may help in both removal, and especially re-installation.
-
-
-
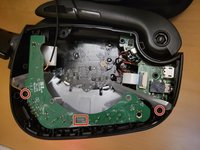
Remove the 6 Phillips #0 screws retaining the top section.
-
Gently pull off the section you just unscrewed. Flipping it upside-down off to the side is a good bet.
-
Note there is a thin cable soldered to both halves. Be very gentle with this, as I suspect repair will be near-impossible. (It's surface-mounted on the PCB, and sealed inside the driver.)
-
-
-
-
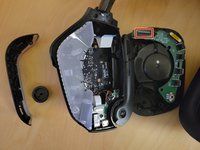
Remove the 2 screws holding the rear plastic facade that retains the buttons and volume wheel.
-
Detach the ribbon cable from the daughterboard.
-
-
-
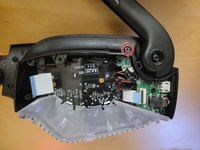
Remove the ribbon cable connecting the daughterboard to the mainboard.
-
Open the microphone to expose a hidden screw
-
Remove the screw retaining the front plastic facade.
-
The microphone will now come out. Take care as it's attached to the daughterboard via a small fragile soldered cable.
-
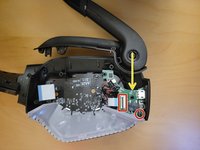
With the microphone out, remove the screw retaining the daughterboard.
-
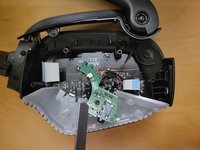
Gently pry the daughterboard out. Prying from the curved section towards the screw (as the yellow arrow points) worked well for me.
-
Take care once the daughterboard is free, as it is still connected to the mainboard via soldered wires.
Incredible, now I know how it is supposed to look like, thank you!
I disassembled it since the mic gave out and found the unshielded wire torn and frayed, possibly also the cause of the slight damage to the other cables.
The unshielded wire seems to be grounding and with red belonging to the mic-mute button. Since its part of the switch, one might assume its required to allow the mic to work at all. I'll have to figure out how to replace such a twisted copper hair bundle to find out.
This model suffers a bit of a design flaw since the mic's movement mechanisms cause chafing of those four cables over the internal boards. So frequent usage of this feature might shorten the lifespan of the device.
APORTO LA TRADUCCION, YA QUE ME HA PARECIDO MUY INTERESANTE EL APORTE DE Fenyx.
Increíble, ahora ya sé cómo tiene que quedar, ¡gracias!
Lo desmonté desde que el micro se estropeó y encontré el cable sin apantallar roto y deshilachado, posiblemente también la causa de los ligeros daños en los otros cables.
El cable sin apantallar parece estar conectado a tierra y el rojo pertenece al botón de silencio del micrófono. Dado que es parte del interruptor, se podría suponer que es necesario para permitir que el micrófono funcione en absoluto. Tendré que averiguar cómo sustituir un haz de pelos de cobre tan retorcido para averiguarlo.
Este modelo tiene un pequeño defecto de diseño, ya que los mecanismos de movimiento del micrófono hacen que los cuatro cables rocen las placas internas. Así que el uso frecuente de esta función podría acortar la vida útil del aparato.Carlos López (España - Spain) - crwdns2934203:0crwdne2934203:0
What I think is amazing is there are two comments. One in English and one in Spanish with the same words. Posted on the same day by different usernames.
I had a wee issue with the power button and was scared to look into myself.
Thanks to you it was easy
Really good instructions! Well done and thank you for this :)
-


To reassemble your device, follow these instructions in reverse order.
To reassemble your device, follow these instructions in reverse order.
crwdns2935221:0crwdne2935221:0
crwdns2935229:014crwdne2935229:0

crwdns2947412:04crwdne2947412:0
Thanks! It helped a lot. Mine was having a problem with the power on slider, I sprayed a little bit of contact cleaner and a little bit of rubbing with a soft brush, it's working like new now!
Thanks, gracias. Me ha ido bien para arreglar el boton de power que da ese sonido tan bugueao. Hay videos en youtube.
I have a issue that i can move it from left to right a bit and the left ear isnt working at times until I fiddle with it, would this solve it ?
Ones i have sound it continues but every time i put it off i will have the same issue with the power slider.
At the very least getting a good view of the daughter board and the switch may give you other ideas as to what's going on. Good chance it's just the contacts inside the switch not making good contact, but cant hurt to clean up the daughter board if it seems to be dirty or corroded (one of mine was pretty corroded, not sure what happened to that one honestly). Once you have the daughter board out, you can take the metal cover off the switch mechanism and dismantle the switch to clean the internal contacts. Idk if I'm allowed to post links so we'll see if it lets me
This video is technically for the G933, not the G935, but the process of dismantling the switch mechanism itself is identical:
https://youtu.be/9r8KK3ynSQA?si=tTVSIBbN...
Be careful not to lose any of the little metal contacts when you clean it, but it's not terribly difficult.