crwdns2915892:0crwdne2915892:0
If the C-Clamps on your Logitech G27 break, you will need to replace them before using the steering wheel again. This is a little bit of a pain to do, because the C-Clamps are fully inside the device case. To replace them, you will just need to remove a few screws.
crwdns2942213:0crwdne2942213:0
-
-
Remove the six gray 25mm hex screws with a 4mm allen wrench.
-
Carefully lift up the wheel, but do not disconnect it from the rest of the device.
-
-
-
Carefully lift the wheel off of the hub, exposing the 2 shifter paddle wires and PCB board.
-
-
-
Remove the two 7.5 mm silver screws holding the green PCB board in the wheel with a Phillips #1 screwdriver.
-
-
-
Carefully remove the PCB board from the wheel hub.
-
-
-
Carefully pinch and unplug the large 7-pin connector under the PCB board.
These screws refused to go all the way back in for me, and one of them stripped completely. If this happens to you, you can get replacement screws that are shorter here - https://www.amazon.com/gp/product/B01MFA...
This works for the G27, not sure about the G25 or any other wheels.
Obviously the screws being shorter means the wheel isn't as strongly attached to the base in this direction, so if you have to do this remember not to put unnecessary stress on these screws by pulling the wheel straight off the base.
bro i need new long cable i think and that connector or just replace the whole thing .. i put new grease, screw it more tight by the encoder so it woulnt go to the left .. wheel works verry nice tho all my buttons and shifter pedals wont work now tho the lights works dont know what to do now.. and now i kinda regreat opening it.. my wheel run so good now just these buttons are off not working at all and it kinda screws up midle of the game..
@alexdinpoik I’ve had the same problem when the 7 pin connectors blue and green cables broke off. First, only the blue one was broken which only took the led indicators gradual increase but all buttons were working then when i tried to plug in back, the green one broke off leading to none of the buttons working but the led indicators just working. Now i’ll try to fix it with iron soldering.
okan can u pls share a video of you doing it? so i can do the “copy paste” hahah where can i buy cables and stuff i need for that? whats the name of these white connectors ? im new to this but share me a link to buy. i rather just try to fix it then buy a new wheel since its a great wheel compare to g29 that has bad software and the other wheels are to expensive. g27 cant be found in stores anymore neither and if im gonna buy one it has to be new haha hopefully u can share some knowlage thanks!
Where i can Buy the 7 pin cable for Main board please
Hey guys!
i broke the 7 pin cable anyone know where can is buy it? Thanks
-
-
-
You can now fully remove the wheel from the hub. Set it aside until you put the wheel back together.
-
Remove the innermost three 37.5mm silver screws with a Phillips #2 screwdriver.
-
Remove the wheel hub and push the connector through the center of the hub.
-
-
-
-
The wheel hub can now be set aside and flip over the steering wheel housing to reveal the under side.
-
Remove the eight 15.9mm silver surrounding screws underneath the wheel housing with a Phillips #1 screwdriver.
-
-
-
Rotate the housing back over and remove the top half of the housing revealing the majority of the components of the wheel.
-
The housing cover can be set aside until you put the wheel back together.
need two new black screes abouve the pcb board.. lost them need to know the size since the screws i replace it with was not exact..
Loosen the desk clamps before removing the housing, otherwise you risk breaking something. The housing should come off without having to use any force whatsoever.
-
-
-
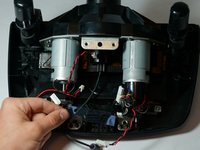
Remove the four 7.3mm silver screws attaching the green PCB board to the motor housing with a Phillips #2 screwdriver.
I’d do steps 9 and 10 in reverse order, the connectors are much easier to unplug while the board is secured in place.
For removing C-Clamps steps 9-13 are unnecessary.
-
-
-
Unplug the three plastic connectors on the left side of the PCB board.
-
Unplug the two plastic connectors on the top of the PCB board.
-
Unplug the three plastic connectors on the right side of the PCB board.
Some of the connectors have locks on them, I would recommend this as a two person job.
I didn't take them off :)
I messed up and broke the cables of the 5 Pin Connector on the right. Can anyone tell me what it’s called so I can buy replacement? The Rest of the cable is stuck in there so I can’t re-use it sadly.
-
-
-
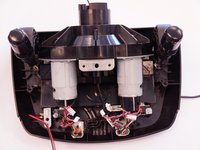
Remove the PCB board after all of the plastic connectors are disconnected.
-
You can now set it aside.
-
-
-
Remove the two 12.3mm upper black screws with a Phillips #2 screwdriver.
-
Remove the two 15.5mm bottom silver screws with a Phillips #1 screwdriver.
-
-
-
Remove the PCB board mount and remove the clear plastic piece underneath.
-
Set them aside until you reassemble the wheel.
-
-
-
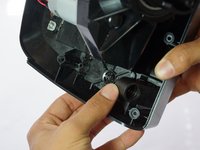
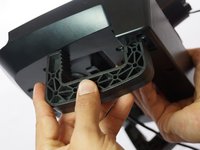
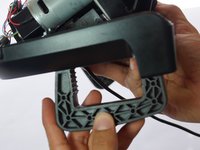
Unscrew the piece holding the C-Clamp in place with your hand.
-
-
-
Push the remaining nob forward and then inward through the slot.
-
-
-
The C-Clamp can now be easily pulled out of the bottom of the device.
-


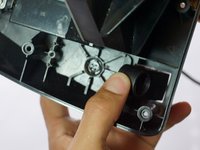


To reassemble your device, follow these instructions in reverse order.
To reassemble your device, follow these instructions in reverse order.
crwdns2935221:0crwdne2935221:0
crwdns2935229:024crwdne2935229:0
crwdns2915084:0crwdne2915084:0

Cal Poly, Team 15-4, Amido Spring 2015 crwdns2935289:0Cal Poly, Team 15-4, Amido Spring 2015crwdne2935289:0
CPSU-AMIDO-S15S15G4
crwdns2931471:04crwdne2931471:0
crwdns2935297:025crwdne2935297:0
crwdns2947412:015crwdne2947412:0
Where would I buy the replacement C-Clamps from because one of mine are broken and I need to install a new one.
Look for it at eBay.
Eduardo -
I also need to find a place to buy replacement C-clamps from
Can you tell me where I can buy these clamps?
step 9 to 13 not needed ... please confirm
Agree. Skip from step 8 to 14 directly.
Great tutorial though, cannot make it better! Thanks for putting this together!
Eduardo -
You are absolutely correct. 9-13 are totally unrelated to changing the C-clamp.
Confirmed, you just need to take the top cover off.
Thanks a lot, mate.
Hi did not need step 9-14 as was able to push the clamp from the bottom of the steering wheel saving time and the risk of damaging cables
Great guide! The new clamps can be 3D printed. https://www.thingiverse.com/thing:179714...
Improved Logitech Clamps can be found here. Made with stronger material, holds and weights more. Check it out: https://www.ebay.com/itm/263522953969 . Thank you for looking
Why would you need to unplug the wires and remove the PCB and other things? Once you removed the housing, you can easily remove the clamps without removing anything else.
Anyone know where to get a 3D print of the Logitech G27 "Shifter Center Desk Clamp & Screw".
In other words where can I get the full assembley to secure the shifter to the desk, thanks.
Fijar primero el volante en la mesa para evitar desperfectos.
Alpc360 - crwdns2934203:0crwdne2934203:0
Actually It's usually 90 percent of the issues. To fix that you can buy this replacement at ETSY, search for " Optical Encoder 60 Slot for Steering wheel Logitech G25 / old G27 / Driving Force GT "with the buyer name " abrapartabra " for logitech optical encoder 30 or 60 slot they have for Logitech G25 , G27 and DFGT .We fixed our Logitech g25 with it.
Fixer - crwdns2934203:0crwdne2934203:0