crwdns2933423:0crwdne2933423:0

Linksys WAP54g Bottom Casing/Motherboard Replacement

crwdns2942213:0crwdne2942213:0

  1. Linksys WAP54g Bottom Casing/Motherboard Replacement, Top Casing: crwdns2935265:01crwdnd2935265:01crwdnd2935265:01crwdne2935265:0
    • Power down and unplug the device.

  2. Linksys WAP54g Bottom Casing/Motherboard Replacement: crwdns2935265:02crwdnd2935265:01crwdnd2935265:01crwdne2935265:0
  3. Linksys WAP54g Bottom Casing/Motherboard Replacement: crwdns2935265:03crwdnd2935265:01crwdnd2935265:01crwdne2935265:0
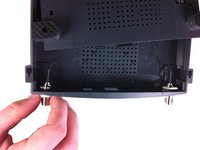
    • Remove the two black rubber feet of the device using the screwdriver. The feet are located on the bottom towards the front.

  4. Linksys WAP54g Bottom Casing/Motherboard Replacement: crwdns2935265:04crwdnd2935265:01crwdnd2935265:01crwdne2935265:0
    • Once the feet are removed, two small screws will be visible. With a small screwdriver, unscrew them. Screws are phillips head, 4.35 mm in diameter, 7.88 mm in length.

  5. Linksys WAP54g Bottom Casing/Motherboard Replacement: crwdns2935265:05crwdnd2935265:01crwdnd2935265:01crwdne2935265:0
    • To remove the front blue panel, grip firmly and place thumbs in the two notches on top. Push thumbs forward while keeping a firm grip on bottom.

    • This may require a bit of force.

  6. Linksys WAP54g Bottom Casing/Motherboard Replacement: crwdns2935265:06crwdnd2935265:01crwdnd2935265:01crwdne2935265:0
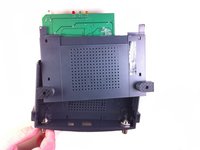
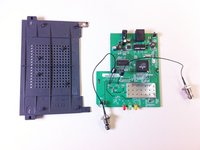
    • Now slide the bottom panel forward and remove it so the top casing is isolated from the bottom casing and motherboard.

  7. Linksys WAP54g Bottom Casing/Motherboard Replacement: crwdns2935265:07crwdnd2935265:01crwdnd2935265:02crwdne2935265:0 Linksys WAP54g Bottom Casing/Motherboard Replacement: crwdns2935265:07crwdnd2935265:02crwdnd2935265:02crwdne2935265:0
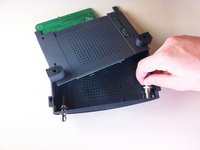
    • Unscrew the nut on the outer side of the back casing. Remove the nut and the washer from both antenna mounts.

  8. Linksys WAP54g Bottom Casing/Motherboard Replacement: crwdns2935265:08crwdnd2935265:01crwdnd2935265:02crwdne2935265:0 Linksys WAP54g Bottom Casing/Motherboard Replacement: crwdns2935265:08crwdnd2935265:02crwdnd2935265:02crwdne2935265:0
    • From here, remove the wires and nuts connected to the back panel by pulling the nuts through the holes.

    • Now the top casing has been removed and isolated from the rest of the device. From here, you can make repairs to the top casing.

    • Once the top panel is removed the main board will still be attached to the bottom panel.

  9. Linksys WAP54g Bottom Casing/Motherboard Replacement, Bottom Casing/Motherboard: crwdns2935265:09crwdnd2935265:01crwdnd2935265:02crwdne2935265:0 Linksys WAP54g Bottom Casing/Motherboard Replacement, Bottom Casing/Motherboard: crwdns2935265:09crwdnd2935265:02crwdnd2935265:02crwdne2935265:0
    • Unscrew the two screws that connect the motherboard to the bottom casing.

    • The motherboard and bottom casing should be completely separated at this point. This allows for replacement of the motherboard and/ or its components as well as the bottom casing.

crwdns2915888:0crwdne2915888:0

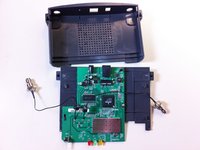
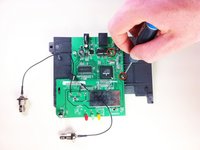
After the motherboard is isolated component level repairs can be made.

crwdns2935229:02crwdne2935229:0

Mathew Fuller

crwdns2935283:010/04/11crwdne2935283:0

146 crwdns2915208:0crwdne2915208:0

crwdns2935295:0crwdne2935295:0

crwdns2915084:0crwdne2915084:0

Cal Poly, Team 21-21, Maness Fall 2011 crwdns2935289:0Cal Poly, Team 21-21, Maness Fall 2011crwdne2935289:0

CPSU-MANESS-F11S21G21

crwdns2931471:05crwdne2931471:0

crwdns2935297:012crwdne2935297:0

crwdns2944067:00crwdne2944067:0

crwdns2917038:0crwdne2917038:0

crwdns2936625:0crwdne2936625:0:

crwdns2936751:024crwdne2936751:0 1

crwdns2936753:07crwdne2936753:0 3

crwdns2936753:030crwdne2936753:0 3

crwdns2942667:0crwdne2942667:0 2,585