crwdns2933423:0crwdne2933423:0

Lenovo Yoga 710-14IKB SSD Replacement

crwdns2942213:0crwdne2942213:0

  1. Lenovo Yoga 710-14IKB SSD Replacement, Back Cover: crwdns2935265:01crwdnd2935265:01crwdnd2935265:01crwdne2935265:0
    • Ensure your device is completely OFF before starting this guide.

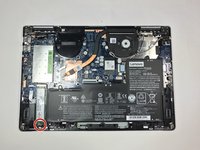
    • Use a Torx T4 screwdriver to unscrew the nine 5 mm screws holding the cover in place.

    • Use a Torx T4 screwdriver to unscrew the 8 mm screw in the center.

    • When, reassembling, make sure not to tighten the screws too much or you may risk cracking the plastic cover.

  2. Lenovo Yoga 710-14IKB SSD Replacement: crwdns2935265:02crwdnd2935265:01crwdnd2935265:03crwdne2935265:0 Lenovo Yoga 710-14IKB SSD Replacement: crwdns2935265:02crwdnd2935265:02crwdnd2935265:03crwdne2935265:0 Lenovo Yoga 710-14IKB SSD Replacement: crwdns2935265:02crwdnd2935265:03crwdnd2935265:03crwdne2935265:0
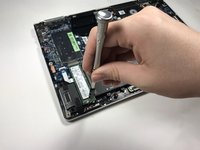
    • Use the plastic opening tool to pry the cover up and away from the laptop, starting at one end and working your way around the cover.

    • The cover is large and flat and made of thin plastic. It cracks easily, so make sure not to pry too hard.

  3. Lenovo Yoga 710-14IKB SSD Replacement, SSD: crwdns2935265:03crwdnd2935265:01crwdnd2935265:02crwdne2935265:0 Lenovo Yoga 710-14IKB SSD Replacement, SSD: crwdns2935265:03crwdnd2935265:02crwdnd2935265:02crwdne2935265:0
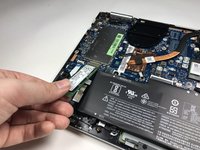
    • Use a Phillips #00 screwdriver to remove the 3mm screw on the SSD.

  4. Lenovo Yoga 710-14IKB SSD Replacement: crwdns2935265:04crwdnd2935265:01crwdnd2935265:02crwdne2935265:0 Lenovo Yoga 710-14IKB SSD Replacement: crwdns2935265:04crwdnd2935265:02crwdnd2935265:02crwdne2935265:0
    • Use your fingers to lift up the SSD and pull away from the socket removing it from the laptop.

crwdns2915888:0crwdne2915888:0

To reassemble your device, follow these instructions in reverse order.

crwdns2935229:07crwdne2935229:0

Grant Doerksen

crwdns2935283:004/17/17crwdne2935283:0

1,011 crwdns2915208:0crwdne2915208:0

crwdns2935297:05crwdne2935297:0

crwdns2915084:0crwdne2915084:0

Cal Poly, Team S14-G5, Banghart Spring 2017 crwdns2935289:0Cal Poly, Team S14-G5, Banghart Spring 2017crwdne2935289:0

CPSU-BANGHART-S17S14G5

crwdns2931471:04crwdne2931471:0

crwdns2935297:027crwdne2935297:0

crwdns2947410:01crwdne2947410:0

Wie habt ihr die NVME zum Laufen bekommen?

Mein Yoga 710 war nicht zu überreden, das er eine NVME M2 als Medium erkennen wollte🙄. Verbaut war ab Werk eine SATA M2, gibt's eine BIOS Einstellung, die die NVME Kompatibilität freischaltet? Ich befürchte, das ihr hier etwas beschreibt, was in der Realität nicht funktioniert.

Don Kiel - crwdns2934203:0crwdne2934203:0

crwdns2917038:0crwdne2917038:0

crwdns2936625:0crwdne2936625:0:

crwdns2936751:024crwdne2936751:0 0

crwdns2936753:07crwdne2936753:0 16

crwdns2936753:030crwdne2936753:0 78

crwdns2942667:0crwdne2942667:0 12,398