crwdns2915892:0crwdne2915892:0
Over time, the USB ports collect dust, dirt, and can become damaged for a multitude of reasons all of which ultimately lead to connectivity issues. This guide will help you remove the USB ports in order to clean or replace them.
crwdns2942213:0crwdne2942213:0
-
-
Remove the ten 3.3 mm screws from the base cover using a T5 Torx screwdriver.
-
-
-
Slide the plastic opening tool between the base cover and the frame to pry open the computer.
-
Slowly go around the entire perimeter of the computer until all edges are loose.
-
-
-
Remove the panel and place it in a safe location.
-
-
-
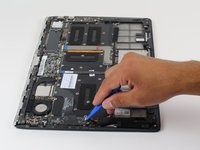
Remove the six 3.5 mm screws surrounding the battery using a Phillips 00 screwdriver.
-
-
crwdns2935267:0crwdne2935267:0Tweezers$4.99
-
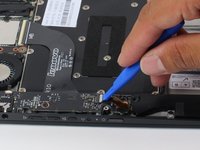
Using either tweezers or your fingers, disconnect the black battery cable by pinching either side of the connector and pulling towards the battery.
-
-
-
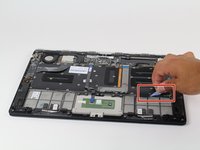
Carefully lift and remove the battery.
-
-
-
Remove the four 4 mm screws using the Phillips 00 screwdriver.
-
-
-
-
Using the plastic opening tool, flip open tab as shown.
-
-
-
Remove the adhesive tape.
-
Flip open the ribbon connecting tab.
-
-
-
Remove the speaker and set it on the side.
-
Use the plastic opening tool to remove the cables.
-
-
-
Removing the other speaker by unwinding cables.
-
-
-
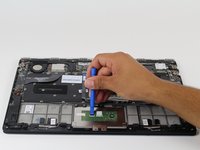
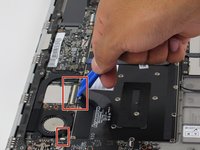
Use the plastic opening tool to flip open the tab on each ribbon connector as shown.
-
-
-
Remove the three indicated 3.5 mm screws using the Philips 00 screwdriver.
-
-
-
On the other side of the laptop, remove the two 3.5 mm screws using the Philips 00 screwdriver.
-
-
-
Remove the two 2.5 mm screws using the Philips 00 screwdriver.
-
-
-
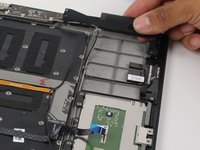
Use the plastic opening tool to lift the metal cable holders.
-
-
-
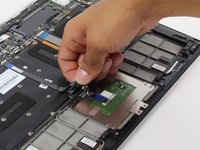
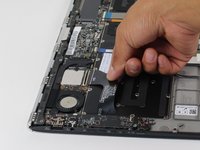
Lift the USB port up and use the plastic opening tool to loop the wires around the USB port.
-
-
-
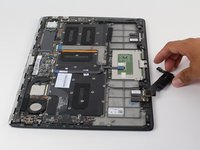
Remove the USB assembly using the plastic opening tool.
-
-
-
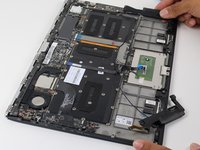
Disconnect the WiFi card from the USB assembly.
-


To reassemble your device, follow these instructions in reverse order.
To reassemble your device, follow these instructions in reverse order.
crwdns2935221:0crwdne2935221:0
crwdns2935229:010crwdne2935229:0
crwdns2915084:0crwdne2915084:0

Cal Poly, Team 12-17, Maness Fall 2015 crwdns2935289:0Cal Poly, Team 12-17, Maness Fall 2015crwdne2935289:0
CPSU-MANESS-F15S12G17
crwdns2931471:04crwdne2931471:0
crwdns2935297:015crwdne2935297:0
crwdns2947412:04crwdne2947412:0
Repaired customers Yoga 3 that had NO working USB ports whatsoever in less than an hour - after cleaning & replacing (no parts needed)
All USB ports were fully functional once again...
Great job & thank you for the help :)
This guide helped me quite a bit today. I really appreciate you providing it.
Can you please help with information on where to get the DC input USB port part. My USB port is broken and unable to find it
None of the 3 USB ports were powering on.
Windows seemed happy and no drivers and bios update helped …
I took apart following this guide, cleaned all ports and PCBs with IPA and a toothbrush and now it’s all working again!
Thank you