crwdns2915892:0crwdne2915892:0
Accessing and replacing the Solid State Drive (SSD) is useful if it has been damaged or if you wish to swap it out with another one for extra storage space. Exercise extreme caution while removing and handling the drive. Although the drive is fairly sturdy, even a small dent can permanently damage it.
Note: The Yoga 3 Pro requires a M.2 SATA drive. NVMe SSDs will not work for the device.
crwdns2942213:0crwdne2942213:0
-
-
Remove the ten 3.3 mm screws from the base cover using a T5 Torx screwdriver.
-
-
-
Slide the plastic opening tool between the base cover and the frame to pry open the computer.
-
Slowly go around the entire perimeter of the computer until all edges are loose.
-
-
-
Remove the panel and place it in a safe location.
-
-
-
-
Remove the six 3.5 mm screws surrounding the battery using a Phillips 00 screwdriver.
-
-
crwdns2935267:0crwdne2935267:0Tweezers$4.99
-
Using either tweezers or your fingers, disconnect the black battery cable by pinching either side of the connector and pulling towards the battery.
-
-
-
Carefully lift and remove the battery.
-
-
-
Remove the 1.5 mm screw using the Philips 00 screwdriver.
-
-
-
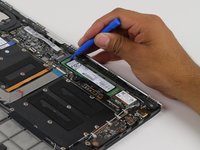
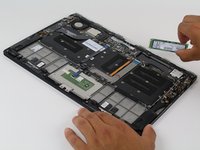
Use the plastic opening tool to remove the hard drive/SSD.
-


To reassemble your device, follow these instructions in reverse order.
To reassemble your device, follow these instructions in reverse order.
crwdns2935221:0crwdne2935221:0
crwdns2935229:08crwdne2935229:0
crwdns2915084:0crwdne2915084:0

Cal Poly, Team 12-17, Maness Fall 2015 crwdns2935289:0Cal Poly, Team 12-17, Maness Fall 2015crwdne2935289:0
CPSU-MANESS-F15S12G17
crwdns2931471:04crwdne2931471:0
crwdns2935297:015crwdne2935297:0
crwdns2947412:05crwdne2947412:0
Thank you. This looks much easier than I imagined that it would.
Why do you remove the battery? Can't you just unhook the battery cable?
You dont have to remove the battery at all to access the SSD
Tunza -
I don't think this guide is 100% accurate, in that the Yoga 3 Pro (mine anyway) ONLY supports SATA3, and NOT NVME(PCIe), for the SSD interface.
As such, if you order, and try to install the Crucial P5 drive (after imaging the old drive to the P5), it will NOT recognize it, in the BIOS, because it can't bootstrap (or in any way, really) the drive.
Maybe there were multiple motherboards, with different chipsets, for the Yoga3 Pro, I have no idea, on this part, but I know the one we have is definitely limited, to SATA3.
@CPSU-MANESS-F15S12G17 (I hope this tags the team, I couldn't figure out how to tag Federico+LopezCasildo, directly, so I'm tagging "the team"), you might want to review this, and adjust, accordingly (there are plenty of SATA3 drives that can/will work, with this system).
Thanks for noting this! I think you're right—I'll update the guide!