crwdns2915892:0crwdne2915892:0
The coin cell battery is responsible for maintaining the laptop’s internal settings while it is powered off, such as its clock. If your Lenovo ThinkPad fails to maintain the date and time, its coin cell battery may need to be replaced. This guide will explain how to replace the coin cell battery in a Lenovo ThinkPad X1 Carbon 4th Gen, model number: 20FB002LUS.
crwdns2942213:0crwdne2942213:0
-
-
Unscrew the nine captive screws on the bottom cover of the laptop using a Phillips #1 screwdriver.
-
There are a few small clips around the edge that you may need to pry at to free them. An opening pick may be helpful for this process.
-
-
-
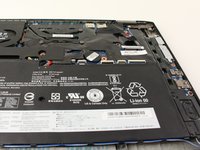
Lift the back cover up and off of the computer.
-
-
-
-
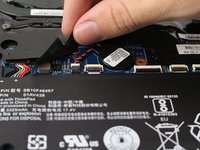
Peel back the plastic protective cover above the main battery section to expose the coin-cell's red and black wires.
-
-
-
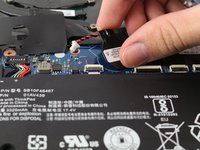
Gently unplug the coin-cell wires from the connector by pulling horizontally away from the connector.
-
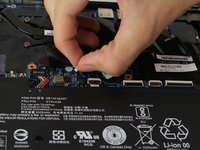
Lift the coin cell out from the computer.
-


To reassemble your device, follow these instructions in reverse order.
To reassemble your device, follow these instructions in reverse order.
crwdns2935221:0crwdne2935221:0
crwdns2935229:06crwdne2935229:0
crwdns2915084:0crwdne2915084:0

Cal Poly, Team S1-G4, White Winter 2020 crwdns2935289:0Cal Poly, Team S1-G4, White Winter 2020crwdne2935289:0
CPSU-WHITE-W20S1G4
crwdns2931471:03crwdne2931471:0
crwdns2935297:021crwdne2935297:0
crwdns2947412:03crwdne2947412:0
Ive got a issue with my X1 Carbon not booting up . It will start up and tell me that my date and time is wrong but then it only gives me two choices Esc to continue or F1 to enter setup. Either way it takes me to a startup interrupt menu and then from there it takes me to boot menu where it says ATA HDDO: Toshiba it's a hard drive I'm guessing cuz it says it has 128 GB capacity. Again I'm faced with two choices because now I have boot menu and app menu, where do I fix this because my laptop is in great shape until all of this started.
1st you have to confirm the boot to device, which is the toshiba drive. as it boots 2nd time, press esc again. it will now boot normally (to toshiba drive). you have to replace the coin battery, otherwise you will face that again when the laptop battery drains to 0%.
Thank you, perfect! Used your direction for my ThinkPad X1 Carbon 4th. Yes, old but served me well. Of course, I’ll need to buy another, but not today. Best to all of you!