crwdns2942213:0crwdne2942213:0
-
-
Unscrew all screws holding the back panel in place and disconnect the battery.
-
Use a prying tool to disconnect the keyboard.
-
Disconnect and remove the palmrest.
-
-
-
-
Remove the metal bracket.
-
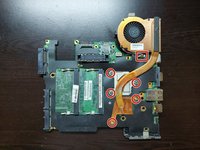
Unscrew and remove the motherboard.
-
-
-
Unscrew the screws holding the CPU heatsink and disconnect the fan.
-
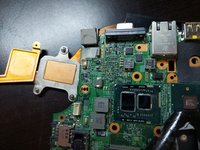
Clean the old thermal paste both from the cooler and the CPU. It is best to use isopropyl alcohol and cotton swabs or paper towel, but be careful not to go too hard on the CPU.
-
It is also recommended to use compressed air to remove any dust in the laptop and the fan.
-
Dont use too much thermal paste, just enough to cover some portion of the pad. If you have a spreader, use it. The thermal paste will apply evenly after you tighten the heatsink.
-
Last, put the heatsink back carefully and tighten the screws in order to ensure even pressure. Dont forget to plug in the fan cable.
-


To reassemble your device, follow these instructions in reverse order.
crwdns2935221:0crwdne2935221:0
crwdns2935229:03crwdne2935229:0

crwdns2947412:03crwdne2947412:0
Thank you! You've helped me give my favorite laptop new life. It was overheating (not to a shutdown point, but I could tell), so I presumed the thermal paste had been baked after so many years, but this is a very compact machine and more intricate than a larger laptop. So I was a little unsure about doing this. You walked me through it, and it worked perfectly. I was expecting it to be a little better, but it was INSTANTLY better, running so much cooler. I'm typing this on my X201!
Thank you! Great stuff.
Nice to hear!
Great guide. Before removing the motherboard, you'll need to remove the thin keyboard bezel first (see here for pictures). It comes off easily.
Also I chose to not remove the thermal pad on the chipset (the chip with one die), just replacing the thermal paste on the CPU (the chip with two dies).
Works perfect so far: random shutdowns are gone, and now I'm not going past 85° under heavy load. Using Arctic MX-6 thermal paste.