crwdns2915892:0crwdne2915892:0
Use this guide to replace a noisy or burned-out fan.
crwdns2942213:0crwdne2942213:0
-
-
Flip the computer over and remove the battery.
-
-
-
Locate the screws on the back of the laptop. Unscrew all 7 screws using a magnetic screwdriver fit with a PH0 bit.
-
-
-
Remove the following screws with a magnetic screwdriver fit with a PH0 bit.
-
-
-
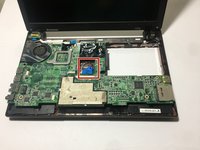
Please follow steps 3-6 from the Keyboard Replacement Guide, then return to this guide.
-
-
-
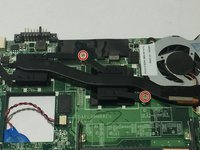
Using the magnetic screwdriver fit with a PH0 bit, unscrew the two screws shown in the picture.
-
-
-
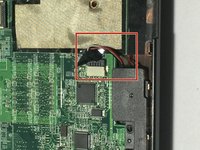
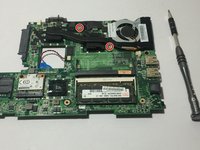
Disconnect the two wired ribbons by pulling up the little black tabs, then pull the wires out.
-
-
-
-
Disconnect the little black wire by simply pulling it out.
-
-
-
Using the spudger, go beneath the frame to pry the frame off the device.
-
Place the frame aside once this step is completed.
-
-
-
Using the magnetic screwdriver, unscrew all 8 screws shown.
-
-
-
Disconnect the three wired ribbons on the top left side of the panel.
-
-
-
Disconnect the wired plug, then close the device and flip it over.
-
-
-
Simply pull the two plugs up and out to disconnect the wires.
-
-
-
Flip the device back over to untape the two black wires located at the bottom left corner of the device.
-
-
-
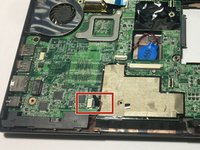
Simply disconnect the blue connector at the center of the device.
-
-
-
Using your fingers, slowly push the panel out of the plastic body.
-
-
-
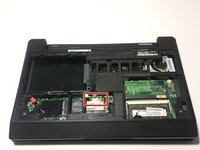
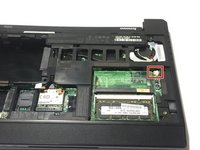
Using the same magnetic screwdriver, unscrew the two screws as shown in the picture.
-
-
-
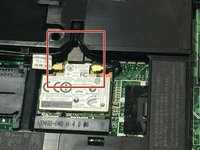
Disconnect the plug right below the Fan. A pair of pliers might be useful during this step.
-


Then you are good to go.
Then you are good to go.
crwdns2935221:0crwdne2935221:0
crwdns2935229:03crwdne2935229:0
crwdns2915084:0crwdne2915084:0

University of North Texas, Team S2-G2, Thomas Spring 2018 crwdns2935289:0University of North Texas, Team S2-G2, Thomas Spring 2018crwdne2935289:0
UNT-THOMAS-S18S2G2
crwdns2931471:03crwdne2931471:0
crwdns2935297:03crwdne2935297:0