crwdns2915892:0crwdne2915892:0
This guide will lead you through the steps to replace the trackpad on the Lenovo ThinkPad X1 Extreme Generation 1. The trackpad is used to control the device and may get worn down with age.
The removal of the trackpad requires you to first remove the battery, then proceed to remove four screws. Make sure the device is turned off before you begin these steps.
crwdns2942213:0crwdne2942213:0
-
-
Orient the laptop so that it is bottom up, and the trackpad is closest to you.
-
Unscrew the seven captive screws with a Phillips #00 screwdriver.
-
Slide a blue opening pick in the gap between the bottom panel and chassis, and pry off the one clip on each side.
-
Remove the back cover from the device.
-
-
-
Use a Phillips #00 head screwdriver to remove the four 4 mm screws above the battery.
-
-
-
Lift the speaker modules on either side of the battery out of its pegs, and unwind the cable from the front of the battery.
-
Set the speaker modules out of the way.
-
-
-
crwdns2935267:0crwdne2935267:0Tweezers$4.99
-
Use tweezers to peel the plastic cover off the connector.
-
Use a spudger or your fingernail to pry up the battery straight up from the motherboard.
-
-
-
Lift the battery out of the frame and remove it from the device.
-
-
crwdns2935267:0crwdne2935267:0Flathead 1.5 mm Screwdriver$5.49
-
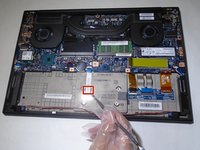
Remove the four screws that are holding the trackpad to the Thinkpad using a 1.5 mm flathead screwdriver.
-
-
-
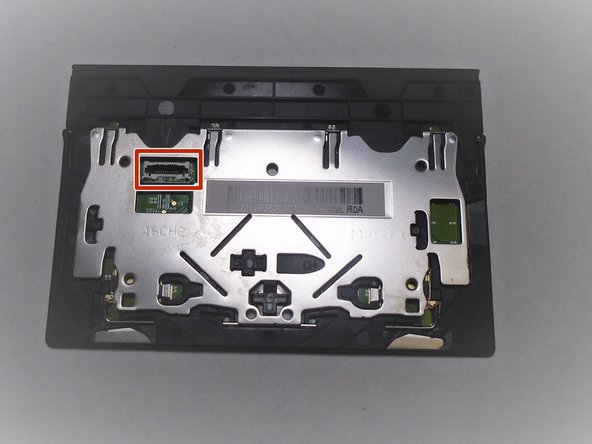
Use a spudger to release the retaining tab on the trackpad cable connector.
-


To reassemble your device, follow these instructions in reverse order.
crwdns2935221:0crwdne2935221:0
crwdns2935227:0crwdne2935227:0
crwdns2935287:0crwdne2935287:0

The Citadel Military College of South Carolina, Team 3-18, Eggleston Fall 2021 crwdns2935289:0The Citadel Military College of South Carolina, Team 3-18, Eggleston Fall 2021crwdne2935289:0
CMCSC-EGGLESTON-F21S3G18
crwdns2931471:03crwdne2931471:0
crwdns2935297:02crwdne2935297:0