crwdns2915892:0crwdne2915892:0
This is a moderate difficulty repair, but takes patience and precision. DO NOT ATTEMPT IF YOU DON'T HAVE ANY EXPERIENCE WITH LAPTOP REPAIR. MOTHERBOARDS AND RIBBON CONNECTORS ARE EXTREMELY FRAGILE!
crwdns2942213:0crwdne2942213:0
-
-
Disconnect any chargers or accessories from the laptop.
-
Shut down the laptop through Windows (or whatever OS it runs), or hold the power button for ~10secs until the screen and power light turn off and the laptop does not respond to key presses or trackpad movement.
-
-
-
Remove the 7 screws on the base. These screws are captive and will not come out of the base after fully unscrewing.
-
Pull up from the top of the base and remove the base.
-
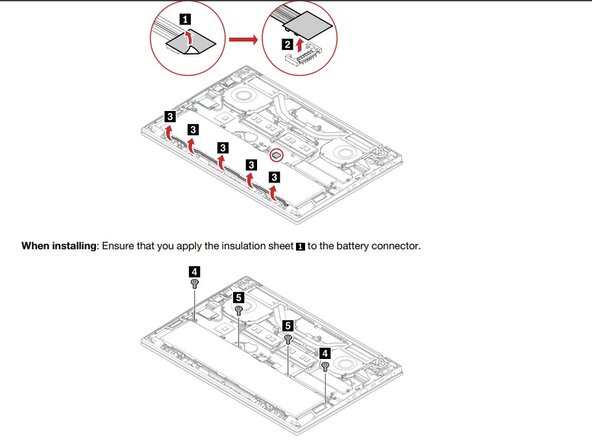
Pull up on the right edge of the battery connector and gently pull upwards to remove and disconnect the battery, then unscrew and remove the battery screws and remove the battery from the chassis.
-
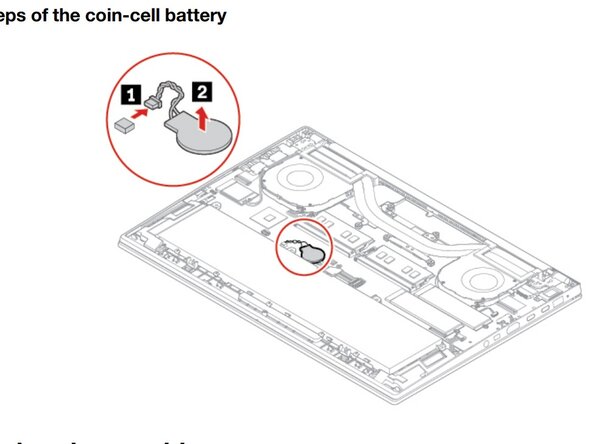
Gently disconnect the CMOS (Real-Time-Clock/BIOS Coin battery) and remove the cell from the board.
-
-
-
-
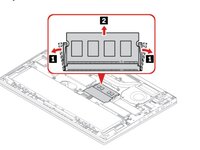
Remove the 1-2 RAM Sticks (the amount of sticks varies by configuration) by gently pulling the 2 metal clips outwards until the RAM stick releases into a 45 degree angle, where you can them pull it out of the system.
-
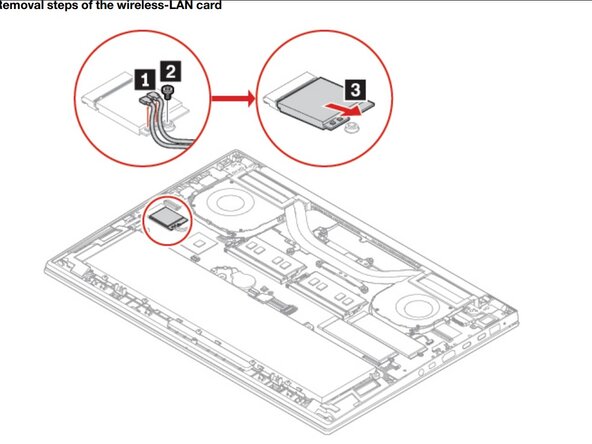
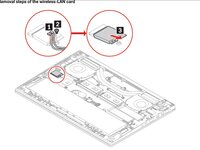
On the WiFi card located near the left thermal fan, gently pull up on the 2 antennae (black and gray) at the tip which connects to the module to disconnect them. Unscrew the 1 philips + screw holding the module in place, then pull the card out gently. Dislodge the WiFi antennae from the clips on the thermal fan and gently push them to the side.
-
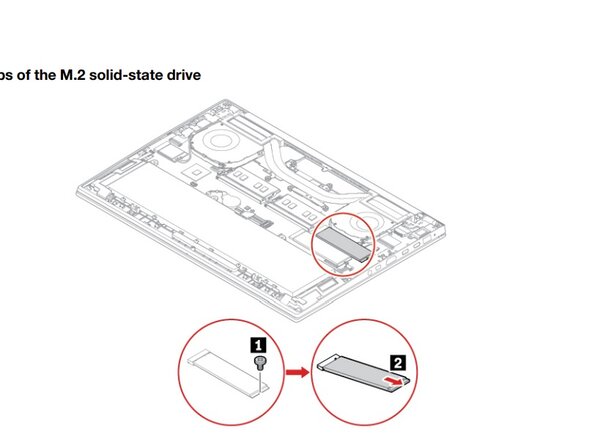
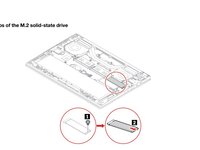
Unscrew the 1 Philips + screw holding the SSD in place, and slowly pull to the right to remove the SSD.
-
-
-
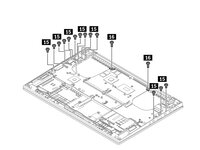
Using the diagram attached, remove all ribbon connectors visible on the motherboard by pulling up on the small black tab and pulling the connector out of the slot.
-
-
-
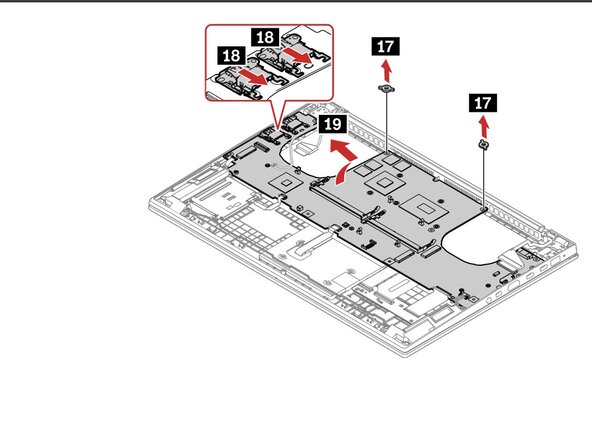
Unscrew all of the screws shown in the diagram and safely store them. Silver screws are all for the motherboard. (Ignore the removed heatsink in the photo, that is not required when removing the motherboard)
-
Follow the 18 label in the photo, and after unscrewing all screws, including the screws for the USB-A ports, push the two ports gently towards the center, this will dislodge them from their holes in the chassis. (only push until it stops, don't go further to avoid damaging ports).
-
-
-
Once all screws are removed, ribbon cables disconnected, and components (RAM, SSD, WiFi) are removed, lift up the motherboard gently from the left side to a 45 degree angle, the gently pull outwards to release the motherboard from the system.
-
When installing a new motherboard, make sure to free all cables so they no cables or connectors get stuck under the board.
-


After replacing the motherboard, test power on, POST, and Windows function before sealing the device, and make sure to test all functions of the laptop (camera, speakers, ports, charger, etc.)
After replacing the motherboard, test power on, POST, and Windows function before sealing the device, and make sure to test all functions of the laptop (camera, speakers, ports, charger, etc.)
