crwdns2915892:0crwdne2915892:0
Reasons for failure in the display on this device include physical damage and cracks or shatters, vertical or horizontal lines appearing on the display, a flickering display, an extremely dim display, or failure to produce all pixels correctly. If you are experiencing any of these issues, a display replacement should return your computer to full functionality. This guide will show you how to replace the display in your Lenovo ThinkPad X1 Carbon 7th Generation laptop.
crwdns2942213:0crwdne2942213:0
-
-
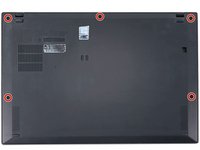
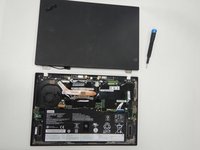
Use a Phillips #1 screwdriver to loosen the five captive screws securing the back cover.
-
-
-
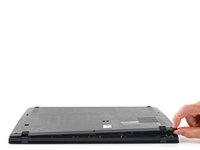
Insert an opening pick at a 45˚ angle between the back cover and frame near the rear middle screw.
-
Pry up on the pick to release the clips securing the back cover to the frame.
-
-
-
-
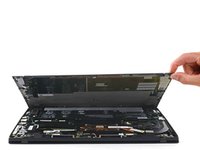
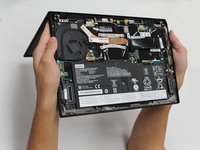
Lift the back cover up and remove it from the chassis.
-
-
-
Remove the six 2mm screws from the display hinges using a Phillips #0 screwdriver.
-
Remove each of the cables connecting the display assembly to the motherboard:
-
A display cable on the left
-
Two coaxial cables in the middle
-
Two more cables on the right
-
-
-
Lift the computer up and rotate the display backwards until it is detached from the rest of the computer as shown.
-


To reassemble your device, follow these instructions in reverse order.
To reassemble your device, follow these instructions in reverse order.
crwdns2935221:0crwdne2935221:0
crwdns2935229:02crwdne2935229:0
crwdns2915084:0crwdne2915084:0

The Citadel Military College of South Carolina, Team S2-G13, Eggleston Fall 2020 crwdns2935289:0The Citadel Military College of South Carolina, Team S2-G13, Eggleston Fall 2020crwdne2935289:0
CMCSC-EGGLESTON-F20S2G13
crwdns2931471:03crwdne2931471:0
crwdns2935297:07crwdne2935297:0
crwdns2947410:01crwdne2947410:0
great guide! BUT the "index page" for the thinkpad x1 carbon 7th gen (Lenovo ThinkPad X1 Carbon 7th Gen) doesn't list it, so something is kind of broken...