crwdns2933423:0crwdne2933423:0

Lenovo ThinkPad T570 SSD Replacement

crwdns2942213:0crwdne2942213:0

  1. Lenovo ThinkPad T570 SSD Replacement, Battery: crwdns2935265:01crwdnd2935265:01crwdnd2935265:03crwdne2935265:0 Lenovo ThinkPad T570 SSD Replacement, Battery: crwdns2935265:01crwdnd2935265:02crwdnd2935265:03crwdne2935265:0 Lenovo ThinkPad T570 SSD Replacement, Battery: crwdns2935265:01crwdnd2935265:03crwdnd2935265:03crwdne2935265:0
    • Switch the left latch to the left to unlock the battery.

    • While holding the right latch to the right, slide the battery away from the device.

  2. Lenovo ThinkPad T570 SSD Replacement, SSD: crwdns2935265:02crwdnd2935265:01crwdnd2935265:03crwdne2935265:0 Lenovo ThinkPad T570 SSD Replacement, SSD: crwdns2935265:02crwdnd2935265:02crwdnd2935265:03crwdne2935265:0 Lenovo ThinkPad T570 SSD Replacement, SSD: crwdns2935265:02crwdnd2935265:03crwdnd2935265:03crwdne2935265:0
    • Loosen the seven captive screws on the back panel of the computer using a Phillips #0 screwdriver.

    • The screws are designed so they do not come out of the laptop base, so twist the screwdriver until they are completely loosened.

    • Remove the back panel.

  3. Lenovo ThinkPad T570 SSD Replacement: crwdns2935265:03crwdnd2935265:01crwdnd2935265:03crwdne2935265:0 Lenovo ThinkPad T570 SSD Replacement: crwdns2935265:03crwdnd2935265:02crwdnd2935265:03crwdne2935265:0 Lenovo ThinkPad T570 SSD Replacement: crwdns2935265:03crwdnd2935265:03crwdnd2935265:03crwdne2935265:0
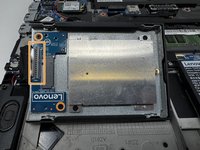
    • Pinch the black tab and pull it to the left and up to remove the SSD.

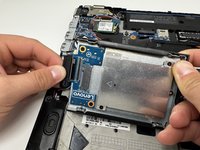
    • Flip the hinge upward and detach the piece that's connected to the SSD by pulling the tab to the left.

  4. Lenovo ThinkPad T570 SSD Replacement: crwdns2935265:04crwdnd2935265:01crwdnd2935265:02crwdne2935265:0 Lenovo ThinkPad T570 SSD Replacement: crwdns2935265:04crwdnd2935265:02crwdnd2935265:02crwdne2935265:0
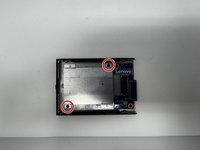
    • Using the Phillips #0 screwdriver, remove the two 3 mm screws.

    • These screws are very small. Be mindful when removing them so that they do not get lost.

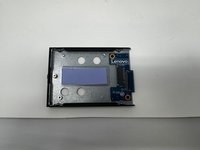
    • Remove the metal bracket.

    • Remove the SSD.

    • This device did not include an SSD.

crwdns2915888:0crwdne2915888:0

To reassemble your device, follow these instructions in reverse order.

Rylee Hjorth

crwdns2935283:009/04/24crwdne2935283:0

277 crwdns2915208:0crwdne2915208:0

crwdns2935297:03crwdne2935297:0

crwdns2915084:0crwdne2915084:0

Utah Tech University, Team 1-3, Crenshaw Fall 2024 crwdns2935289:0Utah Tech University, Team 1-3, Crenshaw Fall 2024crwdne2935289:0

UTAHTECH-CRENSHAW-F24S1G3

crwdns2931471:03crwdne2931471:0

crwdns2935297:04crwdne2935297:0

crwdns2947412:00crwdne2947412:0

crwdns2917038:0crwdne2917038:0

crwdns2936625:0crwdne2936625:0:

crwdns2936751:024crwdne2936751:0 0

crwdns2936753:07crwdne2936753:0 2

crwdns2936753:030crwdne2936753:0 34

crwdns2942667:0crwdne2942667:0 231