crwdns2915892:0crwdne2915892:0
This guide provides information on how to replace a Lenovo ThinkPad Helix battery.
Replacing a battery is essential to keep your device on and running for use. When following these steps remeber to maintain a safe work space and a place to store screws that way you do not lose anything.
Lenovo adds that; “Use only the authorized battery specified for your tablet. Any other battery could ignite or explode.” This is essential to keep you and your device safe, intact and usable.
crwdns2942213:0crwdne2942213:0
-
-
Using a plastic opening tool or opening pick, gently pry the screen off.
-
Once you're able to lift a little bit of the screen away from the tablet, work your way around until screen is separated from tablet. Stop for step two.
-
-
-
Lift the screen up slowly.
-
Open the clips of the ZIF connectors and gently grab the cable to pull it out.
-
-
-
-
Once the cables are disconnected, remove the screen.
-
-
-
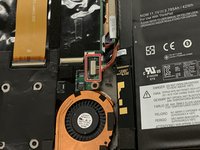
Using a Phillips #00 screwdriver, unscrew the four nylon-coated 3 mm screws holding the battery in place.
-
-
-
Disconnect the battery cable from the motherboard.
-
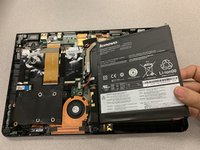
Lift the battery out of the device.
-


To reassemble your device, follow these instructions in reverse order.
crwdns2935221:0crwdne2935221:0
crwdns2935229:07crwdne2935229:0

crwdns2935287:0crwdne2935287:0

Gateway, Team S1-G6, Saknee Fall 2019 crwdns2935289:0Gateway, Team S1-G6, Saknee Fall 2019crwdne2935289:0
GCC-SAKNEE-F19S1G6
crwdns2931471:04crwdne2931471:0
crwdns2935297:03crwdne2935297:0
crwdns2947410:01crwdne2947410:0
Hi, would you possibly have an explanation as to why a replacement battery is still not charging and yielding error messages? Thank you.