crwdns2942213:0crwdne2942213:0
-
-
Start at the microSD slot.
-
Use the opening pick to slide underneath the back cover of the tablet.
-
Slide the opening pick around the tablet until the back cover is off.
-
-
crwdns2935267:0crwdne2935267:0Tweezers$4.99
-
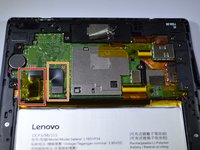
Remove the 8 screws with a Phillips #000 screwdriver [bit].
-
There is a screw under the blue "s" sticker.
-
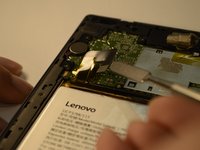
Remove tape holding plate down.
-
Use precision tweezers or your fingers to remove plate.
-
-
-
-
Remove yellow tape.
-
Use a spudger or plastic opening tool to remove the battery's ribbon cable from the motherboard.
-
-
-
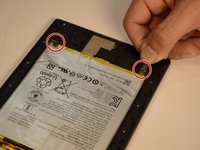
Gently pull on the two stretch release adhesive strips. Do not pull up, pull away from battery.
-
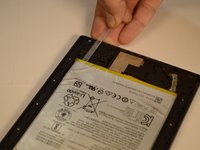
Once the tabs are off, lift the battery up from the frame.
Hi
What I want to ask is how did you get to the motherboard after step four. I couldn't see how you removed the upper protection plastic part.
I couldn't get it out either!!!
I wish you good work.
Be cautious when removing the adhesive strip. Pull it straight ( not up) from the battery a little bit at a time. It is longer than you'd think.
Spot on instructions. Be sure to seat the battery connector very carefully and make sure it doesn't pop off. It look me several tries to seat it.
-


To reassemble your device, follow these instructions in reverse order.
To reassemble your device, follow these instructions in reverse order.
crwdns2935221:0crwdne2935221:0
crwdns2935229:06crwdne2935229:0

crwdns2915084:0crwdne2915084:0

Purdue University Northwest, Team S2-G4, Hingst Spring 2019 crwdns2935289:0Purdue University Northwest, Team S2-G4, Hingst Spring 2019crwdne2935289:0
PNW-HINGST-S19S2G4
crwdns2931471:05crwdne2931471:0
crwdns2935297:06crwdne2935297:0
crwdns2947410:01crwdne2947410:0
Hi,
After replacing the battery, we now get an error “Temperature too high, will shut down” when we boot. We get the same error with the old battery installed. We tried a factory reset. That did not help. I’ve rechecked steps, and it is pretty straighforward. Any ideas?
Thanks,
Dave