crwdns2915892:0crwdne2915892:0
Here is a video tutorial: https://youtu.be/qz381bG0lAo
crwdns2942213:0crwdne2942213:0
-
-
Shut down the laptop.
-
Disconnect the power plug.
-
Close the laptop.
-
-
-
Flip the laptop upside down.
-
Remove these 11 screws with a phillips screwdriver.
-
Remove the cover by putting something thin between the cover and the base and then pushing towards the cooling vents, carefully lift it.
-
-
-
-
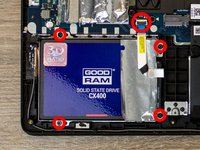
Remove these 4 screws with a phillips screwdriver.
-
Uclip and disconnect the ribbon cable.
-
Remove the disk from the laptop.
-
-
-
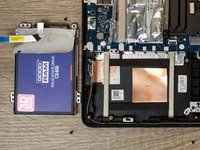
Unplug the SATA adaptor from the disk.
-
Remove these 4 screws with a phillips screwdriver.
-
Remove the disk from the bracket.
-


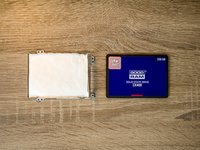
The drive is out. To install a new one, just follow the steps in the opposite order.
crwdns2935221:0crwdne2935221:0
crwdns2935229:06crwdne2935229:0

crwdns2947412:06crwdne2947412:0
Friend, I tried to remove the cover after removing all the screws, but it seemed to be locked.
You need to carefully pry the bottom cover with something thin like a plastic pryer.
My Y700 has two harddrives. Is this the instructions for the primary hard drive or the secondary?
It’s possible that the second drive is a M.2 drive. Both can be either. It’s suggested to use the faster drive for the system and the slower one for storage.
Would Samsung 1TB SSD 860 EVO work for the HDD replacement ?