crwdns2915892:0crwdne2915892:0
Use this guide to replace the back panel of the Lenovo IdeaPad 320-17IKB.
The back panel is the bottom plastic piece of the laptop and it often takes the most wear and tear over the years when the laptop is being used. The back panel can often crack, which can result in damages to the hardware inside the computer.
Before using this guide, check out the Lenovo IdeaPad 320-17IKB Troubleshooting page for more helpful information in diagnosing your device.
Use caution when lifting the back panel off the laptop to not damage any hardware.
crwdns2942213:0crwdne2942213:0
-
-
Flip the laptop over so that the back panel is facing upwards.
-
-
-
Remove fourteen 7mm Phillips #00 screws from the back panel.
-
-
-
-
Carefully remove the optical drive by pulling the bezel away from the laptop.
-
-
-
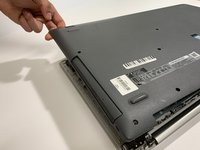
Use your fingers or an opening tool to gently remove the back panel from the bottom of the laptop.
-
Lay both sides of the laptop next to each other.
-


To reassemble your device, follow these instructions in reverse order.
crwdns2935221:0crwdne2935221:0
crwdns2935229:02crwdne2935229:0

crwdns2935287:0crwdne2935287:0

Embry-Riddle Aeronautical University, Team S6-G3, Salas Fall 2019 crwdns2935289:0Embry-Riddle Aeronautical University, Team S6-G3, Salas Fall 2019crwdne2935289:0
ERAU-SALAS-F19S6G3
crwdns2931471:04crwdne2931471:0
crwdns2935297:010crwdne2935297:0