crwdns2933423:0crwdne2933423:0

Lenovo IdeaPad Z570 Disc Drive Replacement

crwdns2942213:0crwdne2942213:0

  1. Lenovo IdeaPad Z570 Disc Drive Replacement, Battery: crwdns2935265:01crwdnd2935265:01crwdnd2935265:01crwdne2935265:0
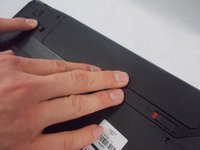
    • Place the laptop face down with the battery facing away from you

  2. Lenovo IdeaPad Z570 Disc Drive Replacement: crwdns2935265:02crwdnd2935265:01crwdnd2935265:01crwdne2935265:0
    • Flip the right switch right-bound

  3. Lenovo IdeaPad Z570 Disc Drive Replacement: crwdns2935265:03crwdnd2935265:01crwdnd2935265:01crwdne2935265:0
    • Hold the left switch.

  4. Lenovo IdeaPad Z570 Disc Drive Replacement: crwdns2935265:04crwdnd2935265:01crwdnd2935265:02crwdne2935265:0 Lenovo IdeaPad Z570 Disc Drive Replacement: crwdns2935265:04crwdnd2935265:02crwdnd2935265:02crwdne2935265:0
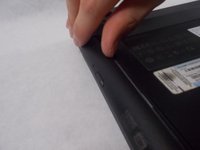
    • Push the battery forward lightly to remove it while holding the left switch.

  5. Lenovo IdeaPad Z570 Disc Drive Replacement, Disc Drive: crwdns2935265:05crwdnd2935265:01crwdnd2935265:01crwdne2935265:0
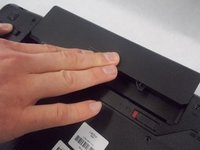
    • Place the laptop face down with the battery slot facing away from you.

  6. Lenovo IdeaPad Z570 Disc Drive Replacement: crwdns2935265:06crwdnd2935265:01crwdnd2935265:02crwdne2935265:0 Lenovo IdeaPad Z570 Disc Drive Replacement: crwdns2935265:06crwdnd2935265:02crwdnd2935265:02crwdne2935265:0
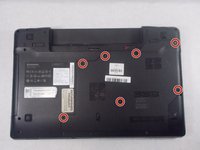
    • Loosen all seven 3mm screws from the back panel using a Phillips #0 screwdriver.

    • These screws cannot be removed from the device.

    • Remove the back panel from the device.

  7. Lenovo IdeaPad Z570 Disc Drive Replacement: crwdns2935265:07crwdnd2935265:01crwdnd2935265:02crwdne2935265:0 Lenovo IdeaPad Z570 Disc Drive Replacement: crwdns2935265:07crwdnd2935265:02crwdnd2935265:02crwdne2935265:0
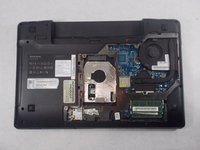
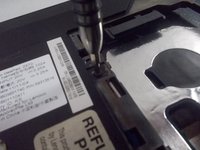
    • Remove the 3 mm Phillips #0 screw located on the left hand side that holds the disc drive in place.

  8. Lenovo IdeaPad Z570 Disc Drive Replacement: crwdns2935265:08crwdnd2935265:01crwdnd2935265:02crwdne2935265:0 Lenovo IdeaPad Z570 Disc Drive Replacement: crwdns2935265:08crwdnd2935265:02crwdnd2935265:02crwdne2935265:0
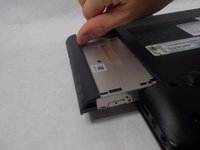
    • Gently remove the disc drive from the left hand side of the laptop.

crwdns2915888:0crwdne2915888:0

To reassemble your device, follow these instructions in reverse order.

crwdns2935227:0crwdne2935227:0

Daniel Lopes

crwdns2935283:003/08/19crwdne2935283:0

610 crwdns2915208:0crwdne2915208:0

crwdns2935297:03crwdne2935297:0

crwdns2915084:0crwdne2915084:0

UMass Dartmouth, Team S1-G6, Botvin Spring 2019 crwdns2935289:0UMass Dartmouth, Team S1-G6, Botvin Spring 2019crwdne2935289:0

UMASSD-BOTVIN-S19S1G6

crwdns2931471:04crwdne2931471:0

crwdns2935297:05crwdne2935297:0

crwdns2944067:00crwdne2944067:0

crwdns2917038:0crwdne2917038:0

crwdns2936625:0crwdne2936625:0:

crwdns2936751:024crwdne2936751:0 1

crwdns2936753:07crwdne2936753:0 10

crwdns2936753:030crwdne2936753:0 20

crwdns2942667:0crwdne2942667:0 698