crwdns2933423:0crwdne2933423:0

Lenovo IdeaPad Yoga 11S Top Assembly Replacement

crwdns2942213:0crwdne2942213:0

  1. Lenovo IdeaPad Yoga 11S Top Assembly Replacement, Top Assembly: crwdns2935265:01crwdnd2935265:01crwdnd2935265:03crwdne2935265:0 Lenovo IdeaPad Yoga 11S Top Assembly Replacement, Top Assembly: crwdns2935265:01crwdnd2935265:02crwdnd2935265:03crwdne2935265:0 Lenovo IdeaPad Yoga 11S Top Assembly Replacement, Top Assembly: crwdns2935265:01crwdnd2935265:03crwdnd2935265:03crwdne2935265:0
    • Remember to power off the device before removing any parts.

    • Position the laptop so that the bottom enclosure is facing upward.

    • Use a Phillips #0 Screwdriver to remove the ten 1.9mm screws holding the bottom enclosure in place.

    • Use an opening tool to carefully pry up the rubber pads.

    • Use a Phillips screwdriver to remove the two screws under the rubber pads, which secure the keyboard.

  2. Lenovo IdeaPad Yoga 11S Top Assembly Replacement, Remove Keyboard: crwdns2935265:02crwdnd2935265:01crwdnd2935265:01crwdne2935265:0
    • Flip the laptop over and swing open the display.

    • Lift the edge of the keyboard closest to the trackpad up.

    • Carefully disconnect keyboard ribbon cable from the laptop.

    • Remove the keyboard.

  3. Lenovo IdeaPad Yoga 11S Top Assembly Replacement: crwdns2935265:03crwdnd2935265:01crwdnd2935265:01crwdne2935265:0
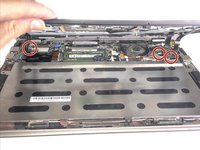
    • Remove the two screws securing the midframe.

  4. Lenovo IdeaPad Yoga 11S Top Assembly Replacement: crwdns2935265:04crwdnd2935265:01crwdnd2935265:03crwdne2935265:0 Lenovo IdeaPad Yoga 11S Top Assembly Replacement: crwdns2935265:04crwdnd2935265:02crwdnd2935265:03crwdne2935265:0 Lenovo IdeaPad Yoga 11S Top Assembly Replacement: crwdns2935265:04crwdnd2935265:03crwdnd2935265:03crwdne2935265:0
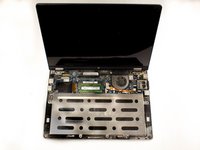
    • Grab the front edge of the top assembly and lift it up carefully.

    • There are three ribbon cables that attach the top assembly to the motherboard. Lift carefully to avoid damaging them.

    • Gently slide the three ribbon cables out of their slots.

    • Remove the top assembly completely by pulling it off of the device.

crwdns2915888:0crwdne2915888:0

To reassemble your device, follow these instructions in reverse order.

crwdns2935229:02crwdne2935229:0

Landon Epps

crwdns2935283:003/26/15crwdne2935283:0

982 crwdns2915208:0crwdne2915208:0

crwdns2935297:05crwdne2935297:0

crwdns2915084:0crwdne2915084:0

Baylor, Team 7-11, Williams Spring 2015 crwdns2935289:0Baylor, Team 7-11, Williams Spring 2015crwdne2935289:0

BU-WILLIAMS-S15S7G11

crwdns2931471:03crwdne2931471:0

crwdns2935297:010crwdne2935297:0

crwdns2917034:0crwdne2917034:0

I am looking into buying one of these but looking at your pictures I can't find the SSD. Is it user upgradeable?

ggr - crwdns2934203:0crwdne2934203:0

crwdns2917038:0crwdne2917038:0

crwdns2936625:0crwdne2936625:0:

crwdns2936751:024crwdne2936751:0 0

crwdns2936753:07crwdne2936753:0 8

crwdns2936753:030crwdne2936753:0 14

crwdns2942667:0crwdne2942667:0 3,126