crwdns2933423:0crwdne2933423:0

Lenovo IdeaPad S400 Touch Hard Drive Replacement

crwdns2942213:0crwdne2942213:0

  1. Lenovo IdeaPad S400 Touch Hard Drive Replacement, Battery: crwdns2935265:01crwdnd2935265:01crwdnd2935265:03crwdne2935265:0 Lenovo IdeaPad S400 Touch Hard Drive Replacement, Battery: crwdns2935265:01crwdnd2935265:02crwdnd2935265:03crwdne2935265:0 Lenovo IdeaPad S400 Touch Hard Drive Replacement, Battery: crwdns2935265:01crwdnd2935265:03crwdnd2935265:03crwdne2935265:0
    • Turn your computer over so the back is face up.

    • Use your forefinger to unlock the two tabs located on the back. Slide the tabs until you see the red showing.

    • The battery cover will then pop up allowing you access to the battery.

  2. Lenovo IdeaPad S400 Touch Hard Drive Replacement, Hard Drive: crwdns2935265:02crwdnd2935265:01crwdnd2935265:03crwdne2935265:0 Lenovo IdeaPad S400 Touch Hard Drive Replacement, Hard Drive: crwdns2935265:02crwdnd2935265:02crwdnd2935265:03crwdne2935265:0 Lenovo IdeaPad S400 Touch Hard Drive Replacement, Hard Drive: crwdns2935265:02crwdnd2935265:03crwdnd2935265:03crwdne2935265:0
    • Remove the five 6mm Phillips #0 screws from the back panel.

    • Pull back the rubber tabs from the corners of the laptop backing to expose the screws.

    • The two tabs next to the battery flip toward the battery. The two remaining tabs flip down, away from the battery.

    • Remove the four 4mm Phillips #0 screws that are underneath the rubber tabs.

    • Remove the three 6mm Phillips #0 screws from under the battery.

  3. Lenovo IdeaPad S400 Touch Hard Drive Replacement: crwdns2935265:03crwdnd2935265:01crwdnd2935265:01crwdne2935265:0
    • Slide the back panel away to remove it.

    • Don't be afraid to apply force when removing the back panel.

  4. Lenovo IdeaPad S400 Touch Hard Drive Replacement: crwdns2935265:04crwdnd2935265:01crwdnd2935265:02crwdne2935265:0 Lenovo IdeaPad S400 Touch Hard Drive Replacement: crwdns2935265:04crwdnd2935265:02crwdnd2935265:02crwdne2935265:0
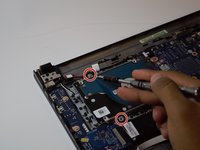
    • Remove the two 3mm Phillips #0 screws that hold the hard drive to the case.

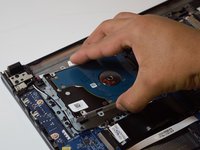
    • Take out the hard drive by lifting and sliding it at the same time.

crwdns2915888:0crwdne2915888:0

To reassemble your device, follow these instructions in reverse order.

crwdns2935229:03crwdne2935229:0

Max Hoyle

crwdns2935283:002/12/19crwdne2935283:0

529 crwdns2915208:0crwdne2915208:0

crwdns2935297:05crwdne2935297:0

crwdns2915084:0crwdne2915084:0

Western Carolina University, Team S1-G6, Virtue Spring 2019 crwdns2935289:0Western Carolina University, Team S1-G6, Virtue Spring 2019crwdne2935289:0

WCU-VIRTUE-S19S1G6

crwdns2931471:05crwdne2931471:0

crwdns2935297:05crwdne2935297:0

crwdns2944067:00crwdne2944067:0

crwdns2917038:0crwdne2917038:0

crwdns2936625:0crwdne2936625:0:

crwdns2936751:024crwdne2936751:0 1

crwdns2936753:07crwdne2936753:0 2

crwdns2936753:030crwdne2936753:0 17

crwdns2942667:0crwdne2942667:0 1,057