crwdns2915892:0crwdne2915892:0
This guide will help you to replace your CMOS battery; sized similarly to a watch battery, this powers the laptop's real-time clock, and when it fails your computer may have difficulty 'remembering' its hardware settings, causing issues with day-to-day use.
crwdns2942213:0crwdne2942213:0
-
-
Remove the eight 6 mm screws using a Phillips #0 screwdriver.
-
Remove the two 11 mm screws using a Phillips #0 screwdriver.
-
-
-
Pry the back cover off by inserting the plastic opening tool at the hinges and wedging it between the Back cover and the body.
-
Follow along the back edge with the plastic opening tool, lifting the cover off as you go. It is normal to hear snapping/clicking sounds as the back cover is held on by clips.
-
Remove the cover.
-
-
-
-
Using the JIS #0 screwdriver unscrew the three battery screws.
-
-
-
Lift up the battery from the long, bottom edge.
-
Remove the battery from the laptop and place it nearby.
-
-
-
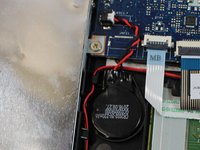
Remove the red and black annotated cable, pulling white head out of black port as indicated.
-
-
-
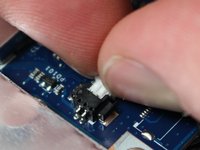
Ply the CMOS battery off with your finger.
-
The battery is attached to the computer by adhesive, but should come off by pulling with fingers; plying tool should not be necessary.
-


To reassemble your device, follow these instructions in reverse order.
To reassemble your device, follow these instructions in reverse order.
crwdns2935221:0crwdne2935221:0
crwdns2935229:02crwdne2935229:0
crwdns2915084:0crwdne2915084:0

UMass Dartmouth, Team S5-G2, Gulbrandsen Fall 2018 crwdns2935289:0UMass Dartmouth, Team S5-G2, Gulbrandsen Fall 2018crwdne2935289:0
UMASSD-GULBRANDSEN-F18S5G2
crwdns2931471:03crwdne2931471:0
crwdns2935297:05crwdne2935297:0
crwdns2947410:01crwdne2947410:0
Does this procedure reset the BIOS?