crwdns2933423:0crwdne2933423:0

Lenovo IdeaPad Flex 3 CB 11M735 Speakers Replacement

crwdns2942213:0crwdne2942213:0

  1. Lenovo IdeaPad Flex 3 CB 11M735 Speakers Replacement, Lenovo IdeaPad Flex 3 CB 11M735 Disassembly: crwdns2935265:01crwdnd2935265:01crwdnd2935265:02crwdne2935265:0 Lenovo IdeaPad Flex 3 CB 11M735 Speakers Replacement, Lenovo IdeaPad Flex 3 CB 11M735 Disassembly: crwdns2935265:01crwdnd2935265:02crwdnd2935265:02crwdne2935265:0
    • It's best to touch the ground before you start to be sure you won't shock any components.

    • Use a T6 Torx screwdriver to unscrew the nine M2 x 6.5mm screws.

  2. Lenovo IdeaPad Flex 3 CB 11M735 Speakers Replacement: crwdns2935265:02crwdnd2935265:01crwdnd2935265:03crwdne2935265:0 Lenovo IdeaPad Flex 3 CB 11M735 Speakers Replacement: crwdns2935265:02crwdnd2935265:02crwdnd2935265:03crwdne2935265:0 Lenovo IdeaPad Flex 3 CB 11M735 Speakers Replacement: crwdns2935265:02crwdnd2935265:03crwdnd2935265:03crwdne2935265:0
    • Using a plastic spudger, carefully lift the palmrest from the bottom cover.

    • Be careful while removing the keyboard, and unplug the connections.

  3. Lenovo IdeaPad Flex 3 CB 11M735 Speakers Replacement, Speakers: crwdns2935265:03crwdnd2935265:01crwdnd2935265:01crwdne2935265:0
    • Start by removing the 2x(M2x3mm) marked screws using your PH00 screwdriver.

  4. Lenovo IdeaPad Flex 3 CB 11M735 Speakers Replacement: crwdns2935265:04crwdnd2935265:01crwdnd2935265:03crwdne2935265:0 Lenovo IdeaPad Flex 3 CB 11M735 Speakers Replacement: crwdns2935265:04crwdnd2935265:02crwdnd2935265:03crwdne2935265:0 Lenovo IdeaPad Flex 3 CB 11M735 Speakers Replacement: crwdns2935265:04crwdnd2935265:03crwdnd2935265:03crwdne2935265:0
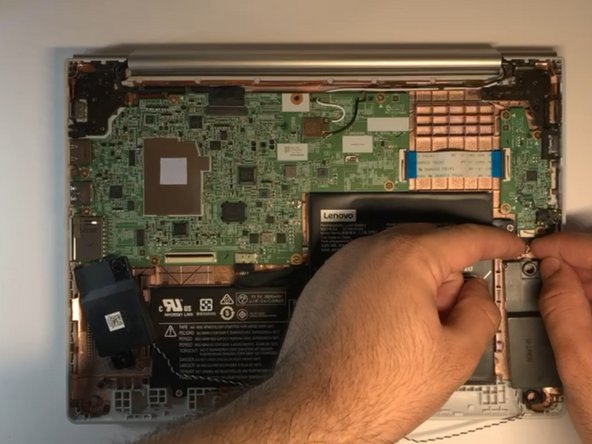
    • Pursue with removing the cable connection of the speaker with the motherboard.

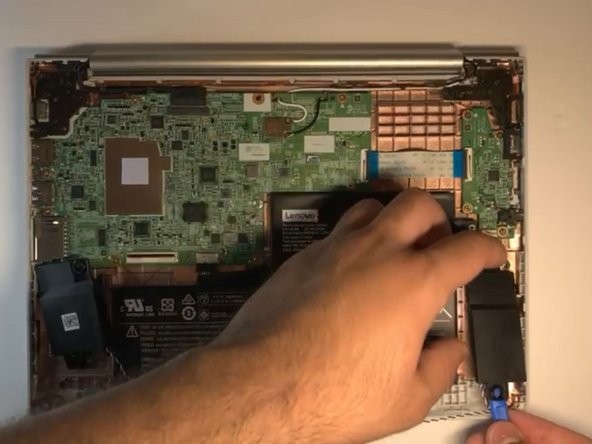
    • Then you can easily take the speakers off.

    • Grap your new speakers and reverse the last two steps.

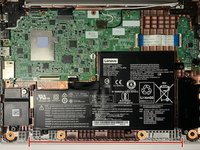
    • As it is shown in the picture, the circles show thee spots where later there will be screws. you have to make sure that the speaker wire is in the provided path and not covering any of the holes. this can result in you scrawling over the wires if it is not secured properly.

crwdns2915888:0crwdne2915888:0

To reassemble your device, follow the first three steps in reverse order.

crwdns2935227:0crwdne2935227:0

Arian Esfandiari

crwdns2935283:002/09/23crwdne2935283:0

421 crwdns2915208:0crwdne2915208:0

crwdns2935297:05crwdne2935297:0

crwdns2915084:0crwdne2915084:0

University of North Texas, Team 3-2, Saru Jimmy Spring 2023 crwdns2935289:0University of North Texas, Team 3-2, Saru Jimmy Spring 2023crwdne2935289:0

UNT-SARU JIMMY-S23S3G2

crwdns2931471:02crwdne2931471:0

crwdns2935297:06crwdne2935297:0

crwdns2944067:00crwdne2944067:0

crwdns2917038:0crwdne2917038:0

crwdns2936625:0crwdne2936625:0:

crwdns2936751:024crwdne2936751:0 0

crwdns2936753:07crwdne2936753:0 0

crwdns2936753:030crwdne2936753:0 0

crwdns2942667:0crwdne2942667:0 71