crwdns2933423:0crwdne2933423:0

Lenovo IdeaPad Flex 3 CB 11M735 Charging Port Replacement

crwdns2942213:0crwdne2942213:0

  1. Lenovo IdeaPad Flex 3 CB 11M735 Charging Port Replacement, Lenovo IdeaPad Flex 3 CB 11M735 Disassembly: crwdns2935265:01crwdnd2935265:01crwdnd2935265:02crwdne2935265:0 Lenovo IdeaPad Flex 3 CB 11M735 Charging Port Replacement, Lenovo IdeaPad Flex 3 CB 11M735 Disassembly: crwdns2935265:01crwdnd2935265:02crwdnd2935265:02crwdne2935265:0
    • It's best to touch the ground before you start to be sure you won't shock any components.

    • Use a T6 Torx screwdriver to unscrew the nine M2 x 6.5mm screws.

  2. Lenovo IdeaPad Flex 3 CB 11M735 Charging Port Replacement: crwdns2935265:02crwdnd2935265:01crwdnd2935265:03crwdne2935265:0 Lenovo IdeaPad Flex 3 CB 11M735 Charging Port Replacement: crwdns2935265:02crwdnd2935265:02crwdnd2935265:03crwdne2935265:0 Lenovo IdeaPad Flex 3 CB 11M735 Charging Port Replacement: crwdns2935265:02crwdnd2935265:03crwdnd2935265:03crwdne2935265:0
    • Using a plastic spudger, carefully lift the palmrest from the bottom cover.

    • Be careful while removing the keyboard, and unplug the connections.

  3. Lenovo IdeaPad Flex 3 CB 11M735 Charging Port Replacement, Charging Port: crwdns2935265:03crwdnd2935265:01crwdnd2935265:01crwdne2935265:0
    • Start with your PH00 screwdriver and remove all of the 7x(M2x4.5mm) indicated screws. These screws keep the screen in place.

    • The marked cord needs to be disconnected too, this is the screen cord to the motherboard.

  4. Lenovo IdeaPad Flex 3 CB 11M735 Charging Port Replacement: crwdns2935265:04crwdnd2935265:01crwdnd2935265:01crwdne2935265:0
    • There are a total of 9x(M2x4) more screws that connect the motherboard into its place that needs to be removed.orange. Opening it will show that this device's motherboard had to be repaired.

    • One of these screws is hidden under a small Lenovo sticker which is marked orange. Opening it will show that this device's motherboard had to be repaired.

    • All of the screws in the motherboard that secures it to the place are marked with a small triangle that helps you to put the right screws back on for reassembling since some holes are meant to be screwed multiple layers together.

    • The two rectangles are two cords that attach the main motherboard to the side motherboards. The blue rectangle needs to be disconnected for our purpose.

  5. Lenovo IdeaPad Flex 3 CB 11M735 Charging Port Replacement: crwdns2935265:05crwdnd2935265:01crwdnd2935265:03crwdne2935265:0 Lenovo IdeaPad Flex 3 CB 11M735 Charging Port Replacement: crwdns2935265:05crwdnd2935265:02crwdnd2935265:03crwdne2935265:0 Lenovo IdeaPad Flex 3 CB 11M735 Charging Port Replacement: crwdns2935265:05crwdnd2935265:03crwdnd2935265:03crwdne2935265:0
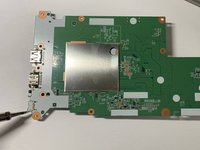
    • As you can see, after the last step, you can easily remove the motherboard.

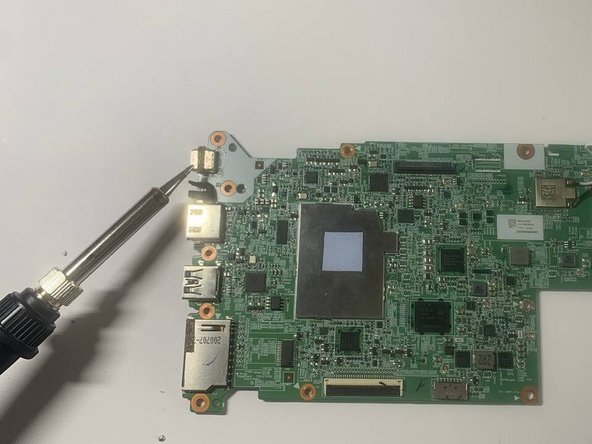
    • Plug your soldering device and set it to around 350°F.

    • Make sure you don't burn yourself. Also, use the proper stand and avode placing your soldering device on anything flamable.

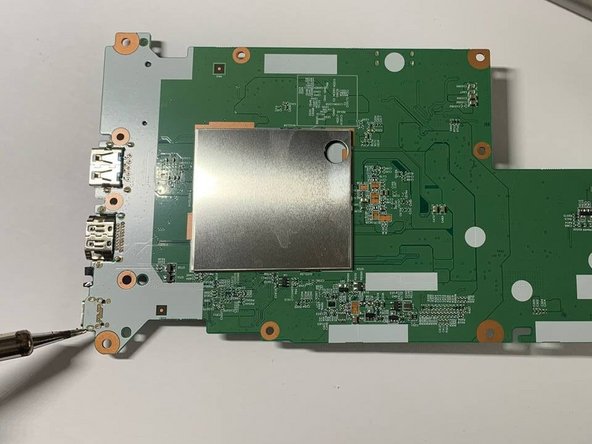
    • Flip the motherboard and start desoldering the little wholes with the tip of your hot soldering device. This will melt the solder and let you remove the USB-C.

    • Put your new USB 3.1 Type-C 16pin Femalein place, and melt down the solder so it attaches to the motherboard.

crwdns2915888:0crwdne2915888:0

To reassemble your device, follow the instruction.

Arian Esfandiari

crwdns2935283:002/09/23crwdne2935283:0

421 crwdns2915208:0crwdne2915208:0

crwdns2935297:05crwdne2935297:0

crwdns2915084:0crwdne2915084:0

University of North Texas, Team 3-2, Saru Jimmy Spring 2023 crwdns2935289:0University of North Texas, Team 3-2, Saru Jimmy Spring 2023crwdne2935289:0

UNT-SARU JIMMY-S23S3G2

crwdns2931471:02crwdne2931471:0

crwdns2935297:06crwdne2935297:0

crwdns2944067:00crwdne2944067:0

crwdns2917038:0crwdne2917038:0

crwdns2936625:0crwdne2936625:0:

crwdns2936751:024crwdne2936751:0 1

crwdns2936753:07crwdne2936753:0 1

crwdns2936753:030crwdne2936753:0 16

crwdns2942667:0crwdne2942667:0 287